Salesforce CC
Use the guides below to enable the Splitit installments payment option in the payment and checkout experience on your Salesforce site, along with messaging that will introduce your customers to installment payment options early in their shopping experience.
SiteGenesis
Overview
The Splitit payment cartridge enables a CC store to integrate with the Splitit payment service. This document provides detailed instructions on installing a Splitit payment cartridge into a CC store.
The integration is based on the SiteGenesis demo store, provided by SFCC.
The integration consists of an archive with contents as described in the below table.
| Name | Purpose |
|---|---|
| cartridges | Contains Splitit integration cartridges |
| cartridges\int_splitit_sg | This cartridge contains the SiteGenesis specific changes required for Splitit integration |
| cartridges\int_splitit | This cartridge contains the API calls for Splitit integration and common code extensions |
| cartridges\splitit_sg_changes | This cartridge references all the changes done to OOB SiteGenesis files. Please do not include this in the cartridge path and this is for reference purposes only |
| cartridges\bm_splitit | This cartridge contains Business Manager UI, BM-related system extensions to add/update general, API, payment, and upstream messaging configurations |
| cartridges\bm_splitit_demo | This cartridge contains BM-related system extensions to testing and validating payment flows (cancel, refund, and capture of charges) |
| metadata | Contains custom objects and settings required for the integration |
| documentation | Contains this document “Splitit SiteGenesis Integration Document” |
Features
The integration described in this document supports the following features:
- Embedded card form checkout using Splitit Flex Fields payment
- Hosted page checkout using Splitit Hosted payment.
- Installment banners that have been implemented using Splitit Upstream Messaging
- Ability to enable/disable the payment methods based on currency and country.
- Ability to configure Splitit settings via a customer-friendly UI interface.
Splitit Flex Fields Payment
Splitit's Flex Fields is a unique product that allows you to fully integrate Splitit into the checkout process on your website, both stylistically and functionally. Flex Fields are individual iFrames plugged directly into the Splitit servers, however, you can extensively customize them. For this customization, we have implemented an intermediate page for the checkout process.
Splitit Hosted Payment
Splitit's Hosted Payment features a full redirect from the merchant site to Splitit's. To use it, fetch a URL from the Splitit API then send your customer there to enter credit card data. After the customer is done checking out, based on the outcome of the transaction, the customer is redirected to the appropriate endpoint within SFCC (success, cancel, or failure).
Splitit Upstream Messaging
Splitit's Upstream Messaging informs the customer early on in their journey on your website that Splitit will be available at checkout. It uses banners, price breakdowns, and Splitit messages that can be added to your home page, footer, product page, cart page, and checkout pages.
Payment Types Supported
Credit cards supported currently
- Visa
- Mastercard
Limitations, Constraints
Please check with Splitit to find out which languages are currently supported.
Compatibility
Available since Commerce Cloud Platform Release 21.2, Site Genesis 105.1.1.
Installation
Cartridges
Upload the following cartridge to the BM code version
- int_splitit_sg
- int_splitit
- bm_splitit
- bm_splitit_demo (Ony on developer sandboxes)
Configure the cartridge path as shown in the below tables. Cartridges should be added to the beginning of the cartridge path.
| Site Cartridge Path | int_splitit_sg:int_splitit |
| BM Cartridge Path | int_splitit:bm_splitit:bm_splitit_demo |
Metadata
All BM configurations related to the below components have been configured within metadata/site-template folder.
- System/Custom object definitions
- Payment Methods
- Payment Processors
- Services
- Jobs
- Content
Please follow the below steps to import the BM configurations for the above-mentioned components
- Locate the folder metadata in the installation package.
- Review the contents within site-template folder.
- Change the site ID under path site-template\sites to your site ID.
- Change the library ID under path site-template\libraries to your library ID
- Archive the folder to ‘site-template.zip’ and then Import the file via Site Import & Export
Services
Two new services, “splitit.http.sandbox” and “splitit.http.production”, has been created as part of the integration.
| Service ID | Service Profile | Service Credential |
|---|---|---|
| splitit.http.sandbox | splitit.http.sandbox.profile | splitit.http.sandbox.credentials |
| splitit.http.production | splitit.http.production.profile | splitit.http.production.credentials |
The URLs for the sandbox and production endpoints have been configured within the cartridge.
| Environment | URL |
|---|---|
| Non-production instances | https://webapi.sandbox.splitit.com/api |
| Production instances | https://webapi.splitit.com/api |
Payment Processor
Two new payment processors have been created as part of the cartridge.
- SPLITIT_FLEXFIELDS
- SPLITIT_HOSTED
| Payment Processor ID | Purpose |
|---|---|
| SPLITIT_FLEXFIELDS | Payment processor for processing transactions using the FlexFields (embedded card form) integration |
| SPLITIT_ HOSTED | Payment processor for processing transactions using the Hosted page (external redirection) integration |
Payment Methods
A new payment method, Splitit has been created as part of the cartridge.
Jobs
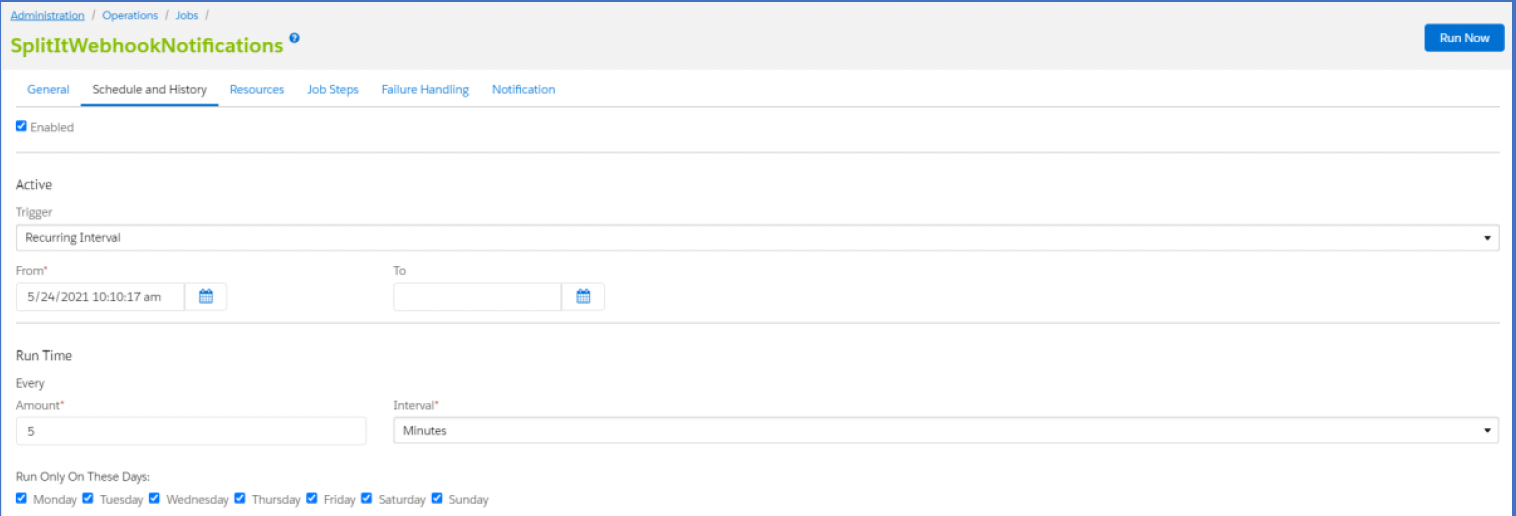
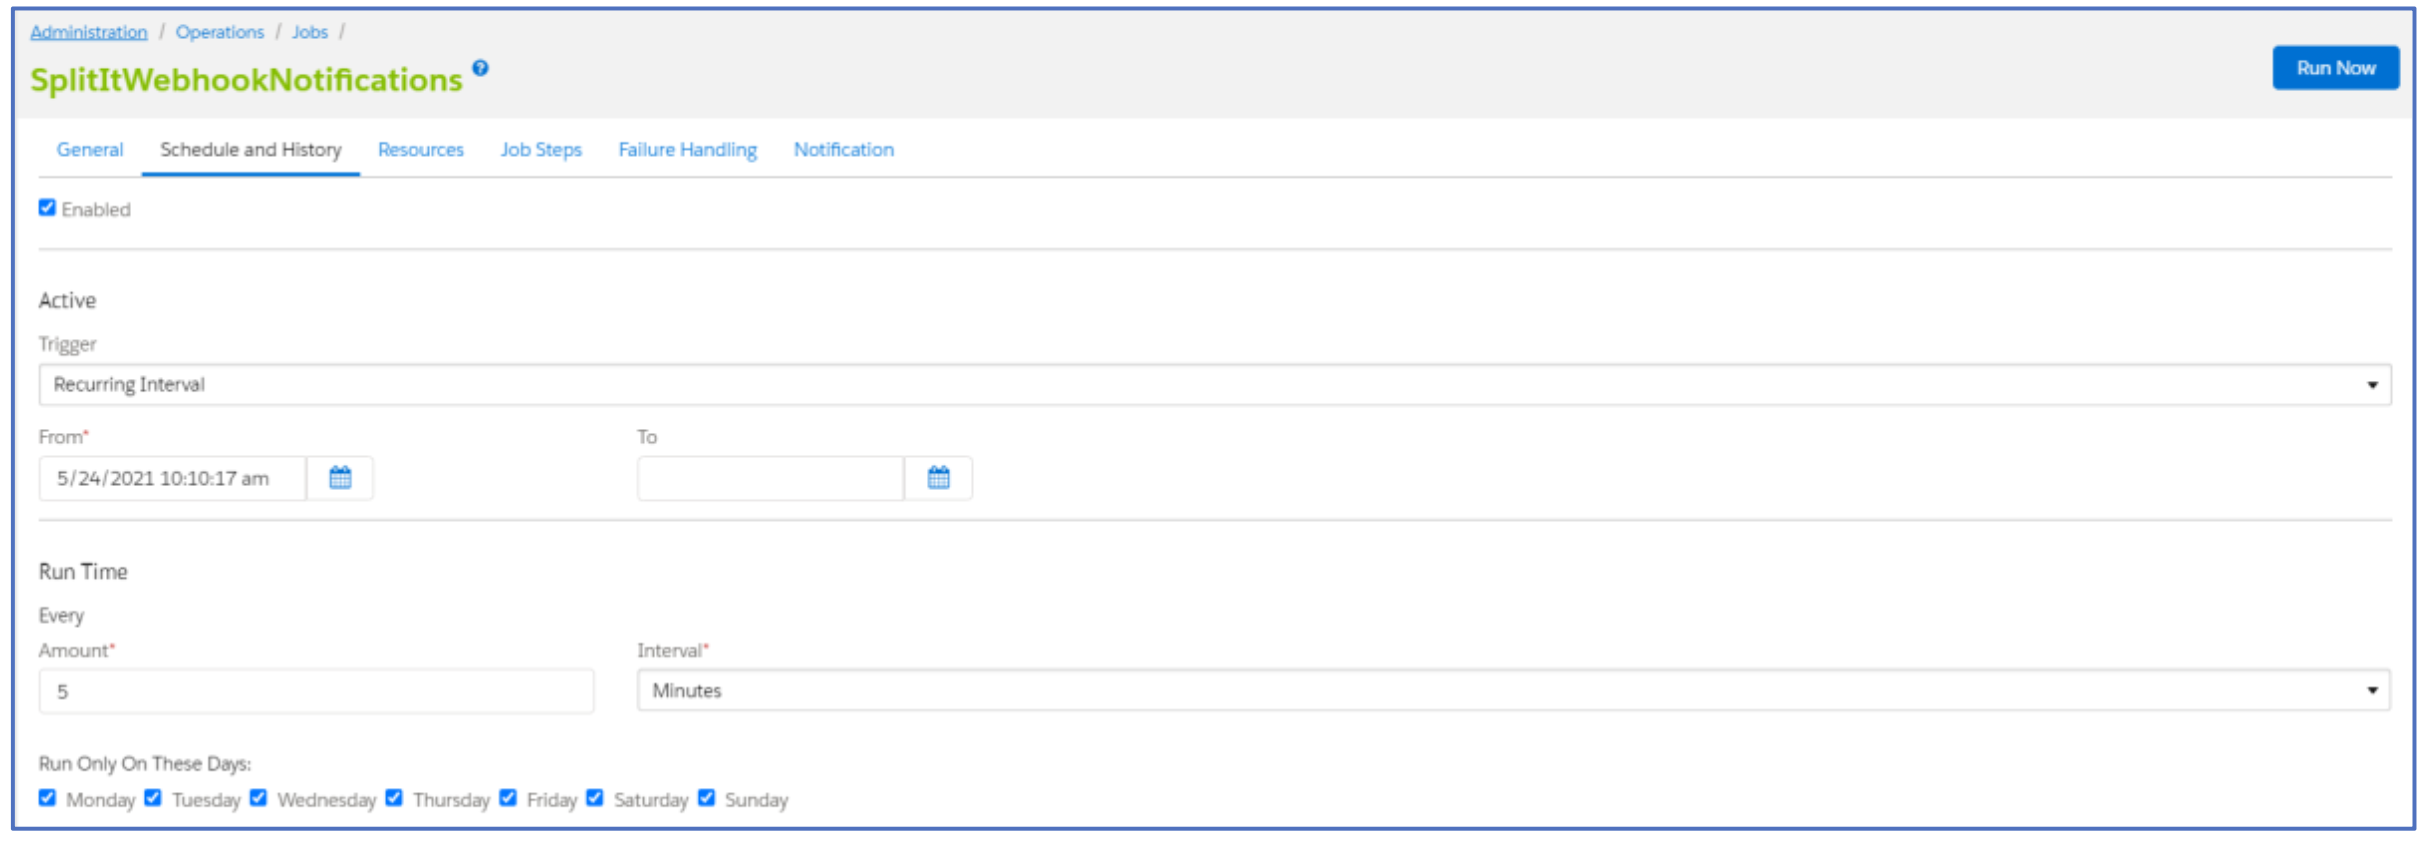
A new job SplititWebhookNotifications has been created as part of the cartridge and is available under Administration > Operations > Jobs. This job processes the CreateSucceeded webhook notifications received from Splitit and processes them in recurring intervals.
Please follow the below steps to configure the job:
- Navigate to Administration > Operations > Jobs > SplititWebhookNotifications
- Select the Schedule and History tab.
- Check the Enabled checkbox.
- Set the Trigger as Recurring Interval
- Configure the start date and recurring interval duration. It is recommended that the recurring interval is >= 5 minutes.
The below image is for reference purpose only.
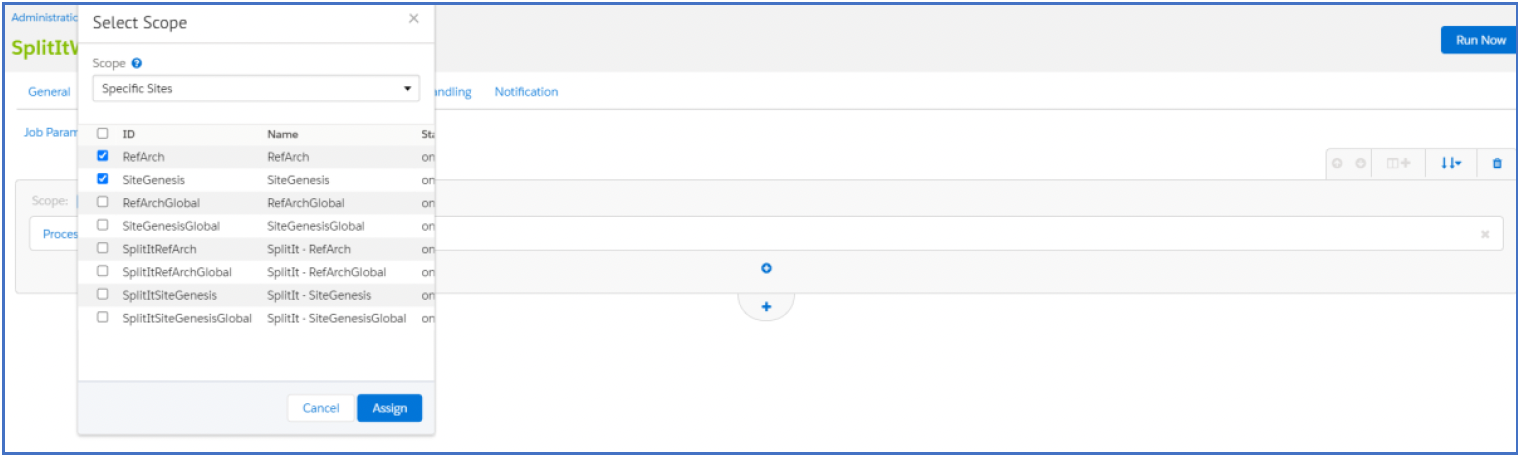
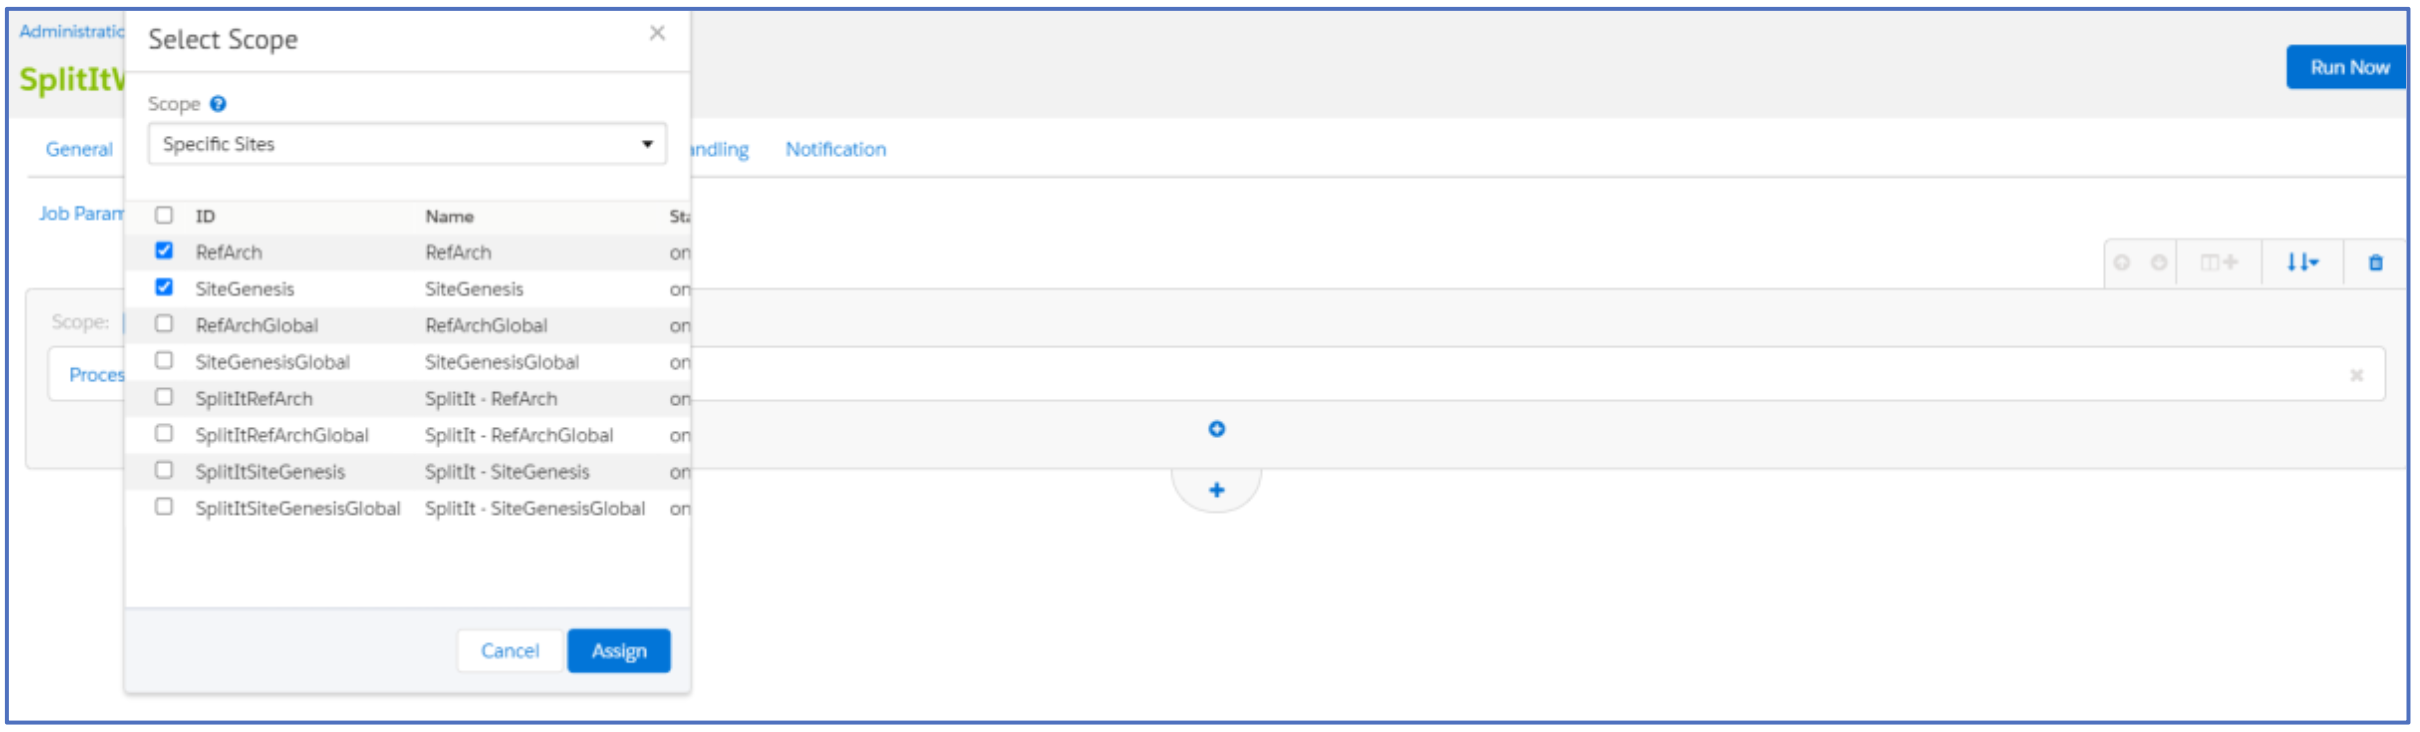
- Click on the Job Steps tab.
- Click on Scope and select the relevant sites
Content
The following content assets have been created as part of the cartridge
- splitit_homepage_banner
- splitit_footer_banner
- splitit_hostedpayment_paymenttab_message
The following content slots have been created as part of the cartridge
- splitit-home-page-banner
Custom BM Module
A custom BM module has been developed to allow merchants to be able to configure all the Splitit related configurations in one place. This module has been developed using custom objects and not site preferences due to limitations around data replication and API availability for updating site preferences.
IMPORTANT: The custom objects are non-replicable. Hence please complete Splitit production configurations directly on the SFCC Production Instance itself. Configurations through this module cannot be replicated via data replication.
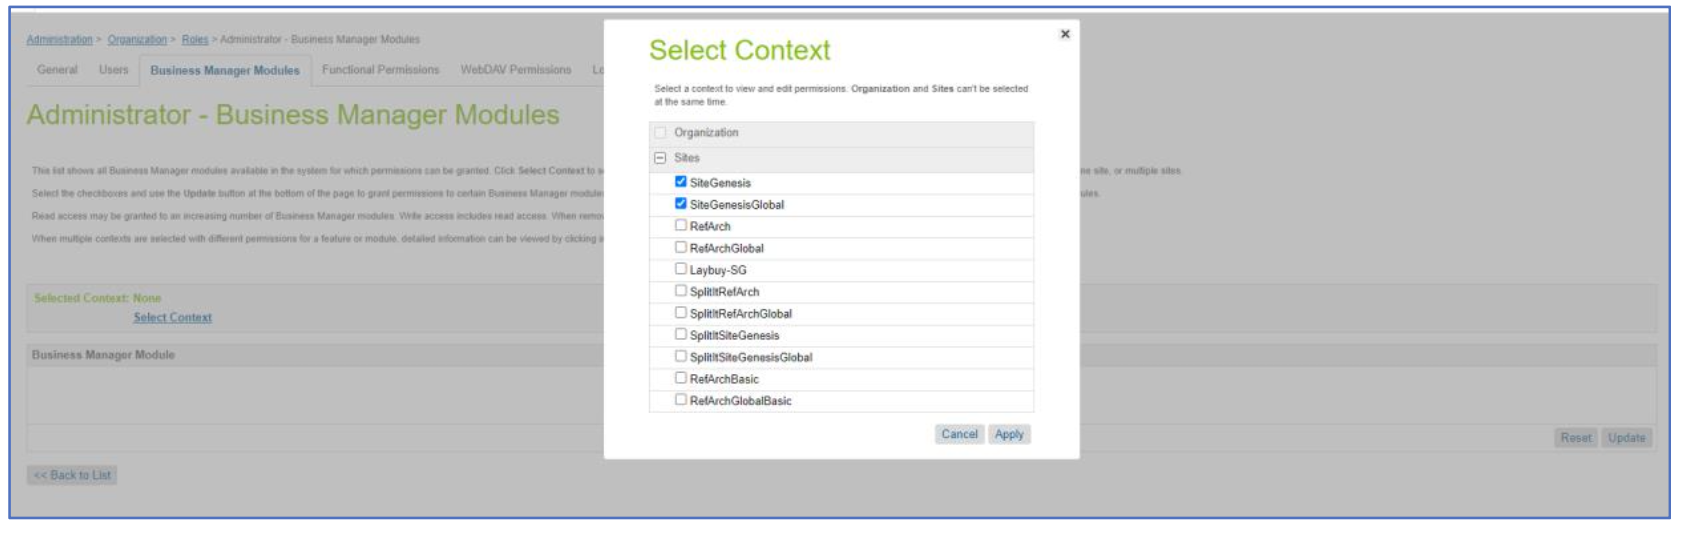
Please follow the below steps to provide permissions to view this BM module.
- Navigate to Administration > Organization > Roles & Permissions.
- Select the role that you would want to give access to the BM module.
- Select the Business Manager Modules tab.
- Select all the relevant sites where Splitit would be configured.
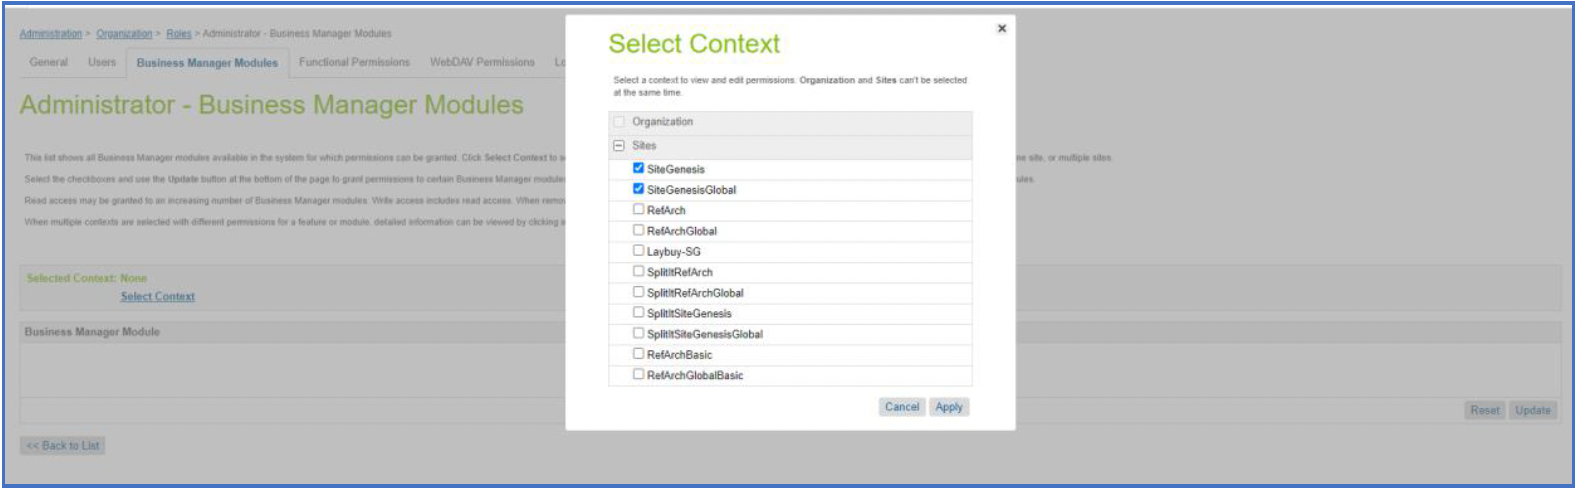
- Select the following modules from the popup and apply the changes

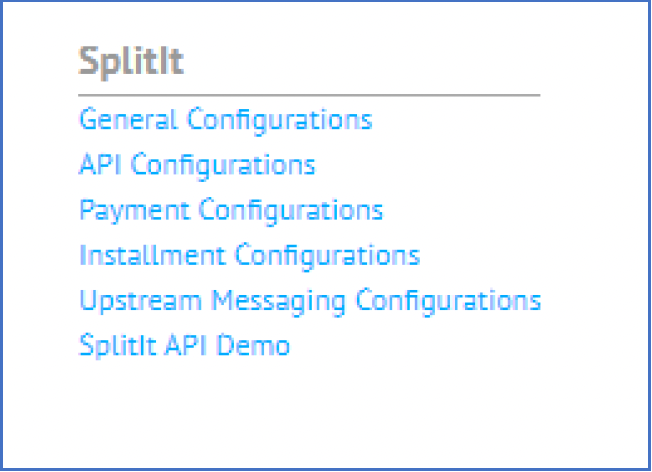
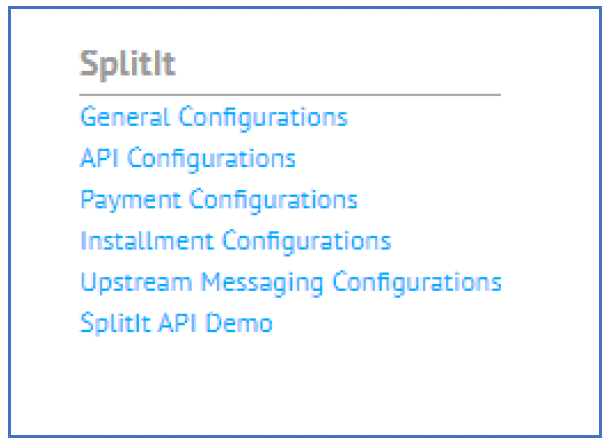
- Confirm that the following section is visible in the Merchant Tools overlay
Configurations
The below sections explain how to set up the Splitit integration-related configurations within Business Manager.
Payment Methods
Please refer to the below table while configuring the Splitit payment method.
| Payment Method Setting | Value | Description |
|---|---|---|
| Payment Processor | SPLITIT_FLEXFIELDS OR SPLITIT_HOSTED | Please select the relevant Payment Processor based on your mode of integration – FlexFields or Hosted |
| Min/Max Payment Ranges | Do not configure | Do not configure the min/max payment ranges for currencies. This will be handled via a separate set of configurations. |
| Currencies | Based on requirements | Please configure the applicable currencies based on your requirements. |
| Countries | Based on requirements | Please configure the applicable countries based on your requirements. |
IMPORTANT: When any of the Payment Method settings have been modified, ensure that the Splitit custom cache is always cleared. Please refer to this link for more details regarding custom cache – Splitit Custom Cache.
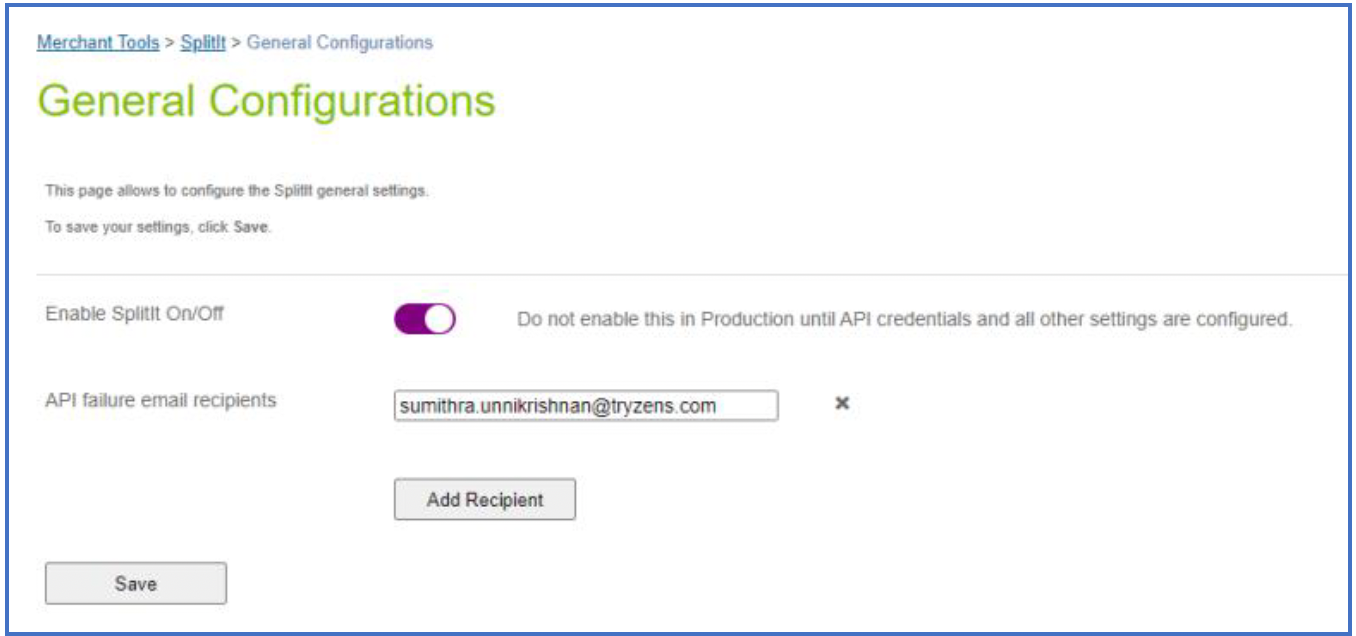
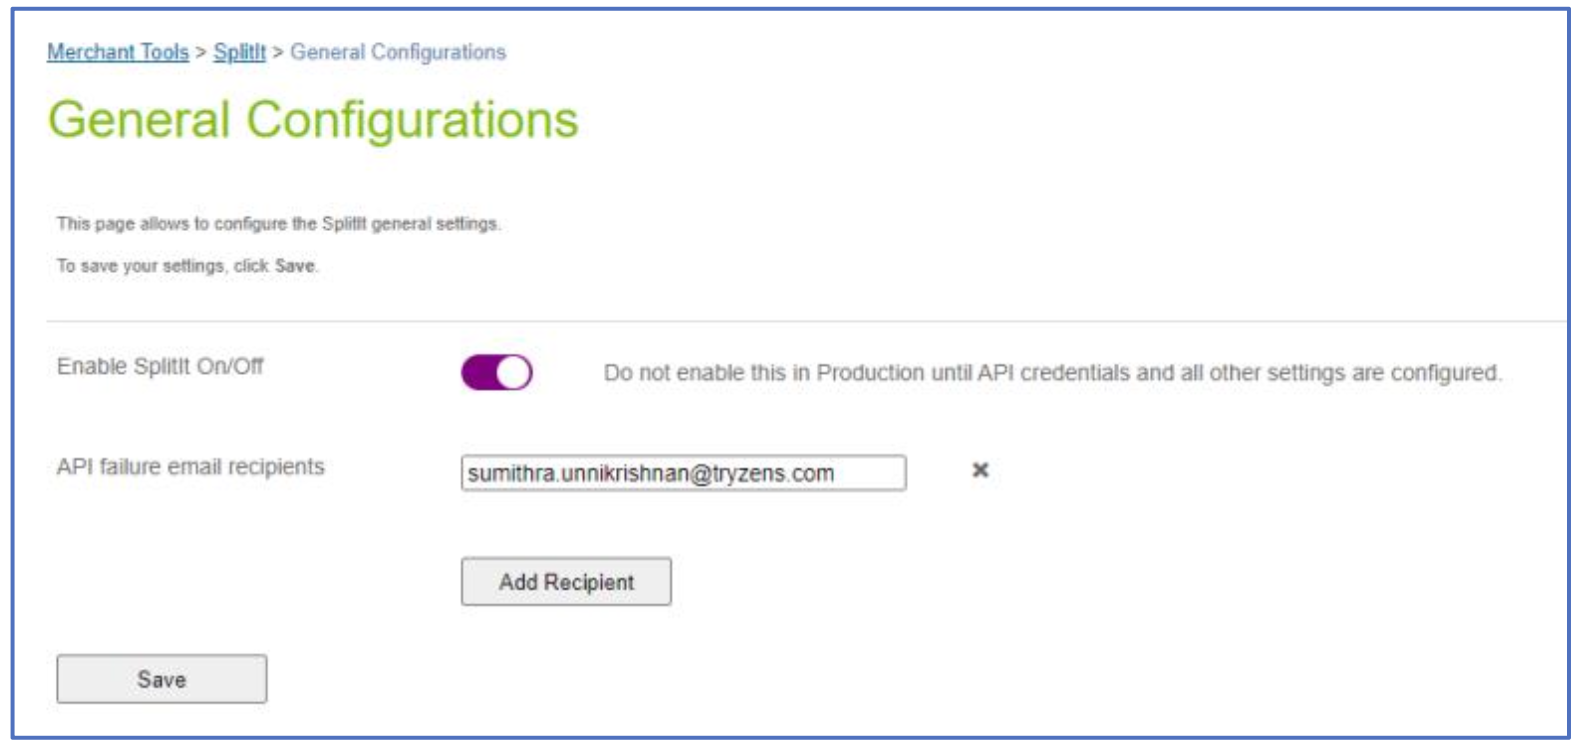
Splitit General Configurations
The General Configurations section within Merchant Tools > Splitit allows merchants to configure the following:
| Configuration | Purpose |
|---|---|
| Enable Splitit On/Off | Controls whether the Splitit integration is enabled for the site |
| API failure email recipients | Configure email addresses where notifications regarding email failure should be sent to. |
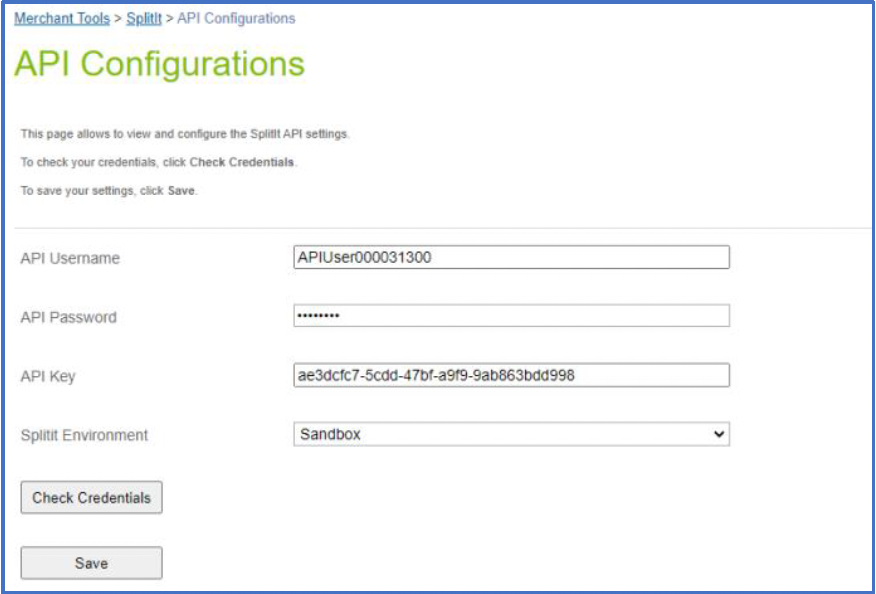
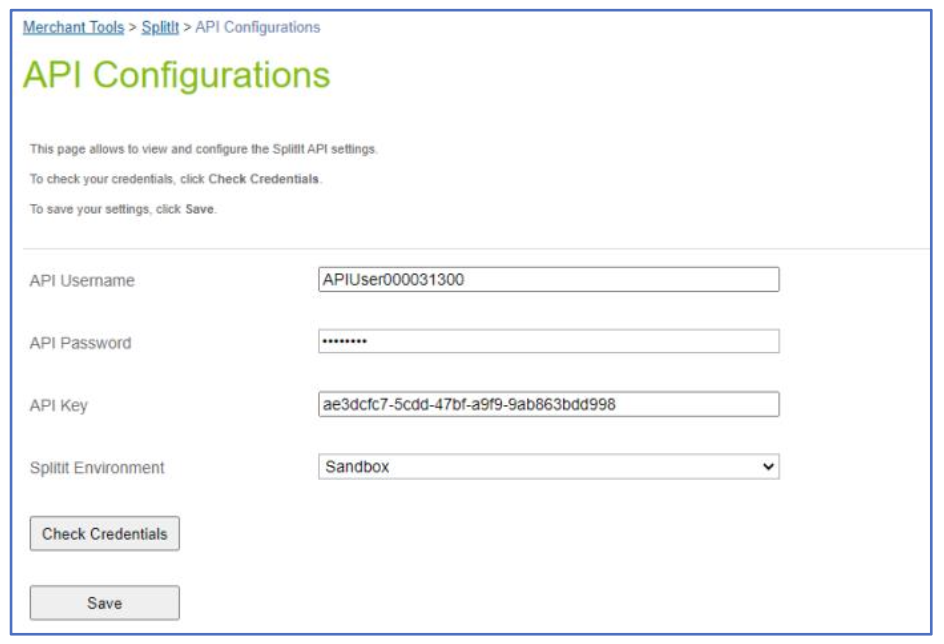
Splitit API Configurations
The API Configurations section within Merchant Tools > Splitit allows merchants to configure the following:
| Configuration | Purpose |
|---|---|
| API Username | This configuration is used within the Login API call which generates the Splitit session id. The value for this configuration can be retrieved from Splitit Dashboard > Credentials > Splitit Integration Credentials > API User Name |
| API Password | This configuration is used within the Login API call which generates the Splitit session id. The value for this configuration can be retrieved from Splitit Dashboard > Credentials > Splitit Integration Credentials > API User Password |
| API Key | This configuration is set within the header of all the Splitit API calls (except Login). The value for this configuration can be retrieved from Splitit Dashboard > Credentials > Gateway Provider Credentials > Payment Terminal API Key |
| Splitit Environment | Configure the Splitit environment this integration would use. On Production SFCC instances, this must be set to Production. On non-production SFCC instances, this must be set to Sandbox |
The Check Credentials button when clicked validates the following
- Format of API Key (does not check if the API key value is valid)
- API User Name and API Password against the Splitit Environment selected
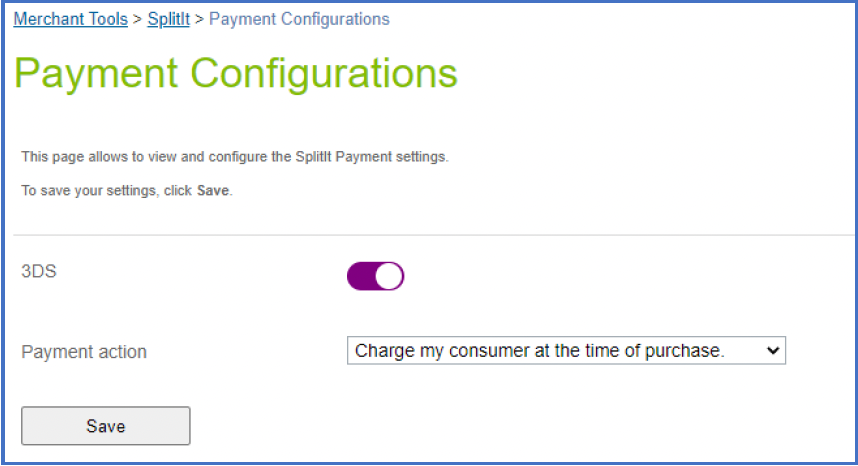
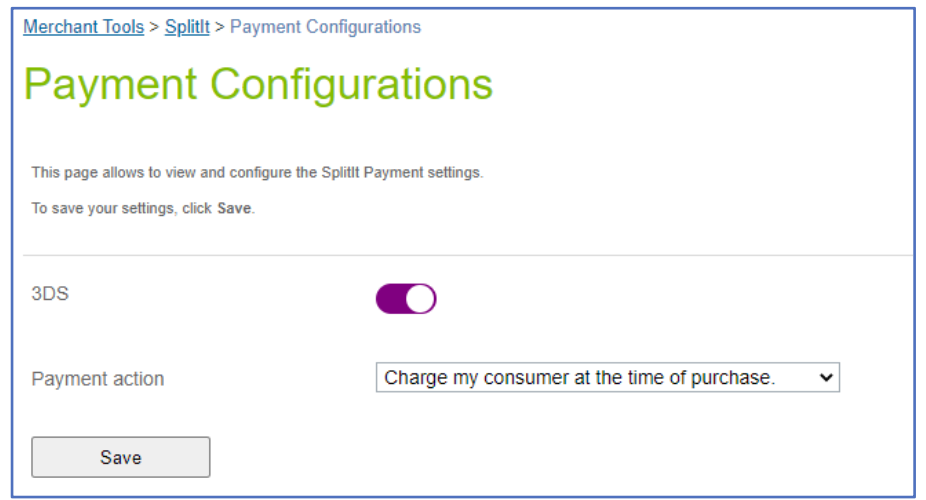
Splitit Payment Configurations
The Payment Configurations section within Merchant Tools > Splitit allows merchants to configure the following:
| Configuration | Purpose |
|---|---|
| Enable 3DS | This configuration is used to enable/disable 3DS validation while processing payments. |
| Payment Action | This configuration indicates whether the first installment must be captured on order placement or once the order is dispatched. |
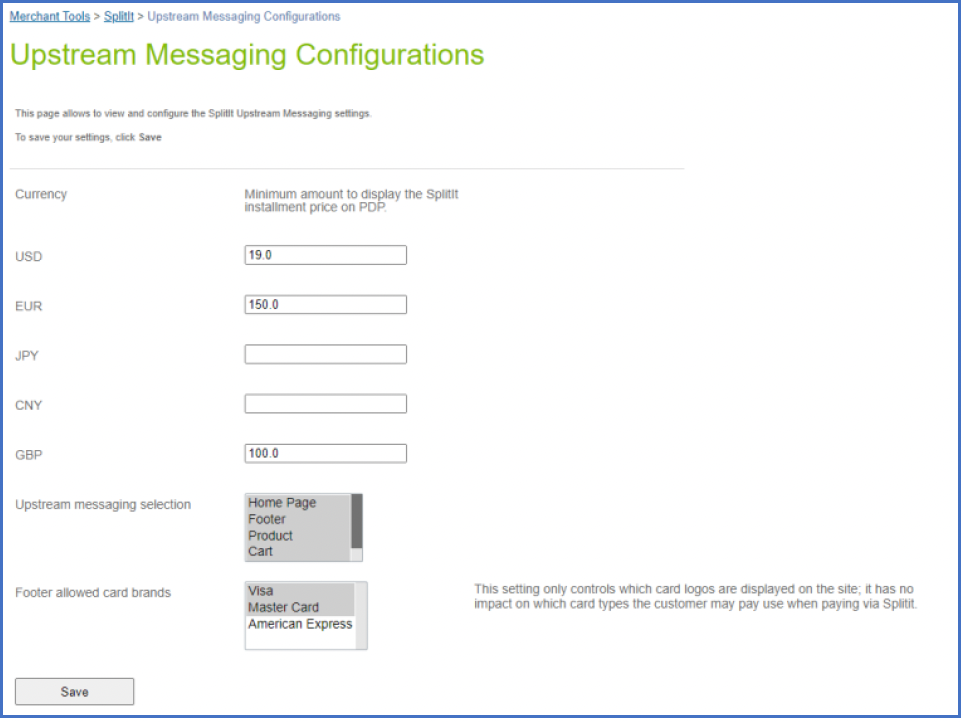
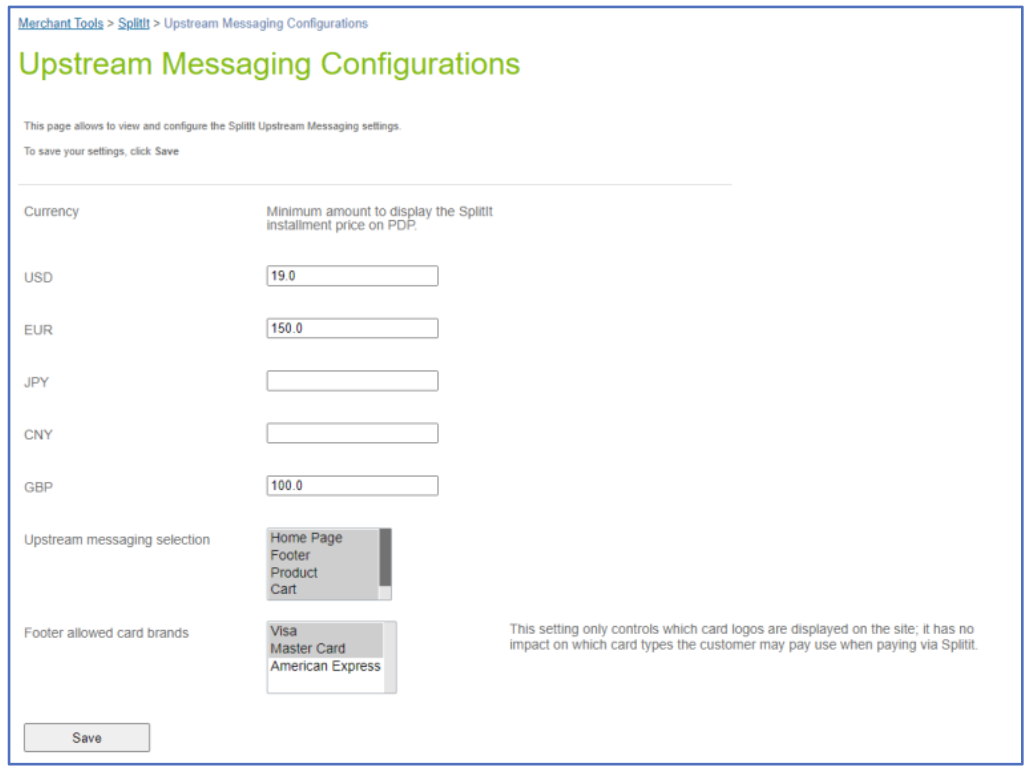
Splitit Upstream Messaging Configurations
The Upstream Messaging Configurations section within Merchant Tools > Splitit allows merchants to configure the following:
| Configuration | Purpose |
|---|---|
| Minimum amount to display the Splitit installment price on PDP | This configuration determines what is the minimum product price required to display the Upstream messaging banners on PDP. Currency-specific amounts can be set. All currencies enabled for the site will be listed here. |
| Upstream messaging selection | This is a multi-select configuration with which merchants can decide which pages should display the Upstream Messaging Banner. |
| Footer allowed card brands | This is a multi-select configuration that indicates which of the card brand logos must be displayed within the Footer upstream messaging banner. The values selected here would also be used to render the card logos shown against the Splitit payment method tab on the checkout page. |
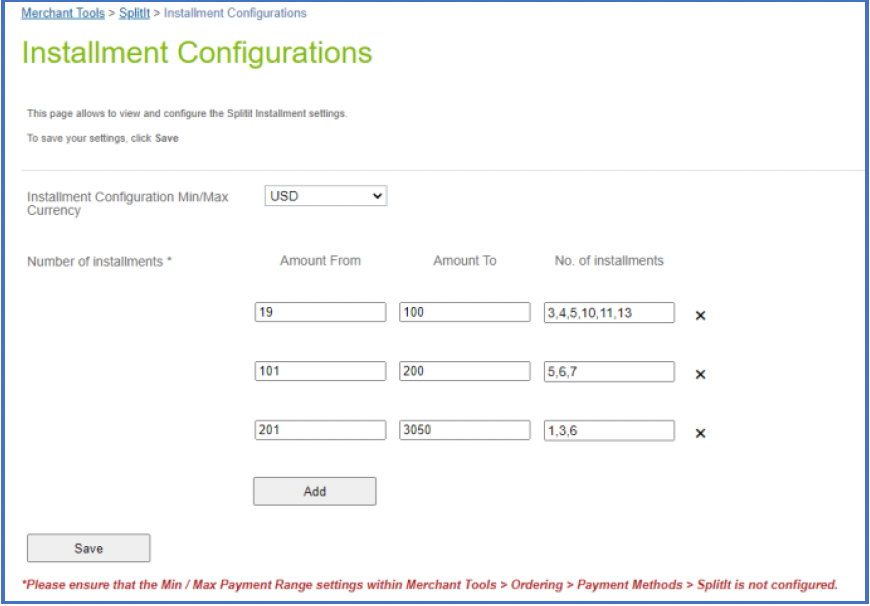
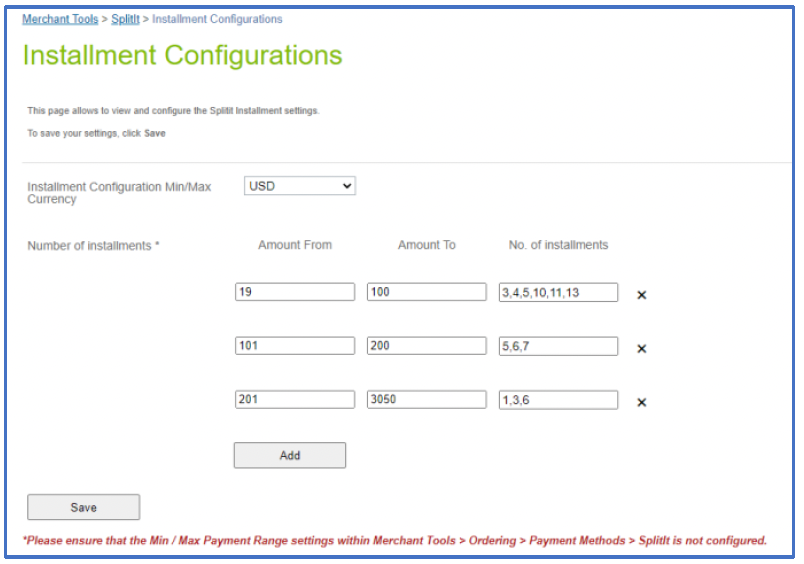
Splitit Installment Configurations
The Installment Configurations section within Merchant Tools > Splitit allows merchants to configure the following:
| Configuration | Purpose |
|---|---|
| Installment Configurations Min/Max currency | This is a currency dropdown that lists all the currencies enabled on the site. Merchants can configure currency-specific installment ranges and the applicable number of installments by selecting the currency from this dropdown. |
| Amount From | Indicates the lower limit of the order total range. |
| Amount To | Indicates the upper limit of the order total range |
| No. of installments | Comma-separated list of installment options to be presented to the customer on the checkout page for the particular range |
Steps to be followed while configuring installment range and options:
- Pre-determine the different order total ranges and the number of installments to be presented to the customers on the checkout page.
- Select the currency from the currency dropdown.
- Using the Add button creates an entry for the range.
- Enter the lower amount of the order total range within the Amount From column
- Enter the upper amount of the order total range within the Amount To column
- Enter the number of installments to be presented to the customers for this particular order total range.
- Repeat steps 4 – 6 if more than one range is applicable as per business requirements.
- Click on Save
- Repeat steps 1 – 8 for other currencies (if applicable)
Storefront Cartridge Changes
For the Splitit integration to work on SiteGenesis, a few changes are required to be made on the SiteGenesis storefront cartridges.
Controller Changes
COPlaceOrder.js
File location: "sitegenesis storefront controller cartridge}\cartridge\controllers\COPlaceOrderjs"
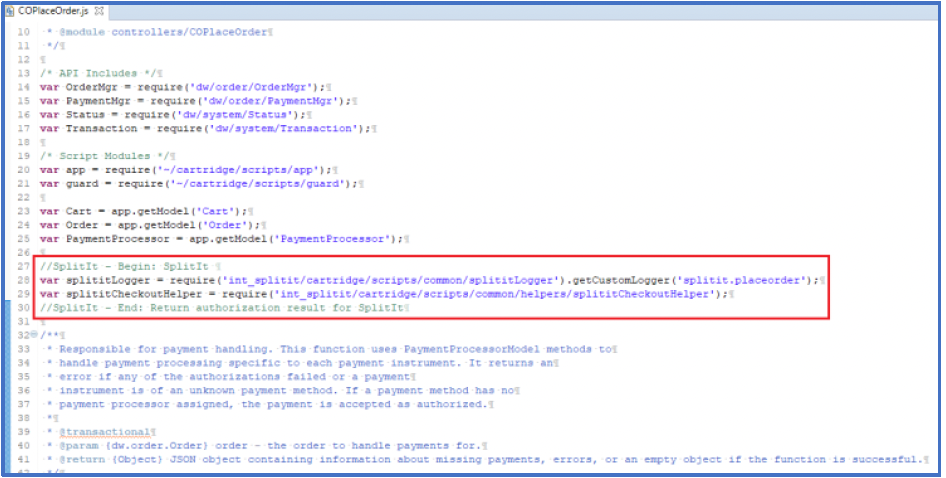
Global Changes
Add the following lines of code in orange at the class level:
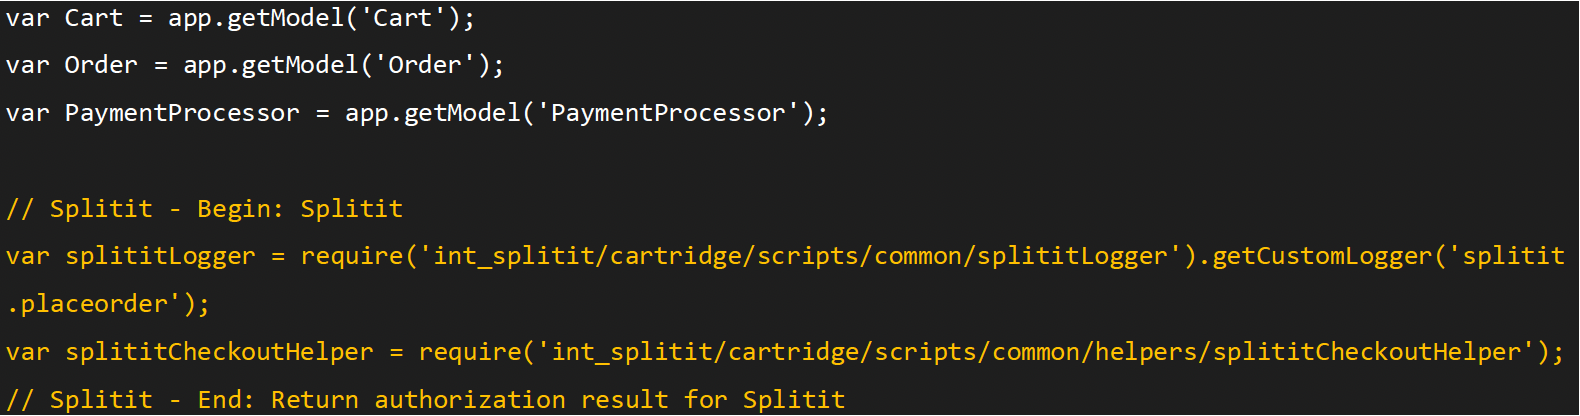
The changes should reflect as shown below.
Function - handlePayments()
Add the following lines of code in orange to the function handlePayments as shown below:
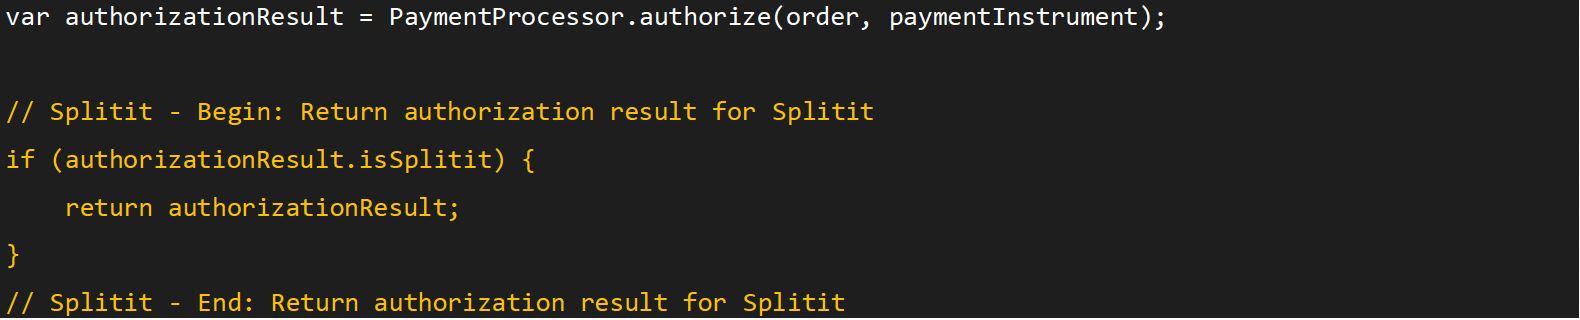

The changes should reflect as shown below:
Function (NEW) – handleSplititRedirect()
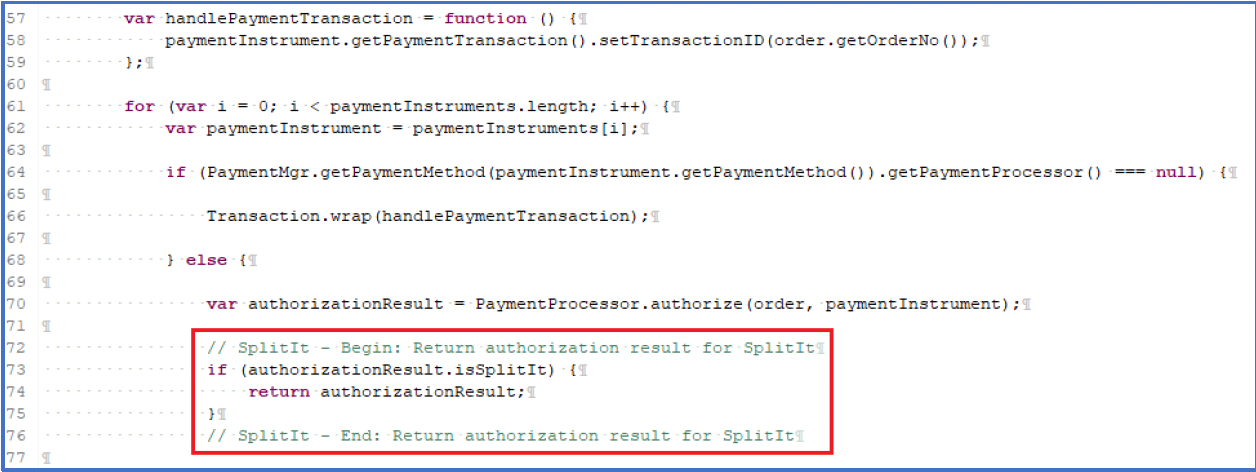
Add this new function to the controller:

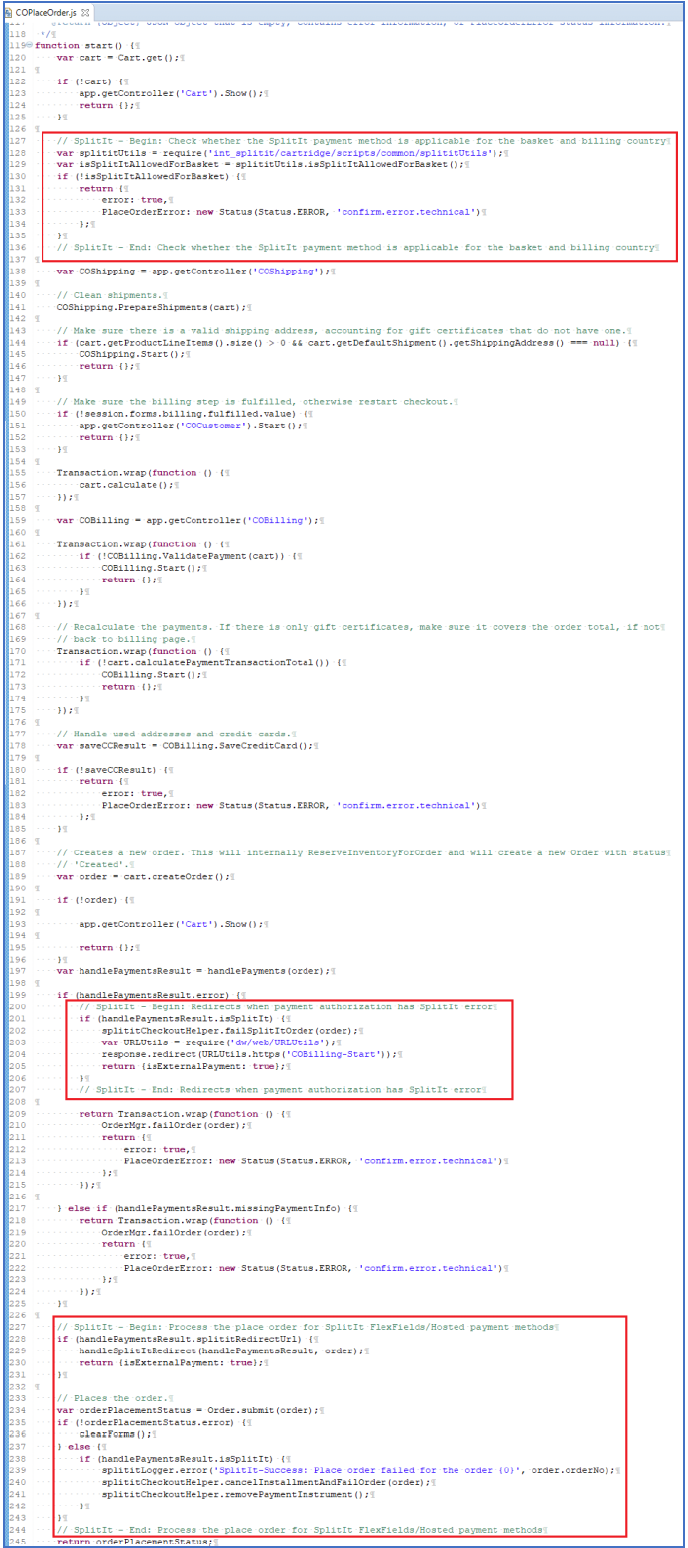
Function - start() Add the following lines of code in orange to the function start() as shown below:
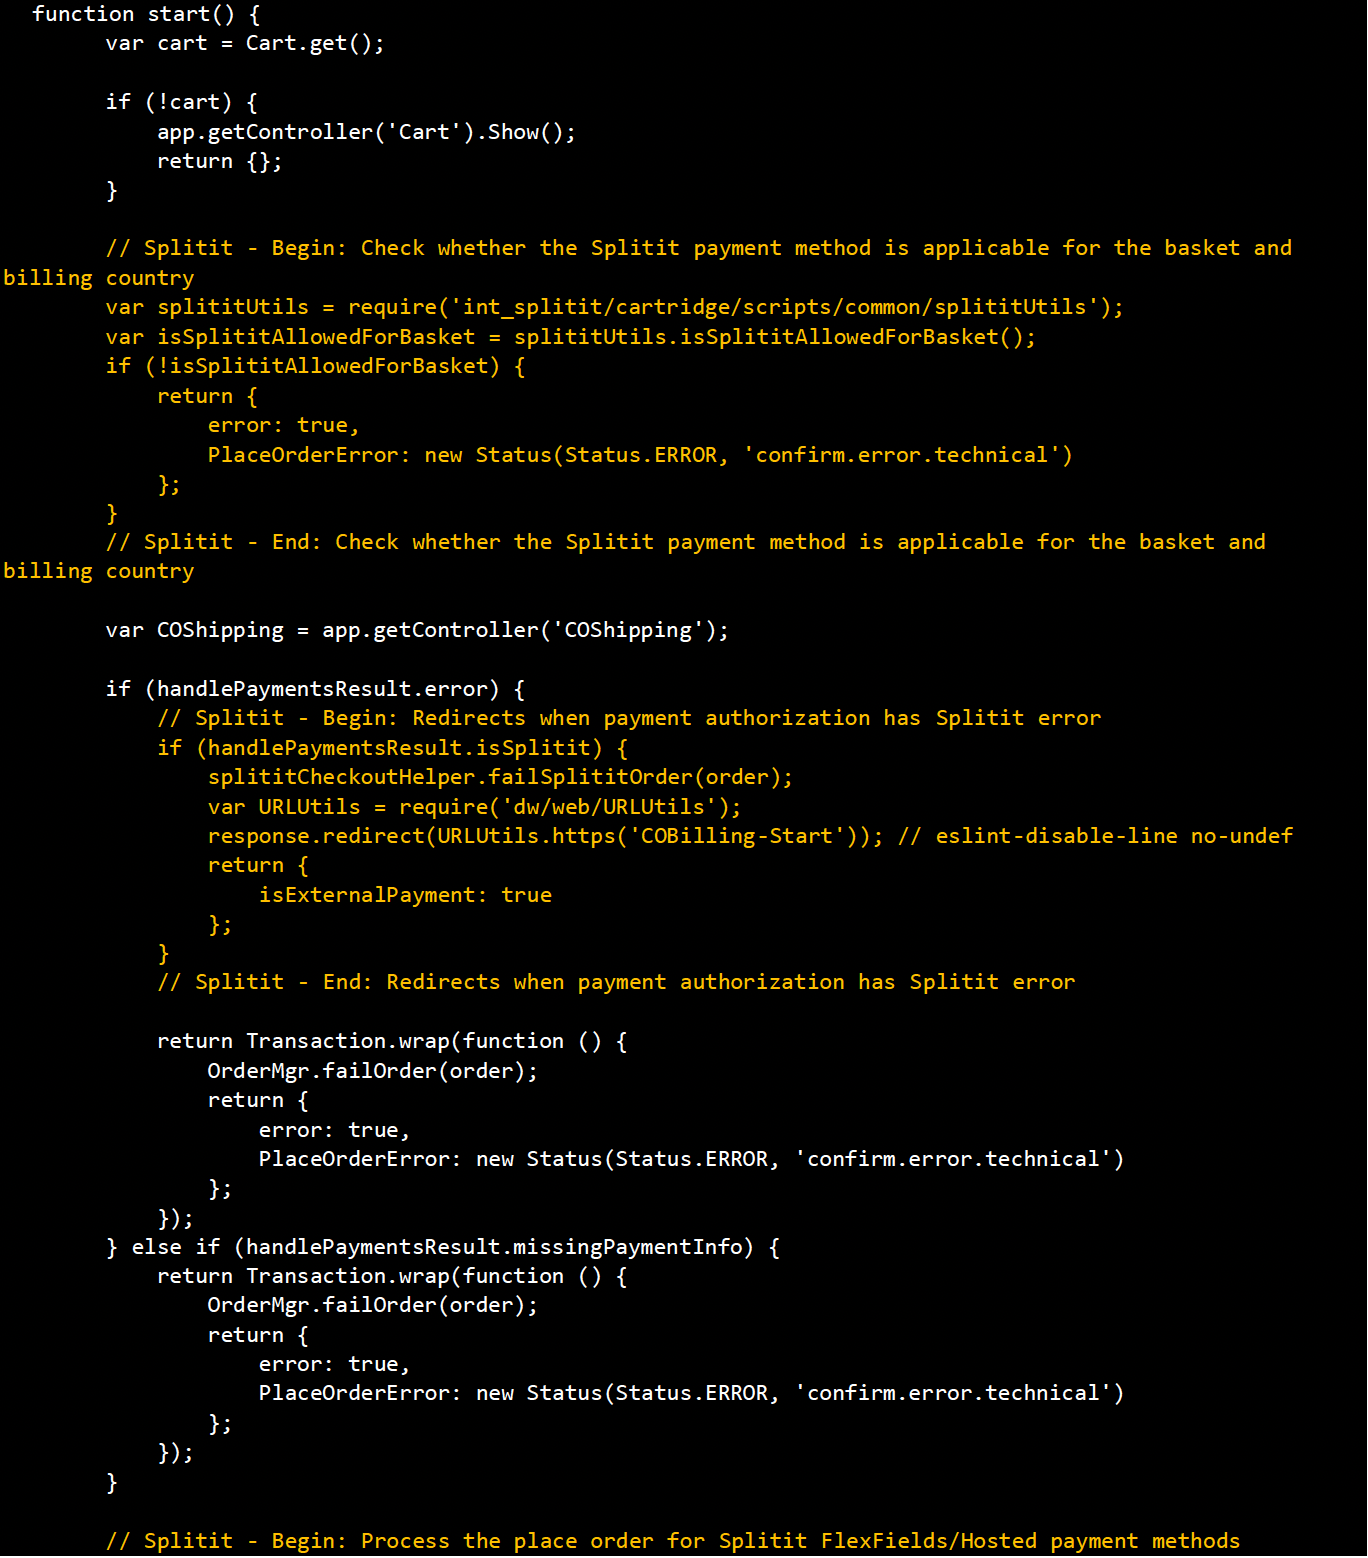
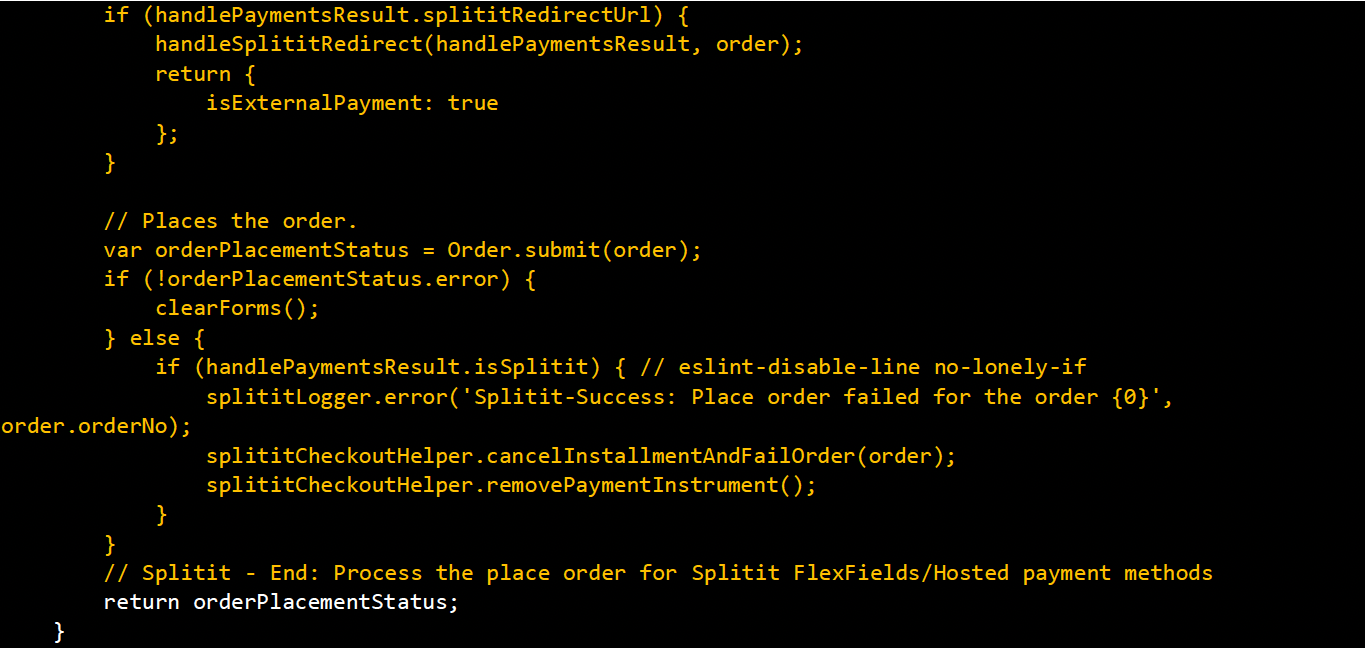
The changes should reflect as shown below:
COBilling.js
File location: sitegenesis-storefront-controller-cartridge\cartridge\controllers\COBilling.js
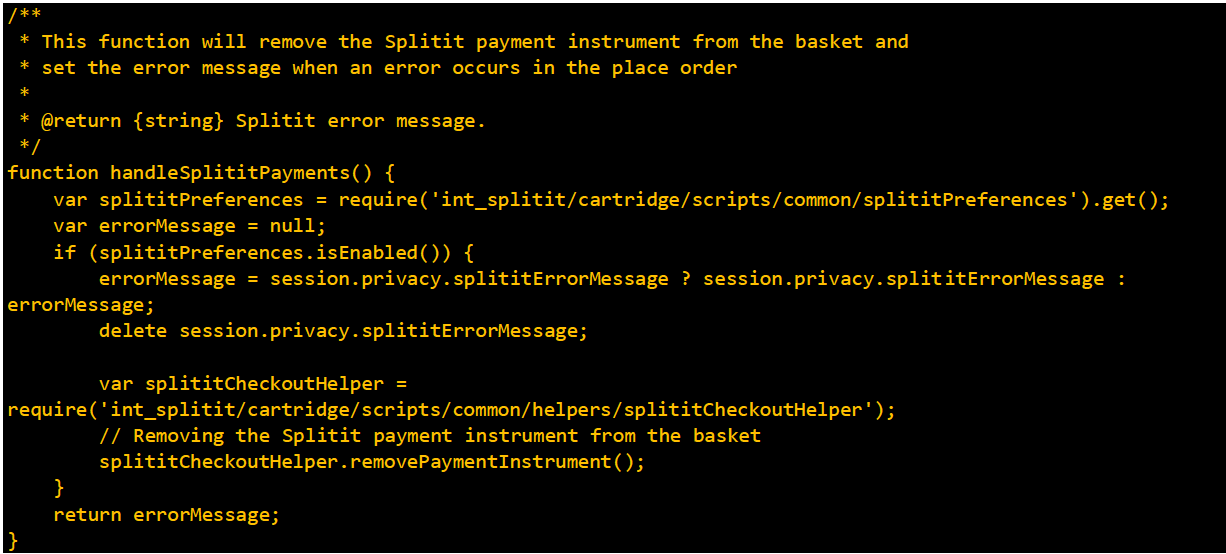
Function (NEW) – handleSplititPayments()
Add this new function to the controller:
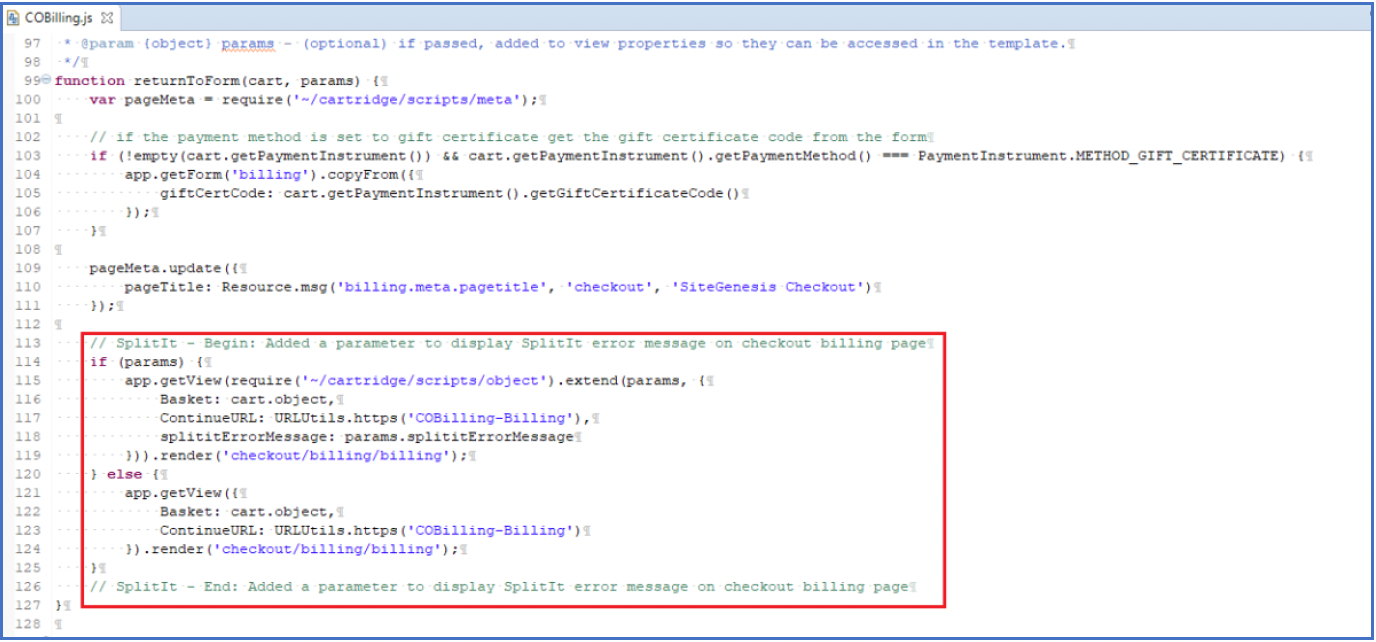
Function - returnToForm()
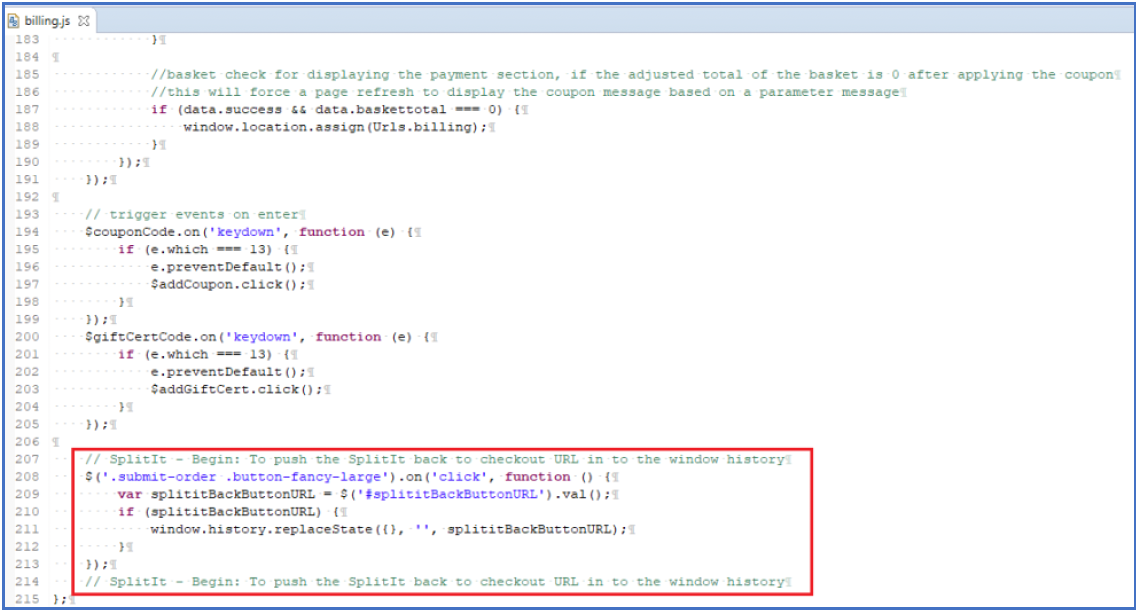
Add the following lines of code in orange to the function returnToForm() as shown below:
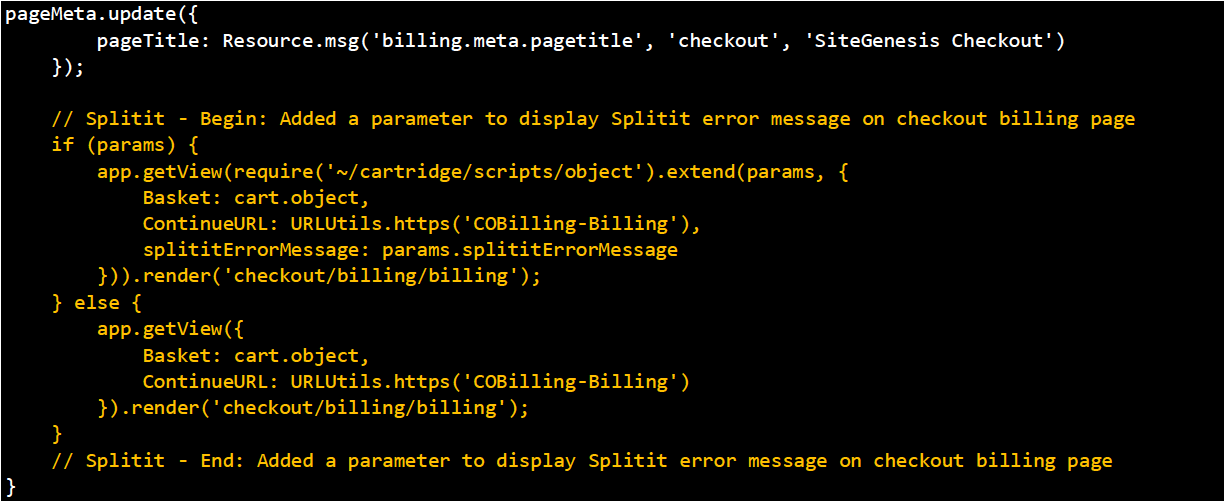
The changes should reflect as shown below:
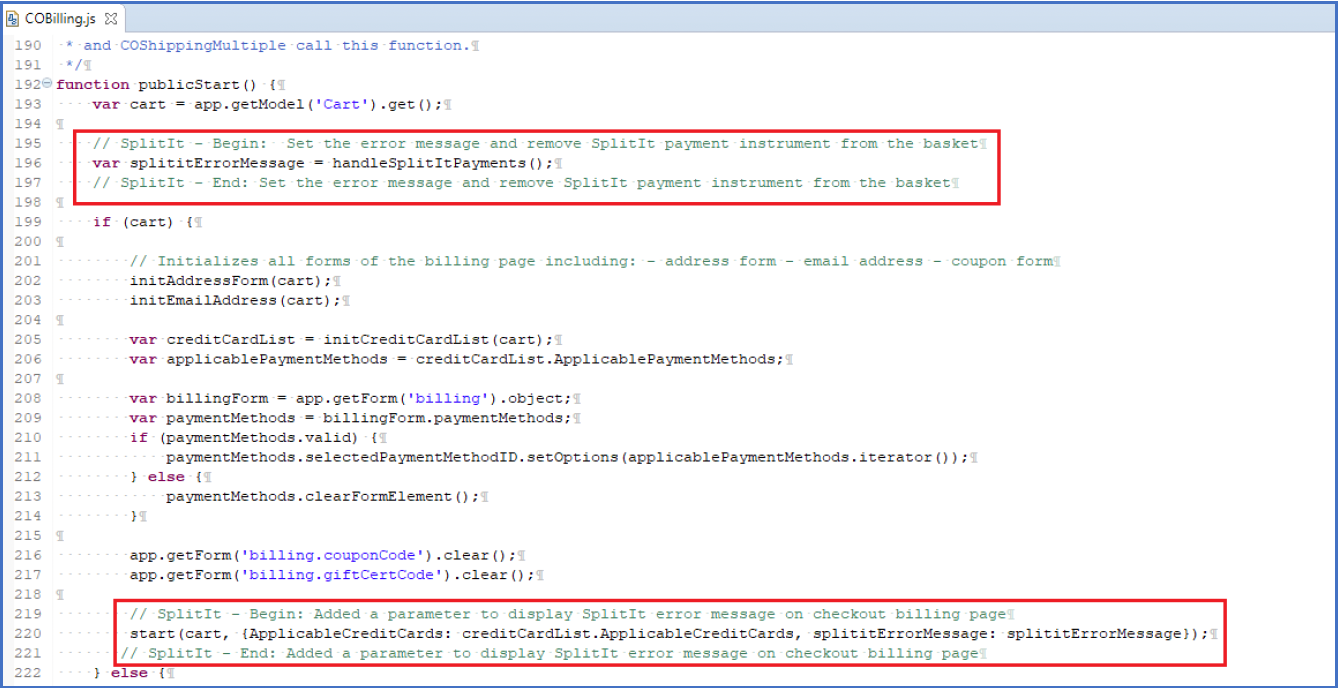
Function - publicStart()
Add the following lines of code in orange to the function publicStart() as shown below:
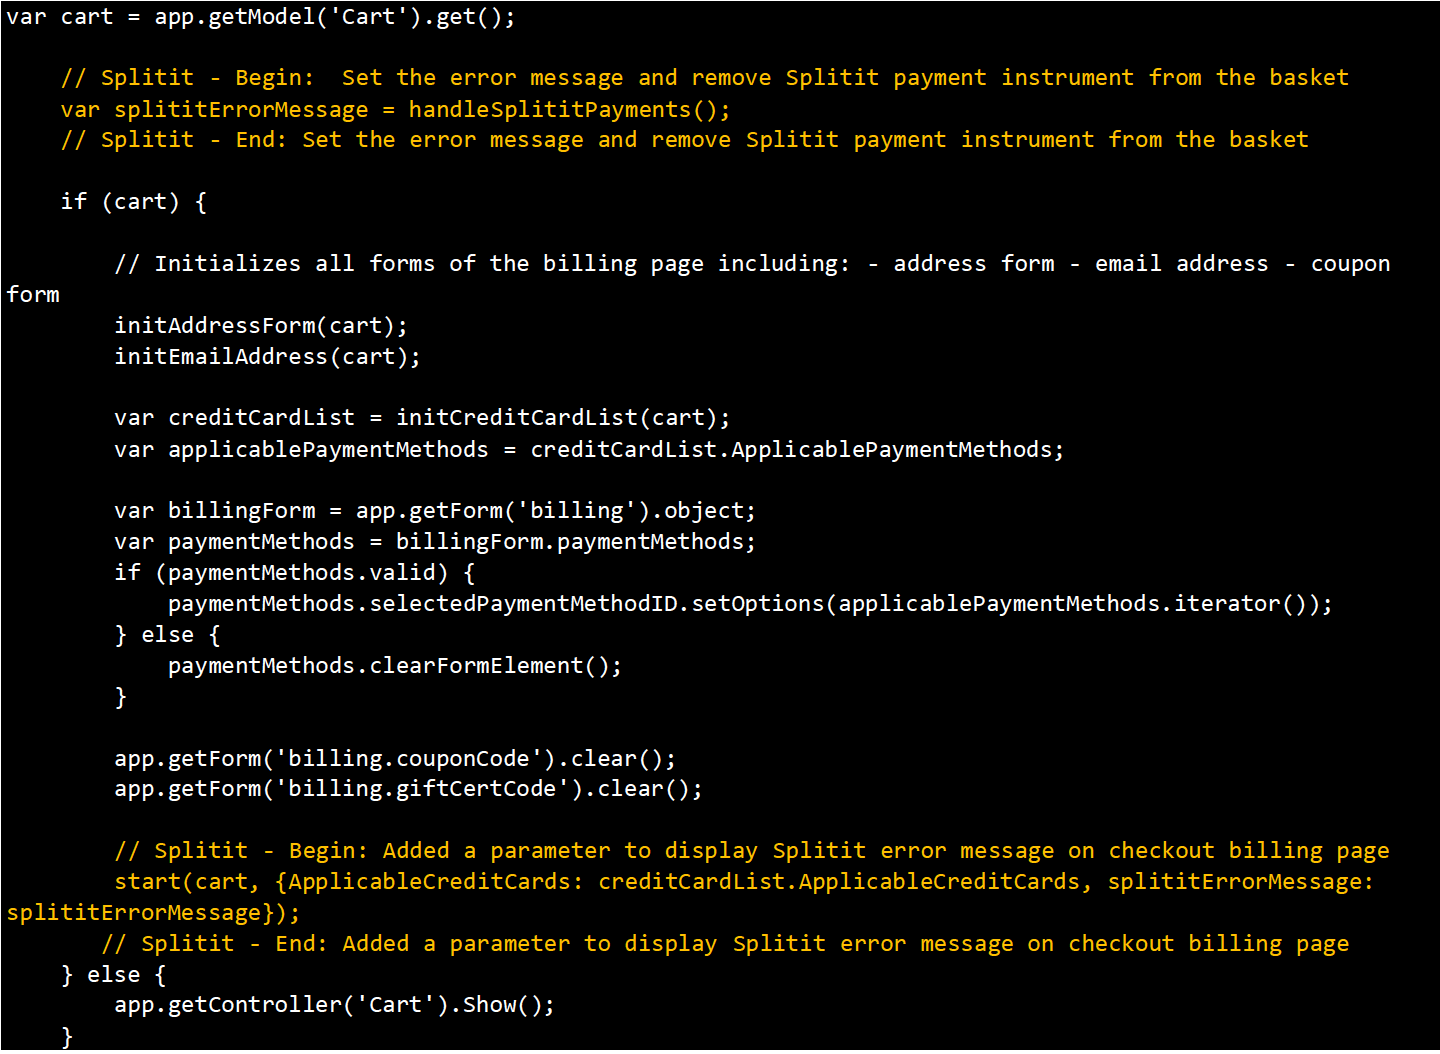
The changes should reflect as shown below:
Client-Side JS Changes
Billing.js
File location: sitegenesis-storefront-core-cartridge/cartridge/js/pages/checkout/billing.js
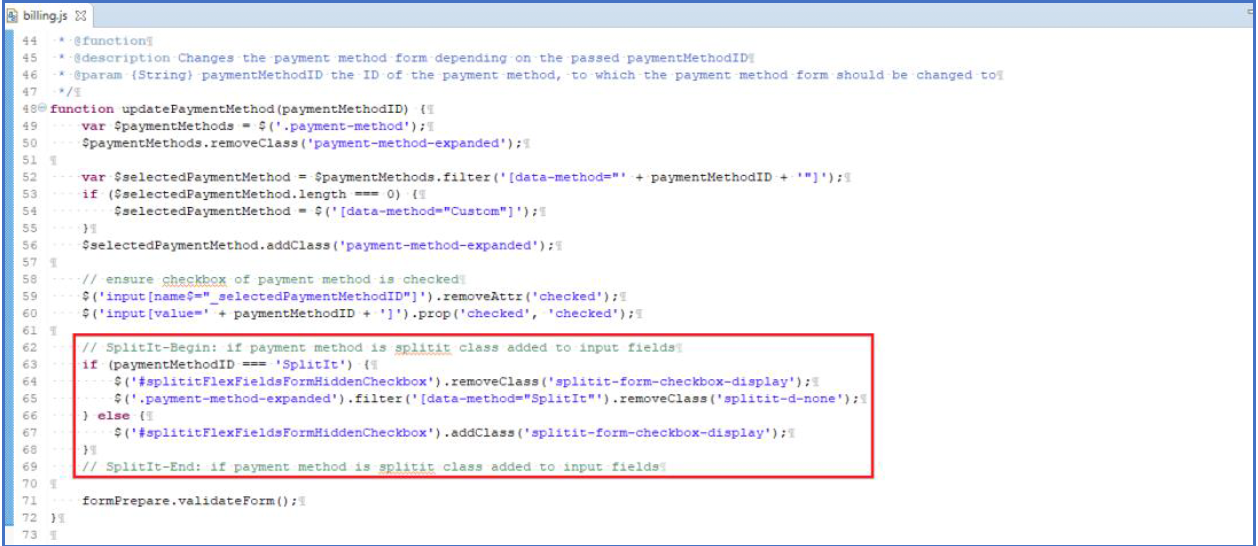
Function - updatePaymentMethod()
Add the following lines of code in orange to the function updatePaymentMethod() as shown below:
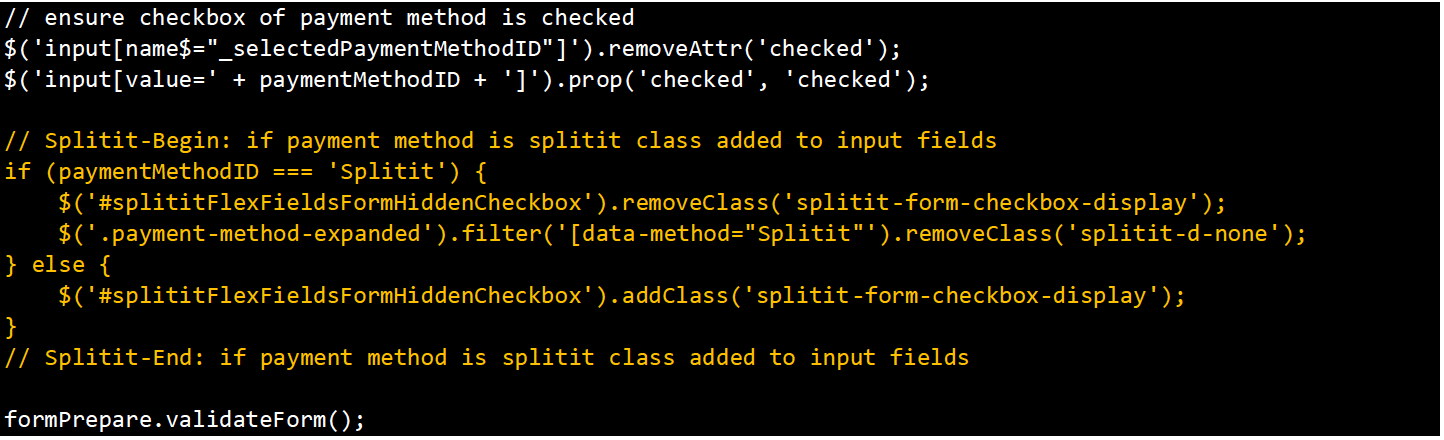
The changes should reflect as shown below:
Function - init()
Add the following lines of code in orange to the function init() as shown below:

The changes should reflect as shown below:
Index.js
File location: sitegenesis-storefront-core-cartridge/cartridge/js/pages/checkout/ index.js
Global Changes
Add the following lines of code in orange at class level:

Function – init()
Add the following lines of code in orange before the end of function init() as shown below

The changes should reflect as shown below:

Shipping.js
File location: sitegenesis-storefront-core-cartridge/cartridge/js/pages/checkout/shipping.js
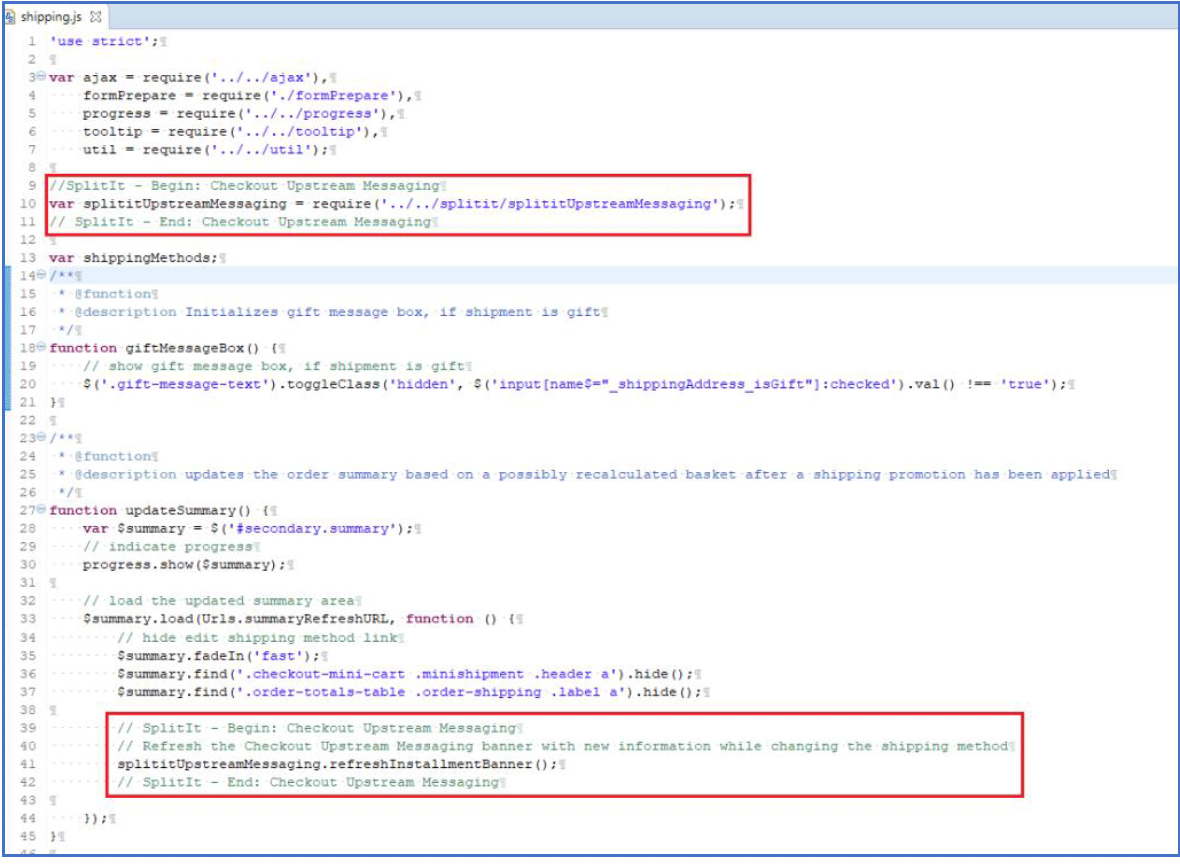
Global Changes
Add the following lines of code in orange at class level:


Function – updateSummary()
Add the following lines of code in orange to the function updateSummary() as shown below:
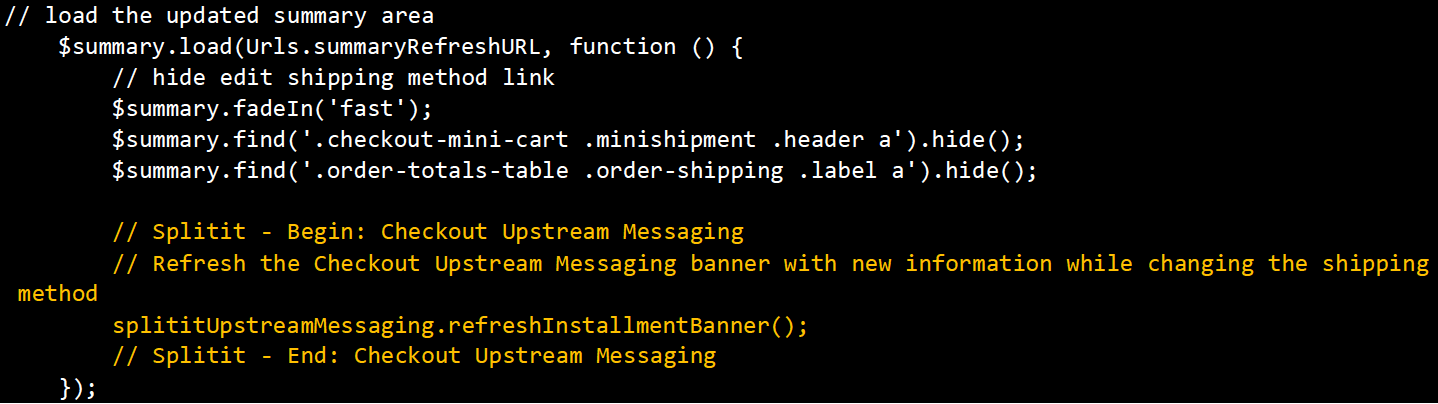
The changes should reflect as shown below:
Index.js
File location: sitegenesis-storefront-core-cartridge/cartridge/js/pages/product/index.js
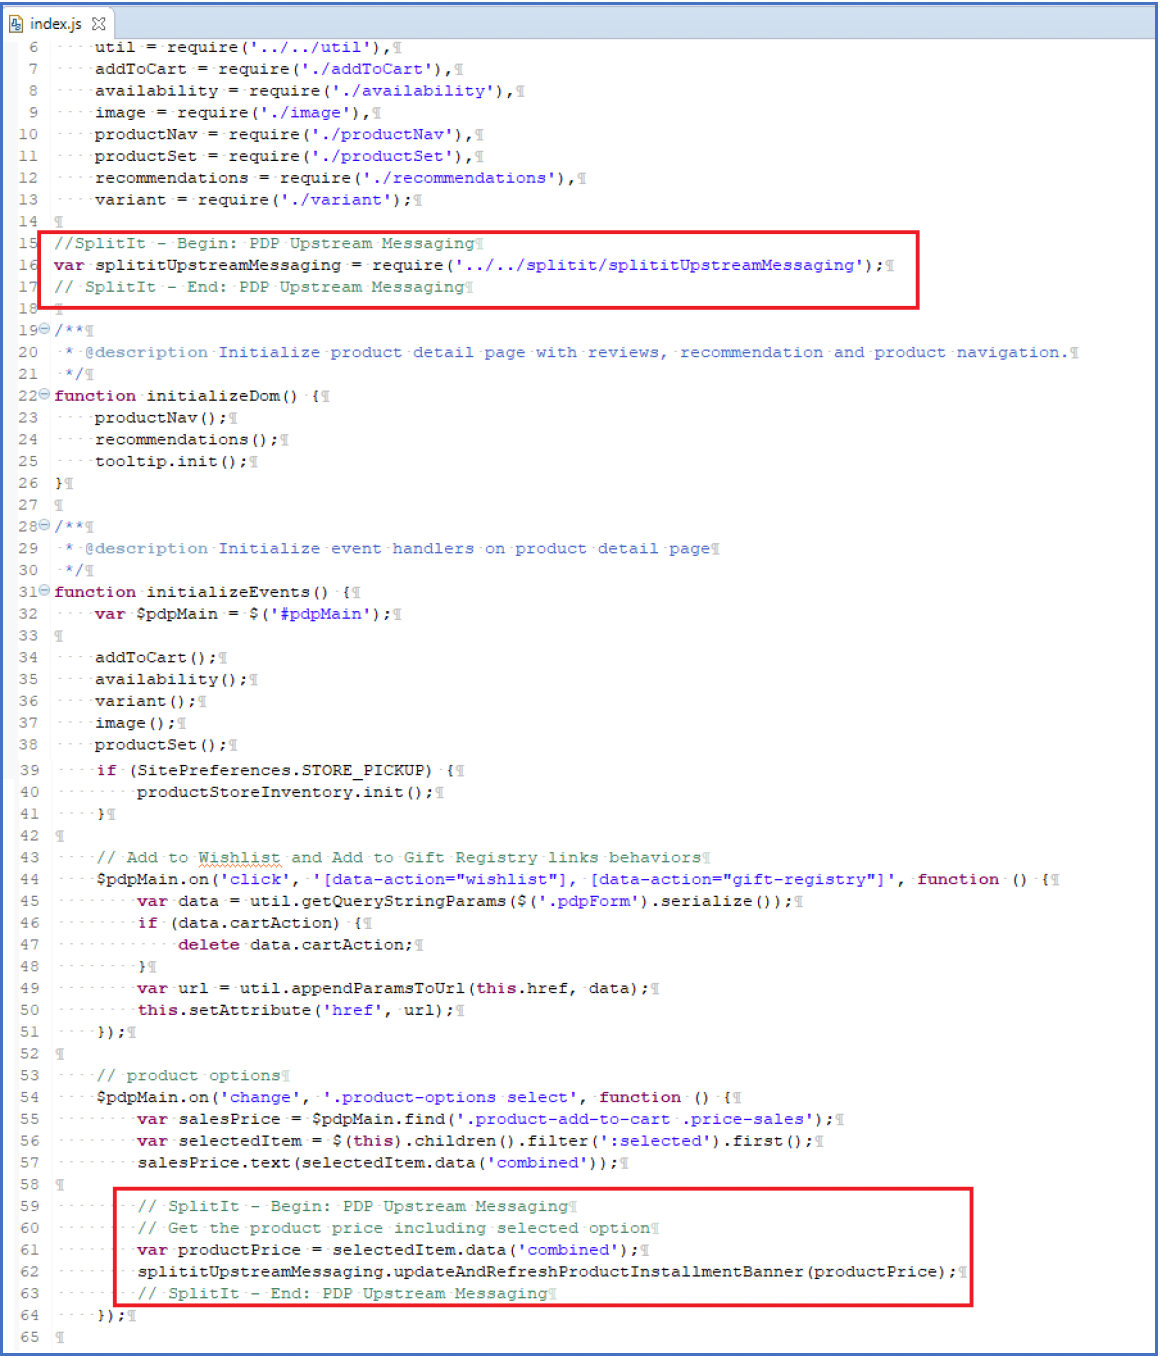
Global Changes
Add the following lines of code in orange at class level:

Function – initializeEvents()
Add the following lines of code in orange to the function initializeEvents() as shown below:
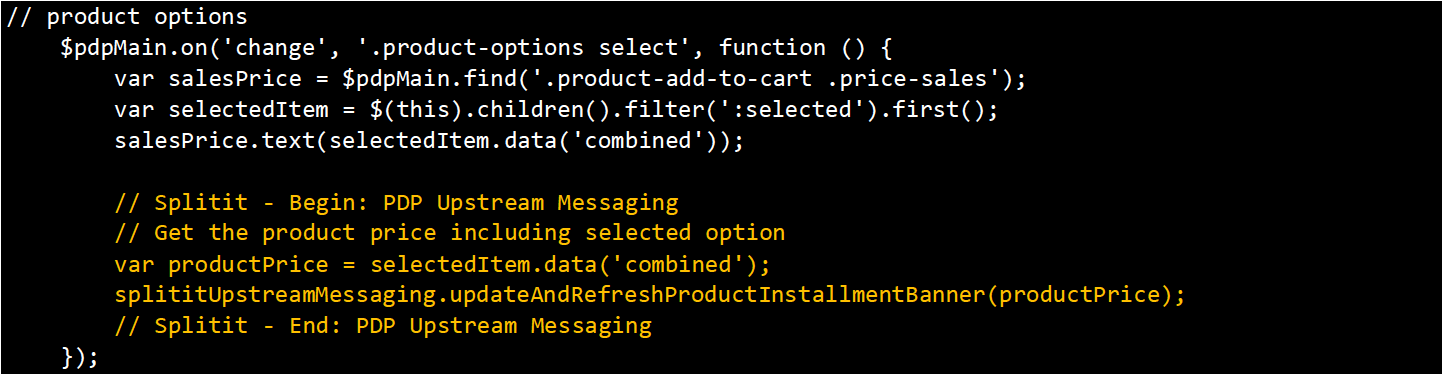
The changes should reflect as shown below:
ProductSet.js
File location: sitegenesis-storefront-core-cartridge/cartridge/js/pages/product/productSet.js
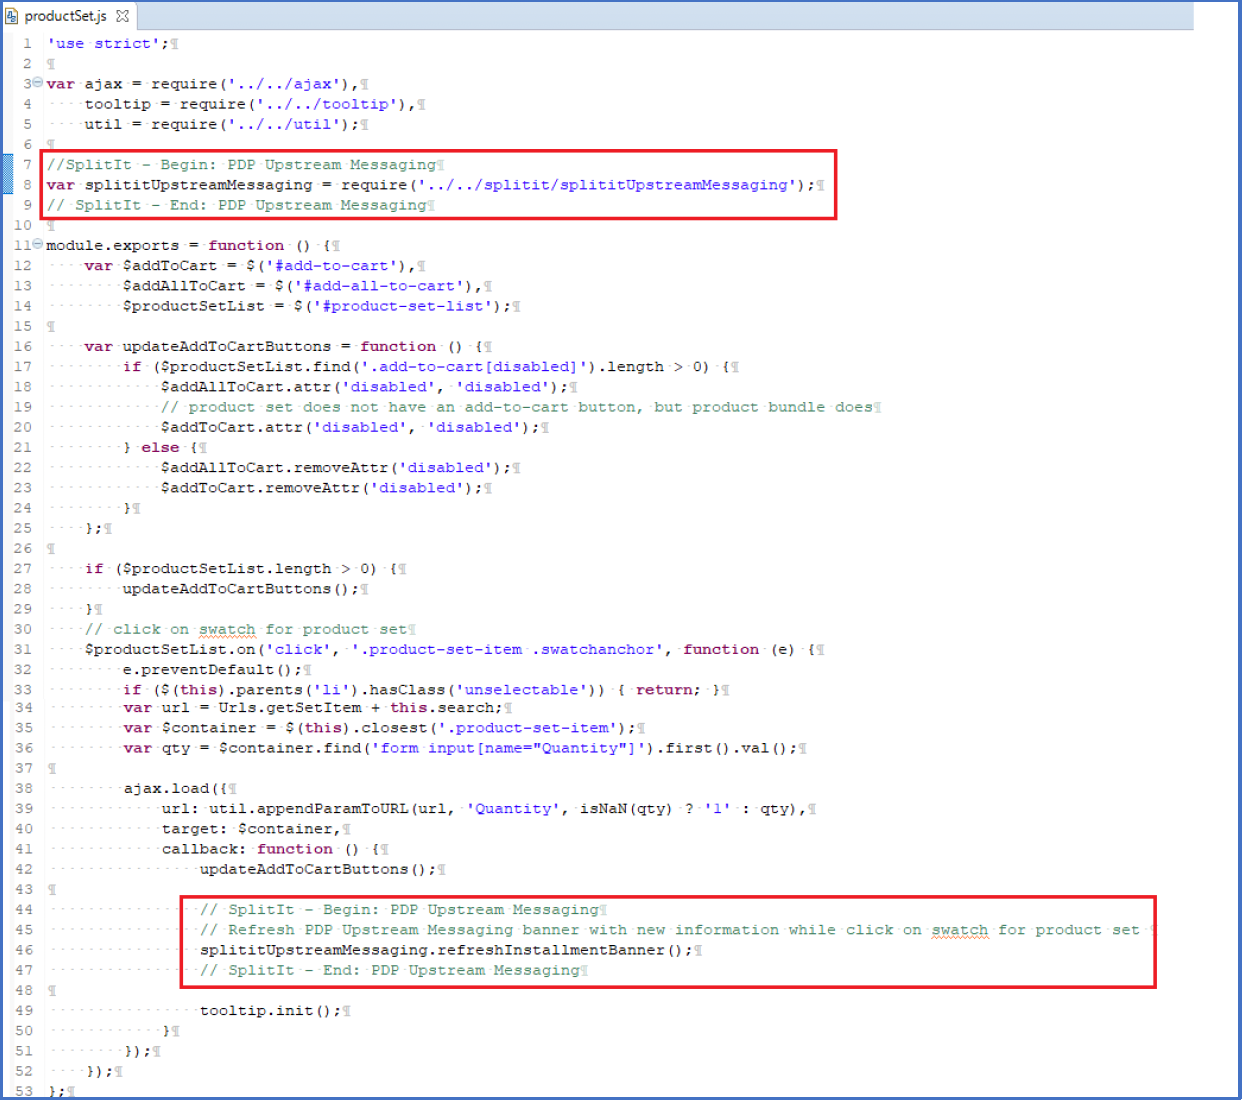
Add the following lines of code in orange at class level:

Function – module.exports
Add the following lines of code in orange to the function module.exports as shown below:
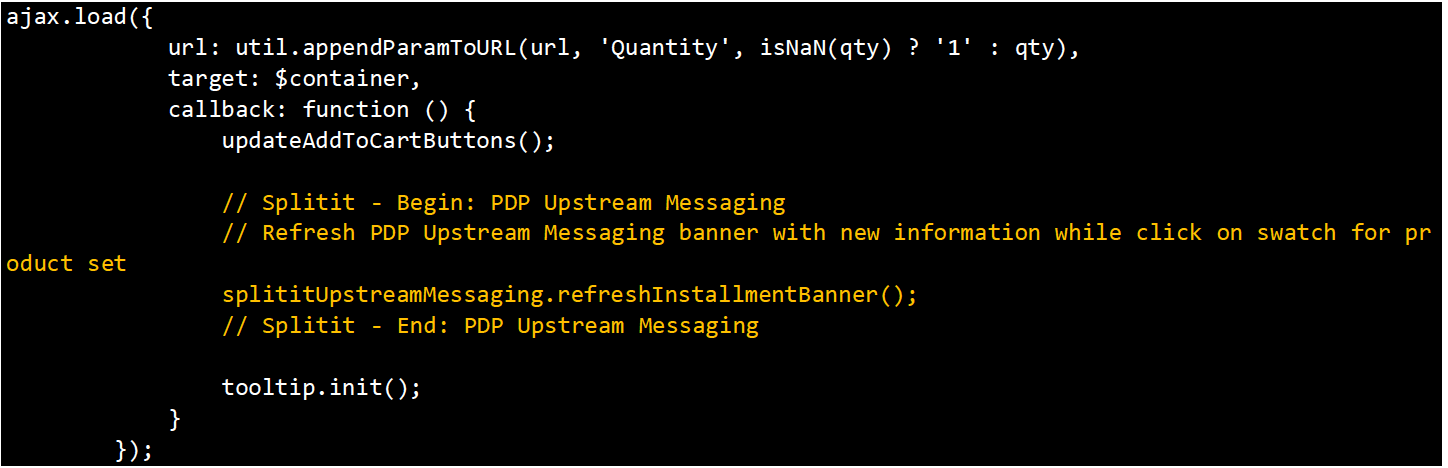
The changes should reflect as shown below:
Variant.js
File location: sitegenesis-storefront-core-cartridge/cartridge/js/pages/product/variant.js
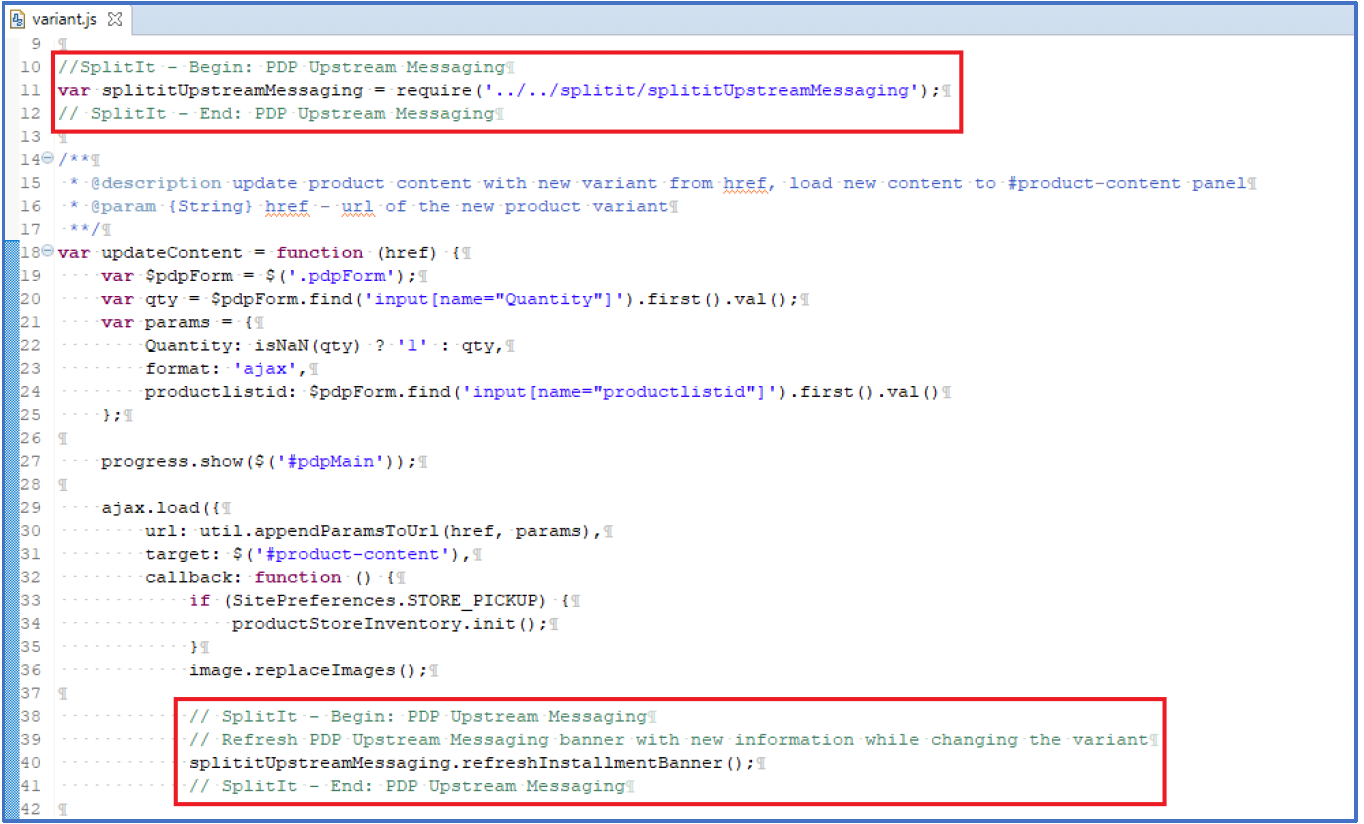
Add the following lines of code in orange at class level:

Function – updateContent()
Add the following lines of code in orange to the function updateContent() as shown below:
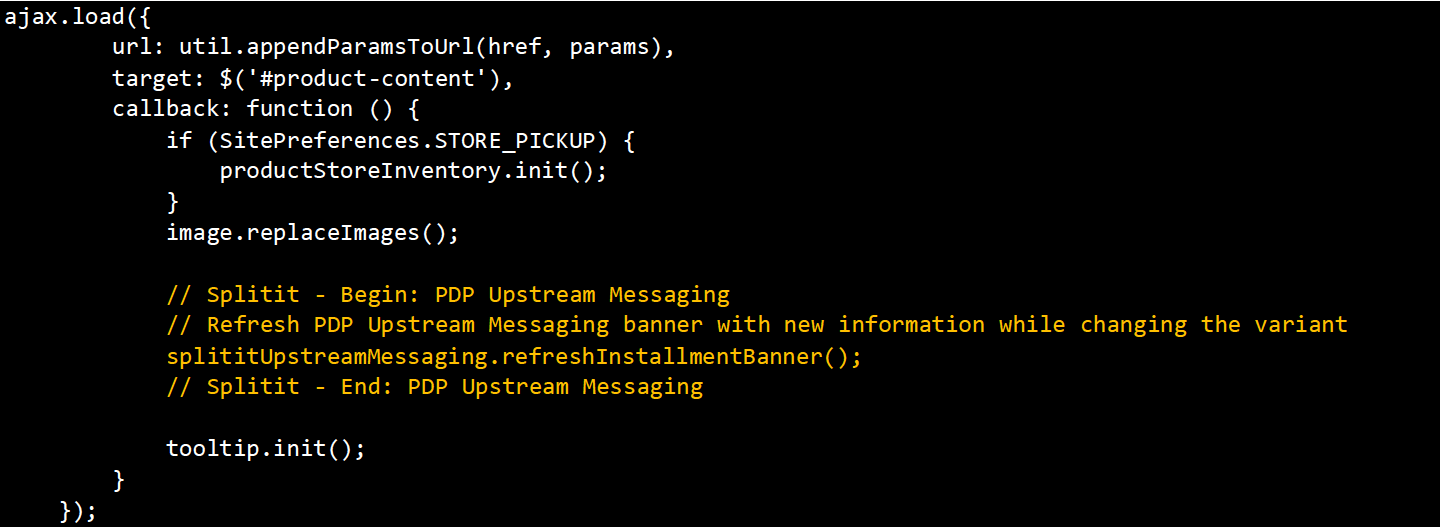
The changes should reflect as shown below:
Quickview.js
File location: sitegenesis-storefront-core-cartridge/cartridge/js/quickview.js
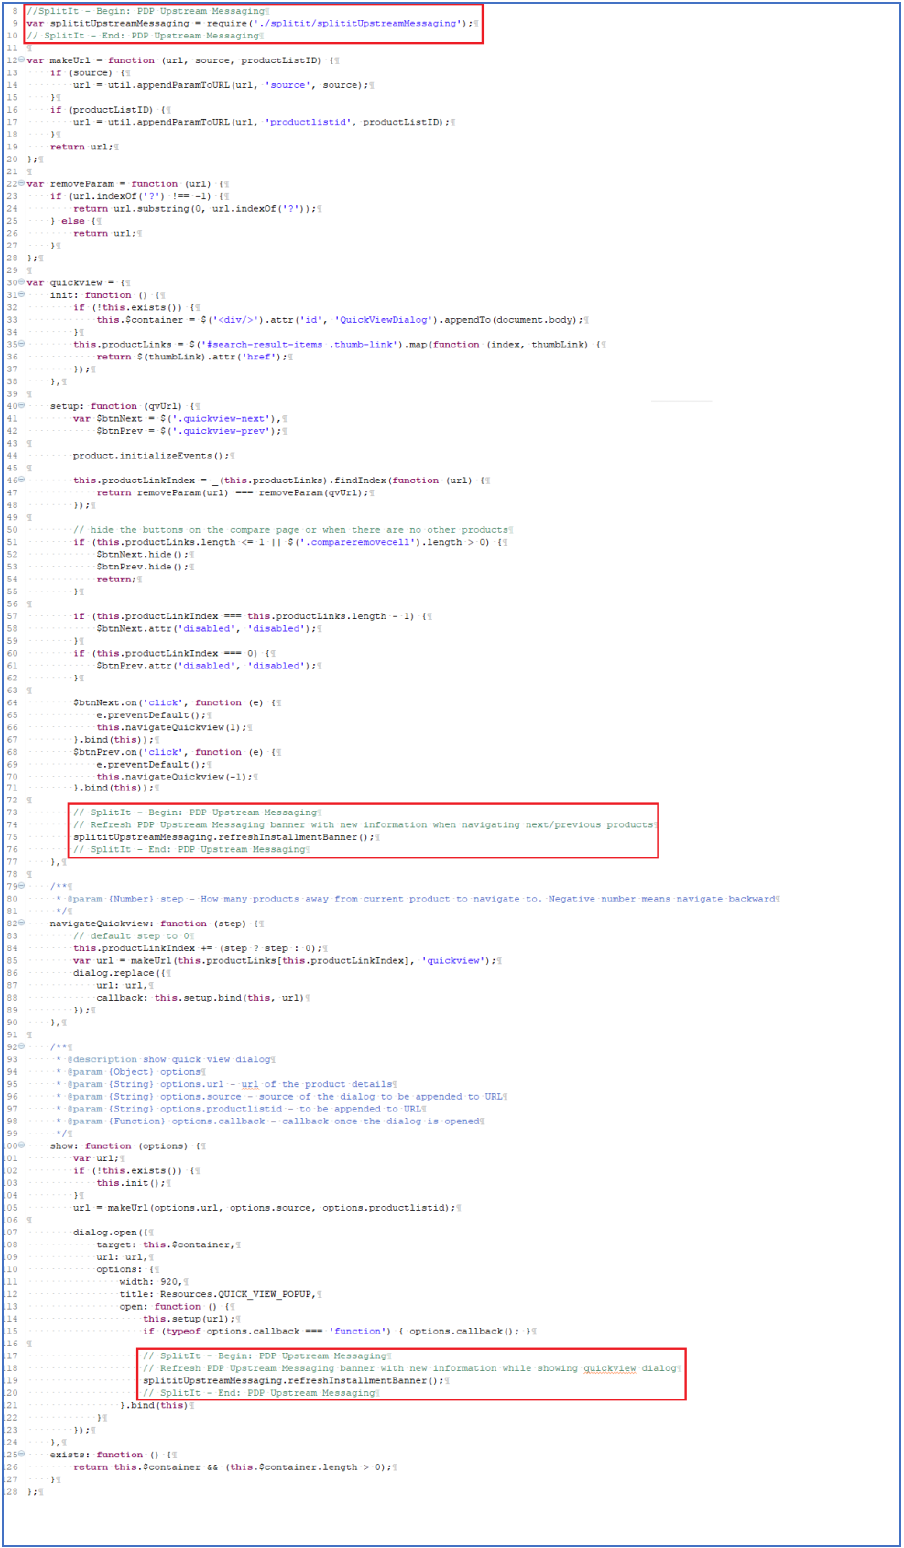
Add the following lines of code in orange at class level:

Function – quickView.setup()
Add the following lines of code in orange before the end of function quickView.setup() as shown below:

Function – show()
Add the following lines of code in orange to the function show() as shown below:
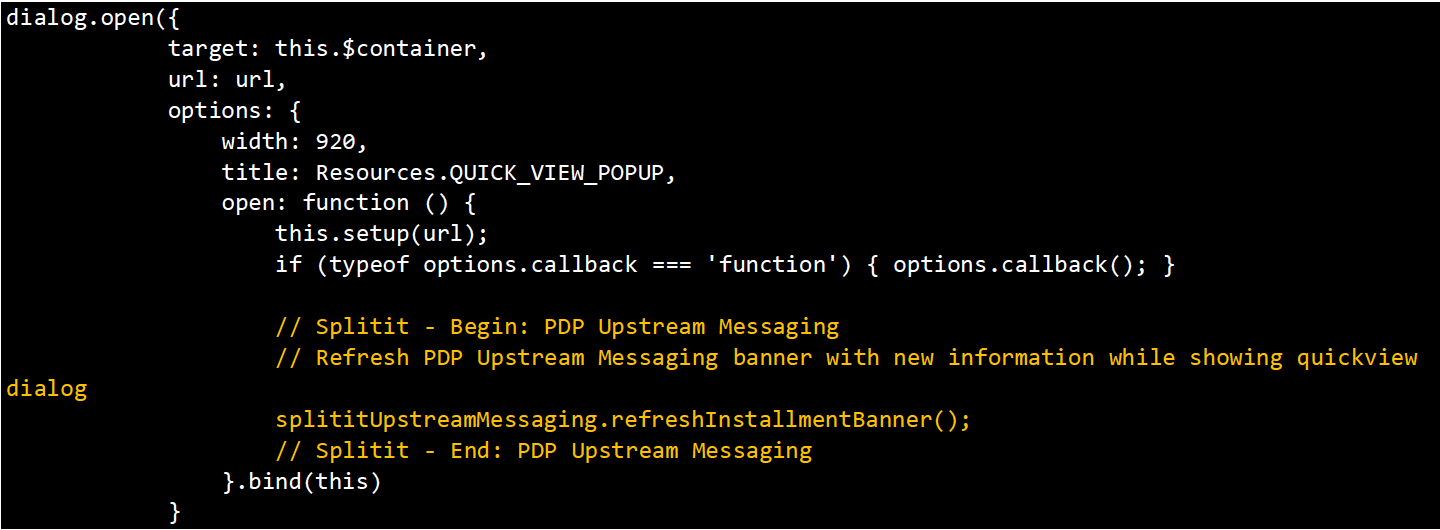
The changes should reflect as shown below:
Custom Files
SplititCheckout.js
This is a new file that needs to be copied into the SiteGenesis storefront core cartridge.
Steps to be followed:
- Create a folder splitit under sitegenesis-storefront-core-cartridge/cartridge/js
- Copy the file from split_sg_changes/cartridge/js/splitit/splititCheckout.js into sitegenesis-storefront-core-cartridge/cartridge/js/splitit/splititCheckout.js
SplititUpstreamMessaging.js
This is a new file that needs to be copied into the SiteGenesis storefront core cartridge.
Steps to be followed:
- Create a folder splitit under sitegenesis-storefront-core-cartridge/cartridge/js
- Copy the file from split_sg_changes/cartridge/js/splitit/splititUpstreamMessaging.js into sitegenesis-storefront-core-cartridge/cartridge/js/splitit/splititUpstreamMessaging.js
Custom_splitit.scss
This is a new file that needs to be copied into the SiteGenesis storefront core cartridge.
Steps to be followed:
- Copy the file from split_sg_changes/cartridge/scss/default/custom_splitit.scss into sitegenesis-storefront-core-cartridge/cartridge/scss/default/custom_splitit.scss
ISML Changes
Cart.isml
File location: sitegenesis-storefront-core-cartridge>>cartridge\templates\default\checkout\cart\cart.isml
Code changes #1:
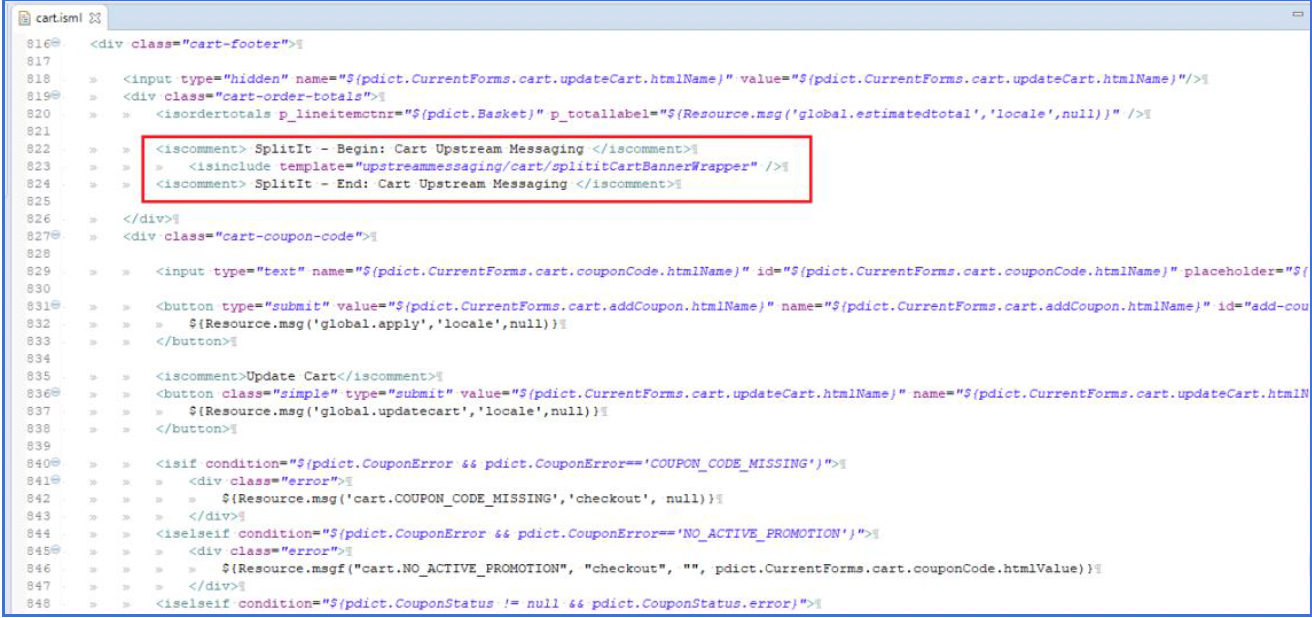
Add the following lines of code in orange as shown below
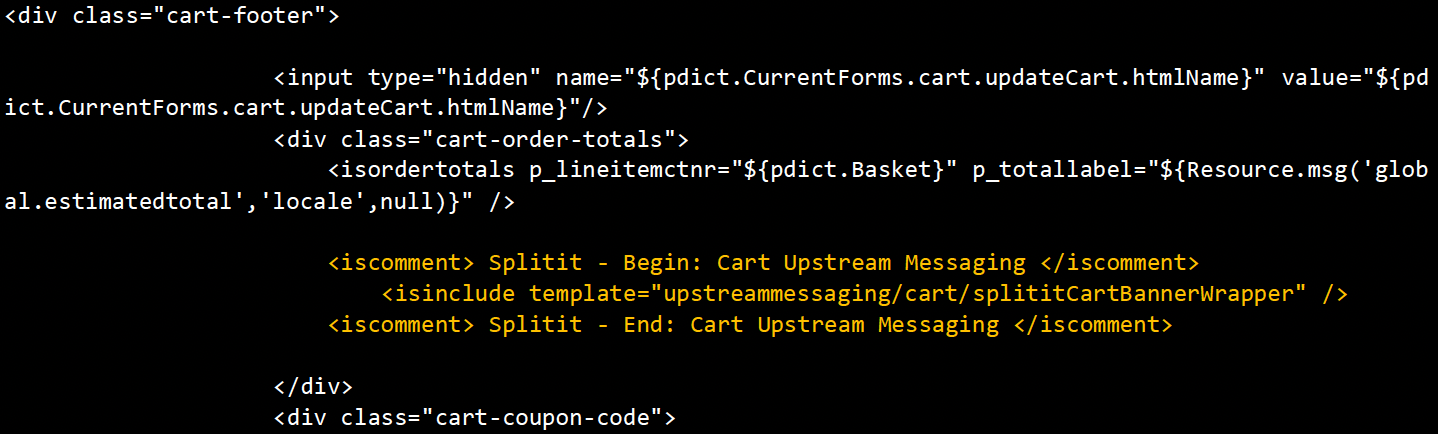
The changes should reflect as shown below:
Billing.isml
File location: sitegenesis-storefront-core-cartridge>>cartridge\templates\default\checkout\billing\billing.isml
Code changes #1:
Add the following lines of code in orange as shown below:

The changes should reflect as shown below:

Paymentmethods.isml
File location: sitegenesis-storefront-core- cartridge>>cartridge\templates\default\checkout\billing\paymentmethods.isml
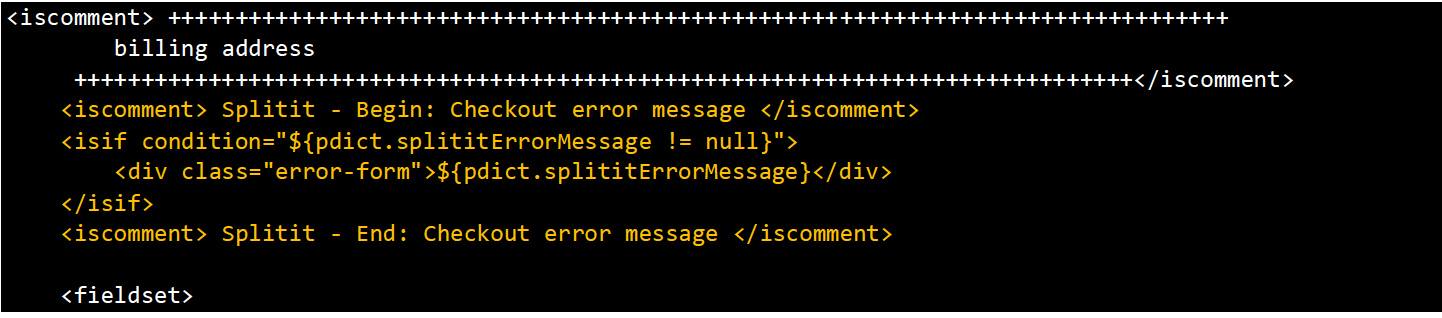
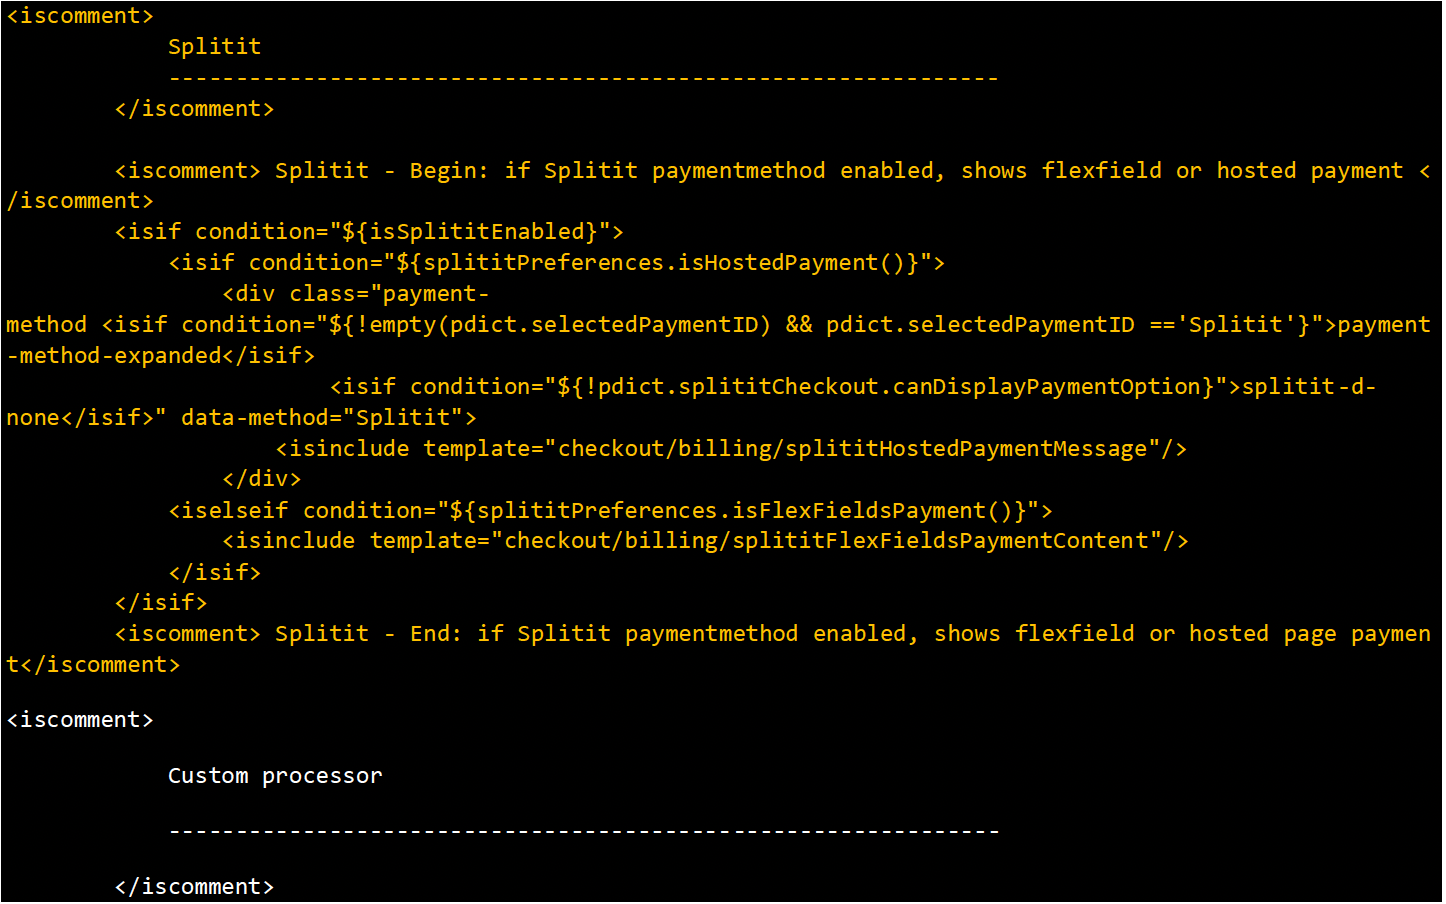
Code changes #1:
Add the following lines of code in orange as shown below:
The changes should reflect as shown below:
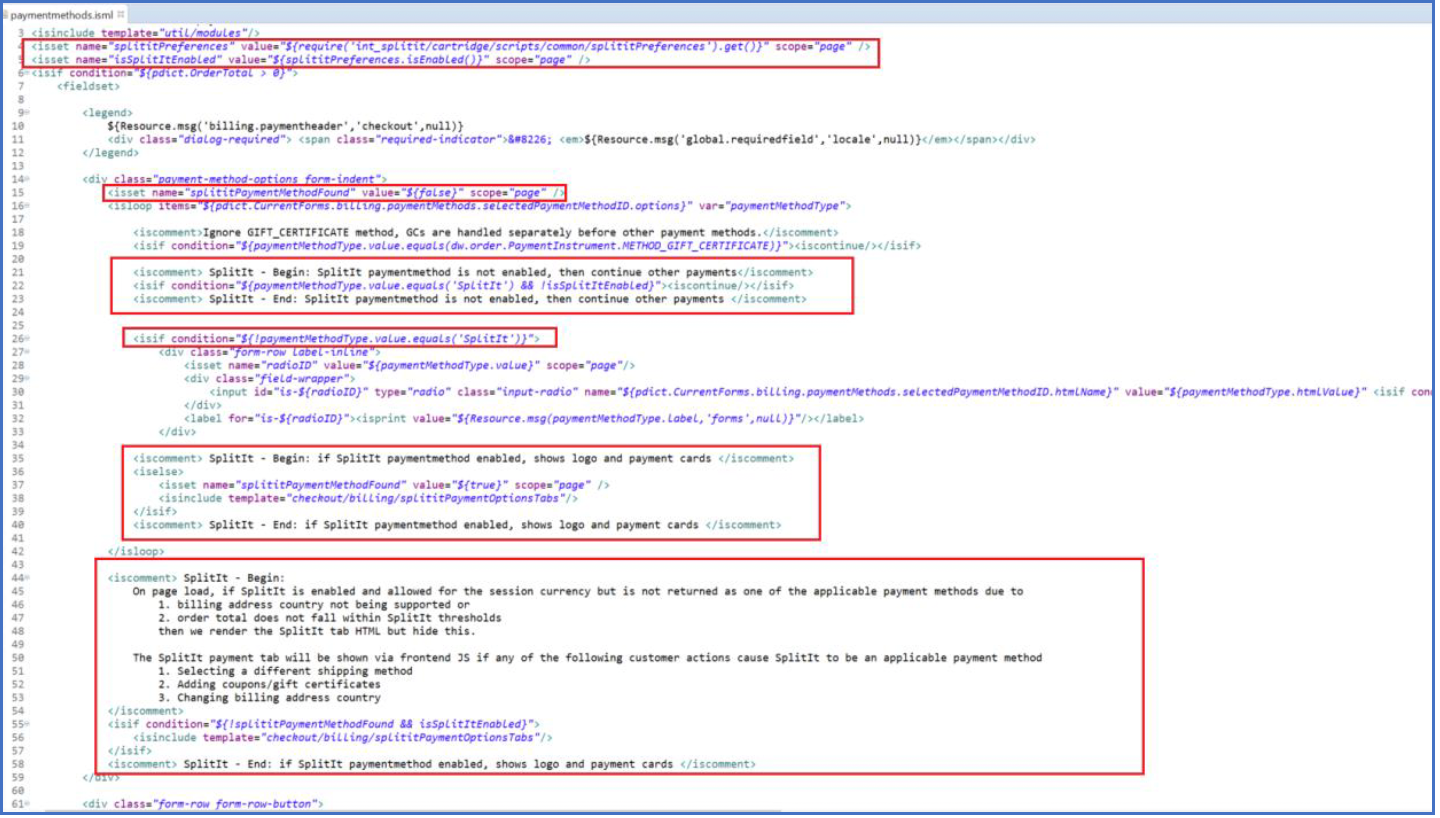
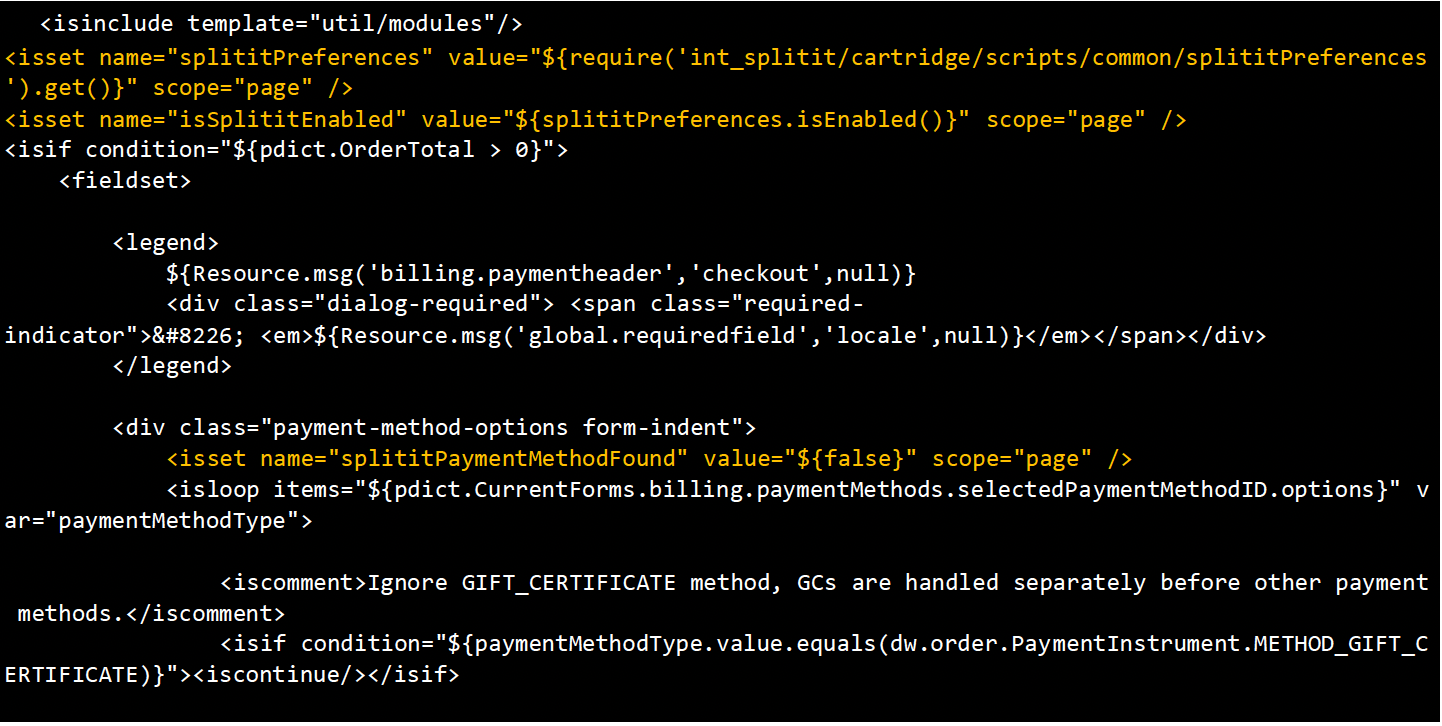
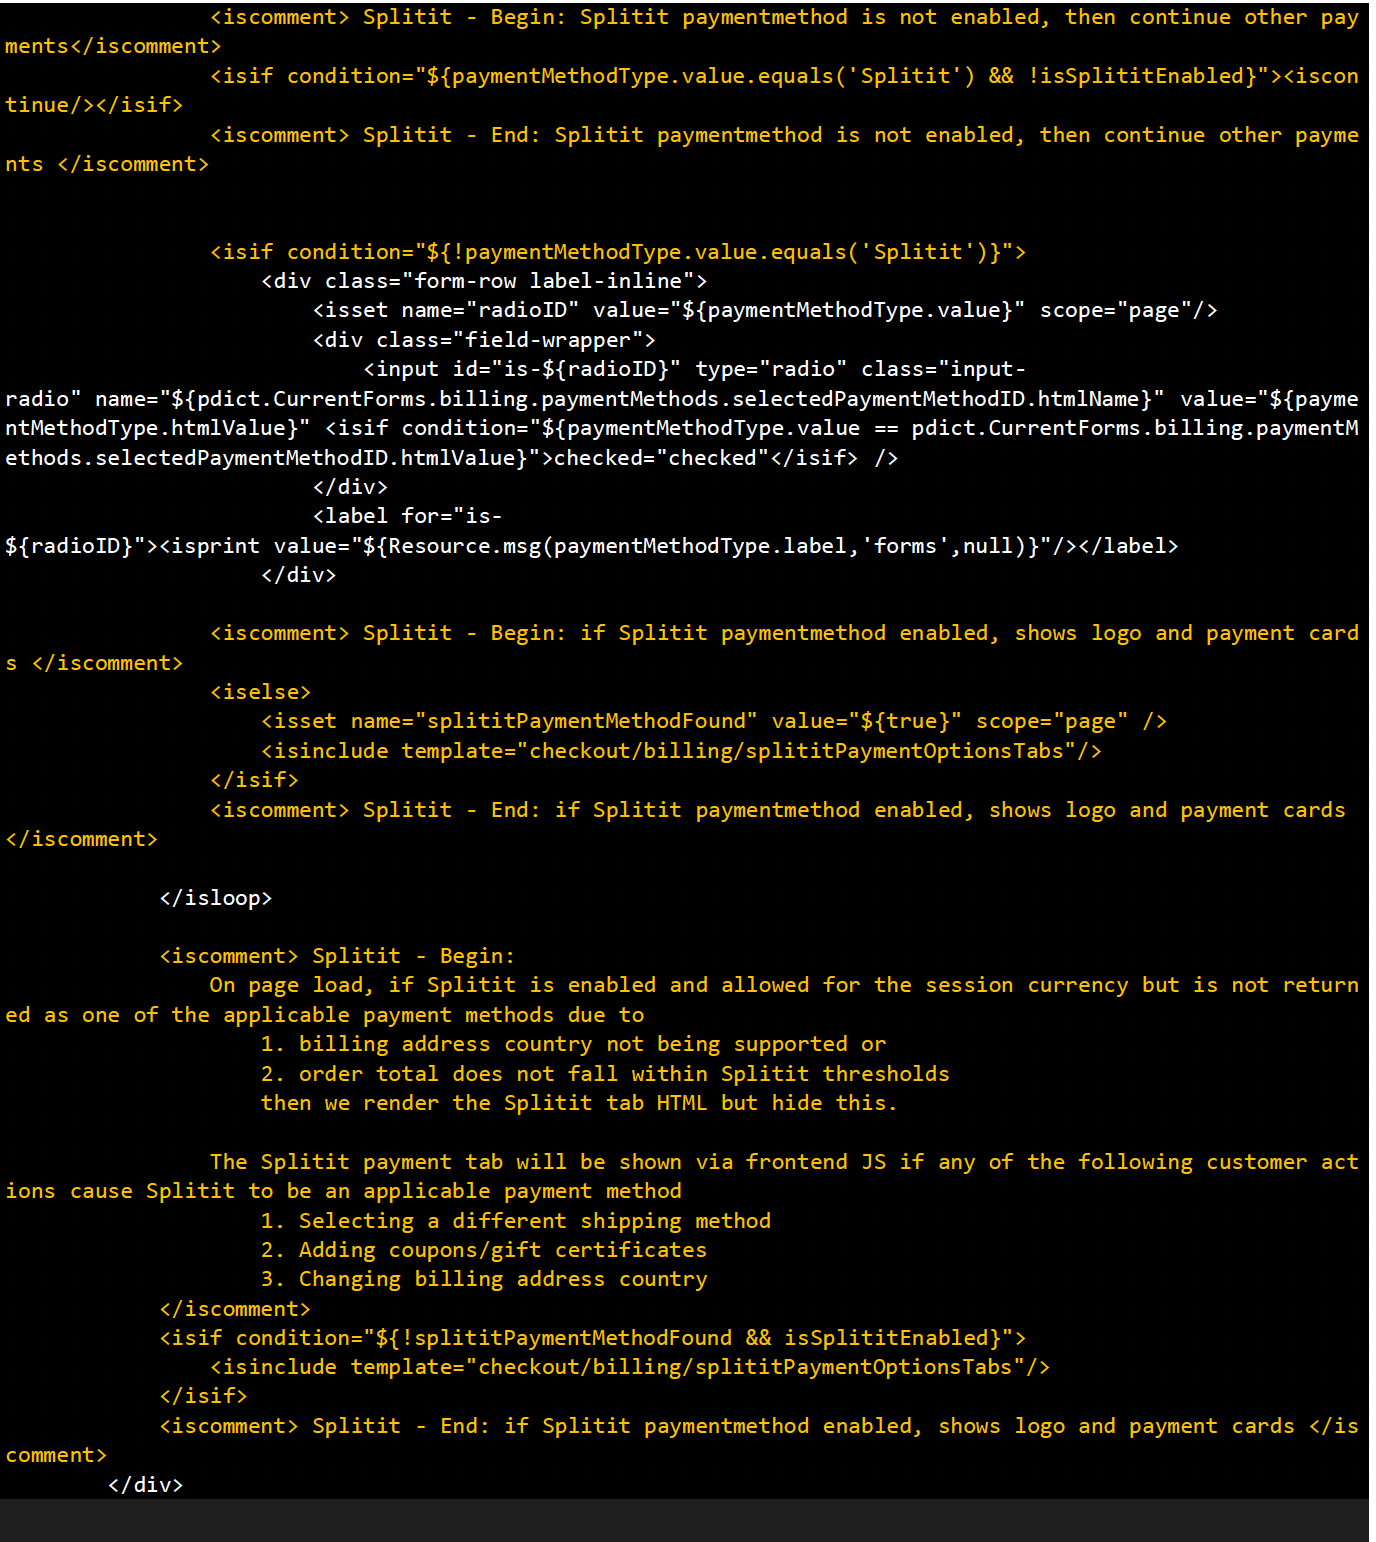
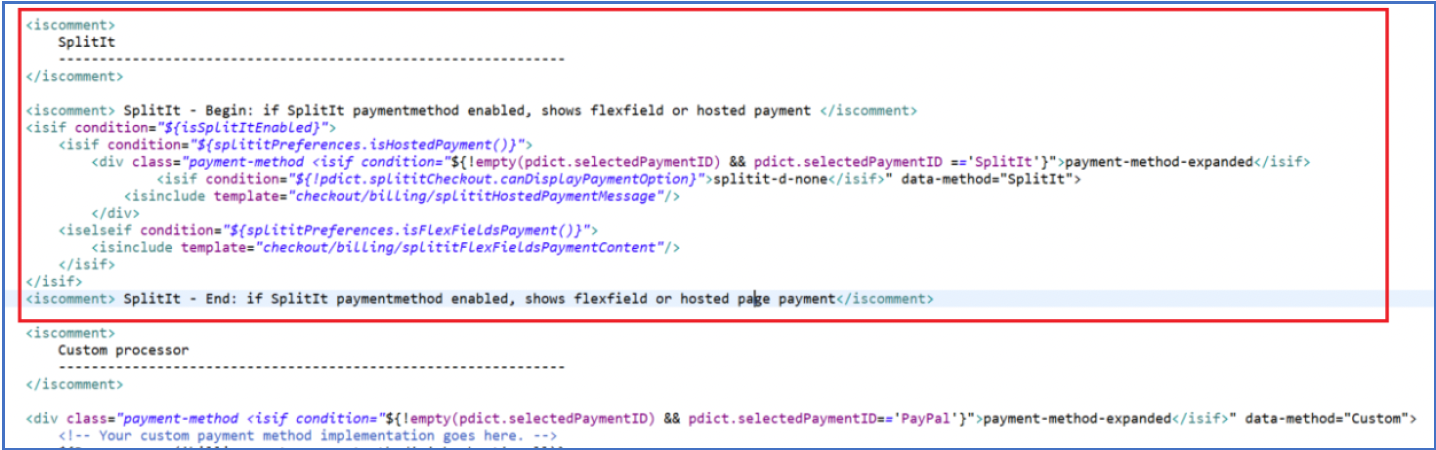
Code changes #2:
Add the following lines of code in orange as shown below:
The changes should reflect as shown below:
Minisummary.isml
File location: sitegenesis-storefront-core-cartridge>>cartridge\templates\default\checkout\minisummary.isml
Code changes #1
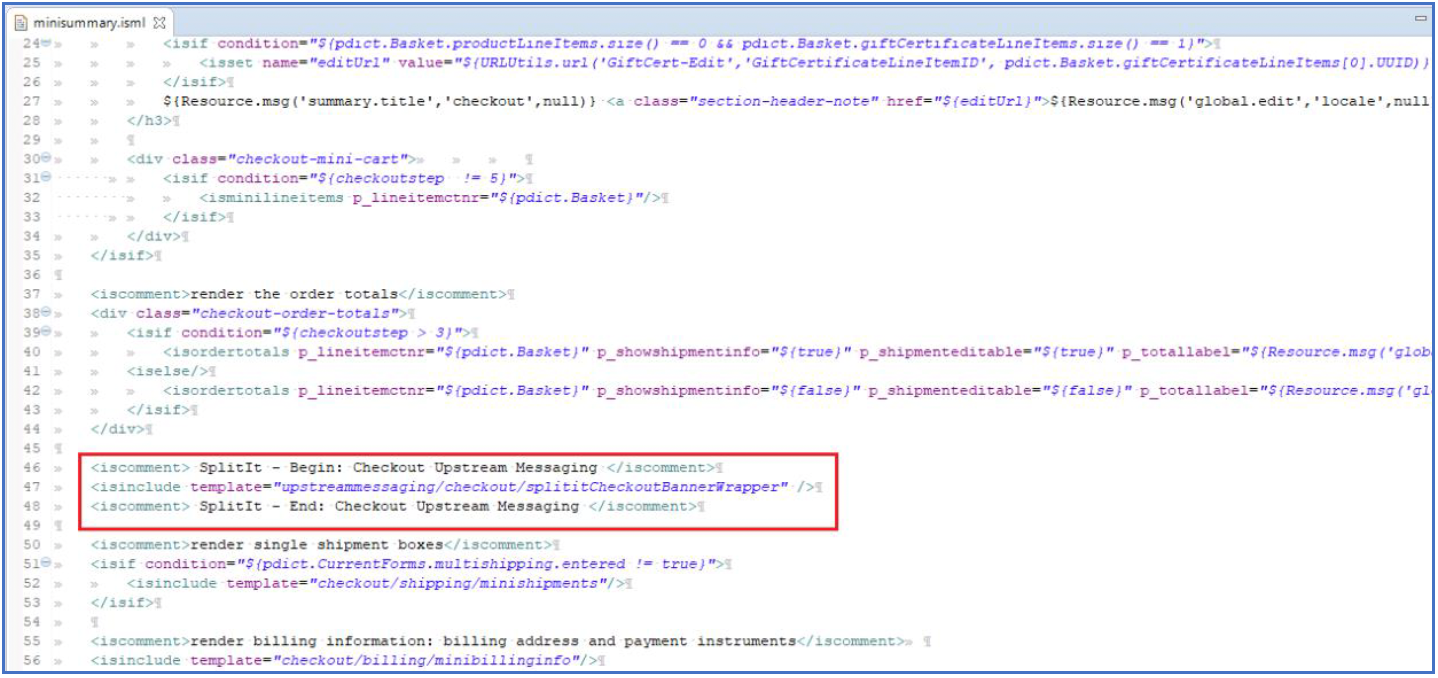
Add the following lines of code in orange as shown below:
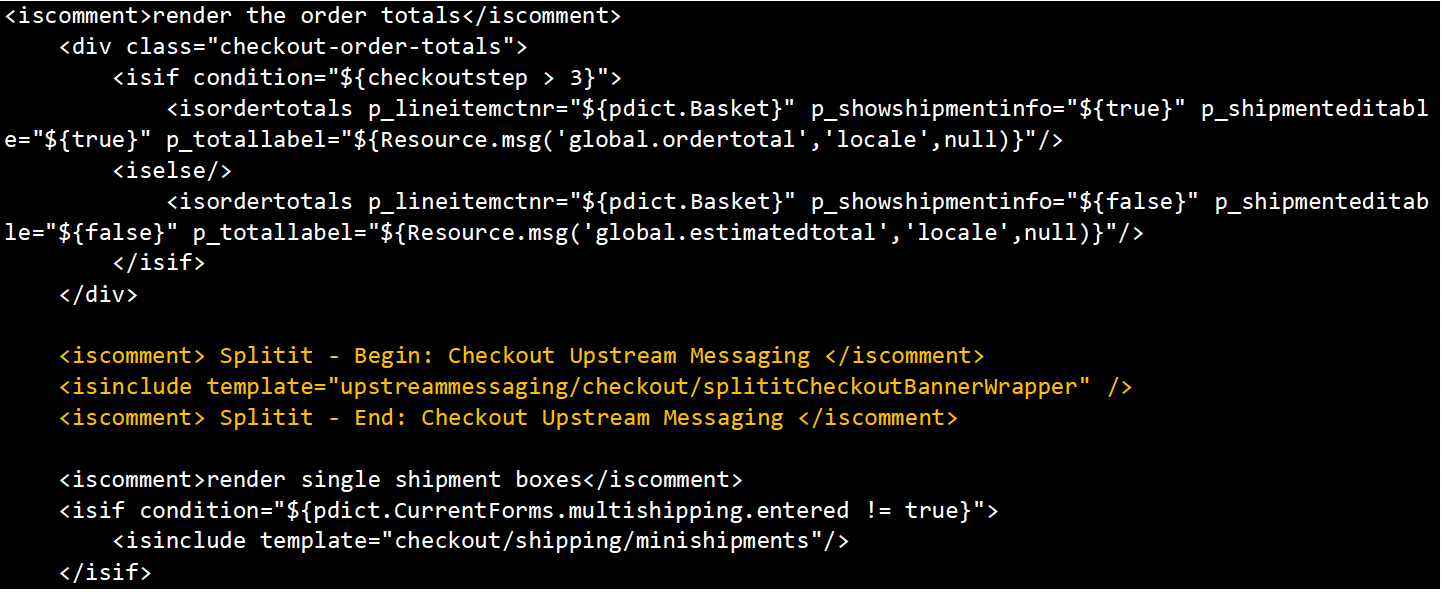
The changes should reflect as shown below:
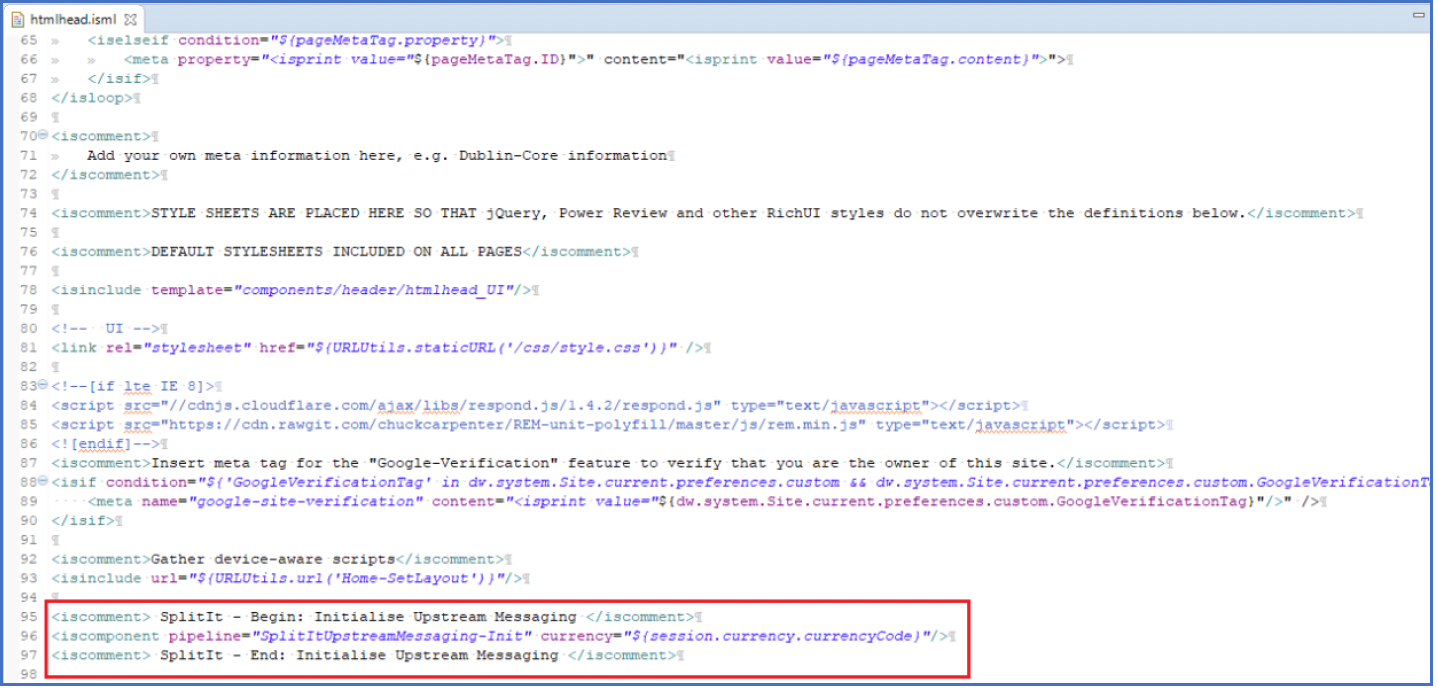
Htmlhead.isml
File location: sitegenesis-storefront-core-cartridge>>cartridge\templates\default\components\header\htmlhead.isml
Code changes #1
Add the following lines of code in orange as shown below:

The changes should reflect as shown below:
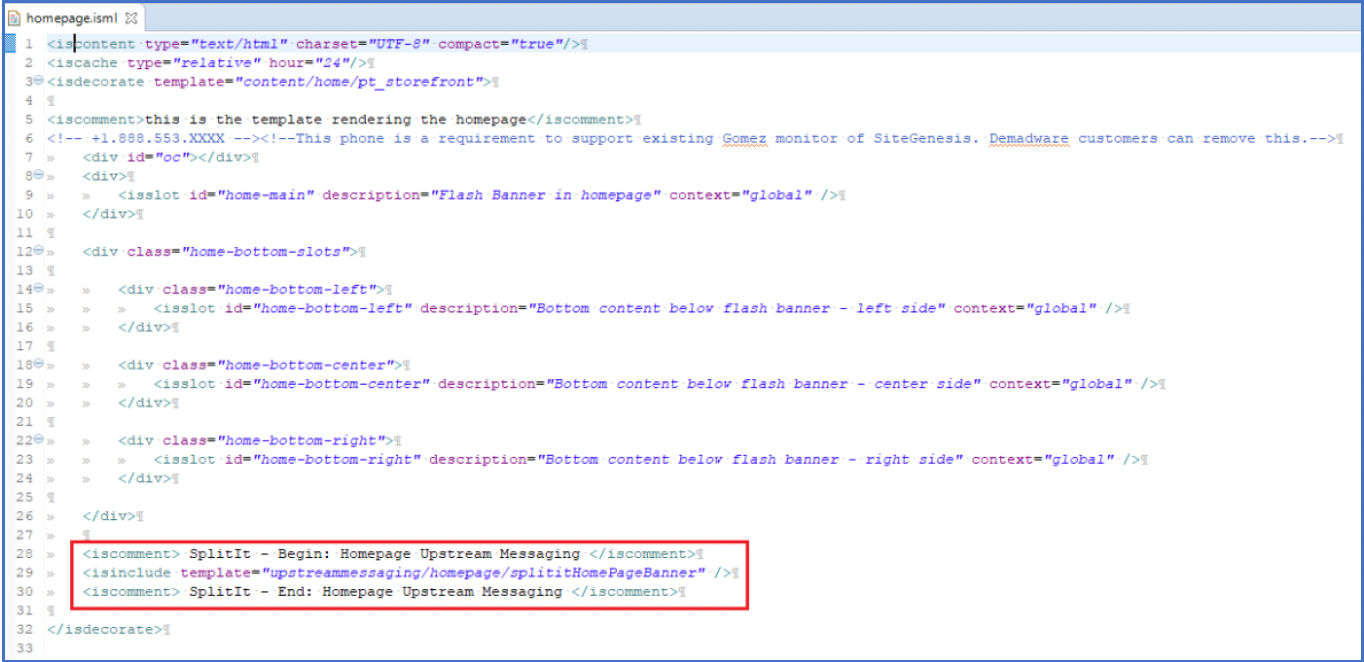
Homepage.isml
File location: sitegenesis-storefront-core-cartridge>>cartridge\templates\default\content\home\homepage.isml
Code changes #1
Add the following lines of code in orange as shown below:

The changes should reflect as shown below:
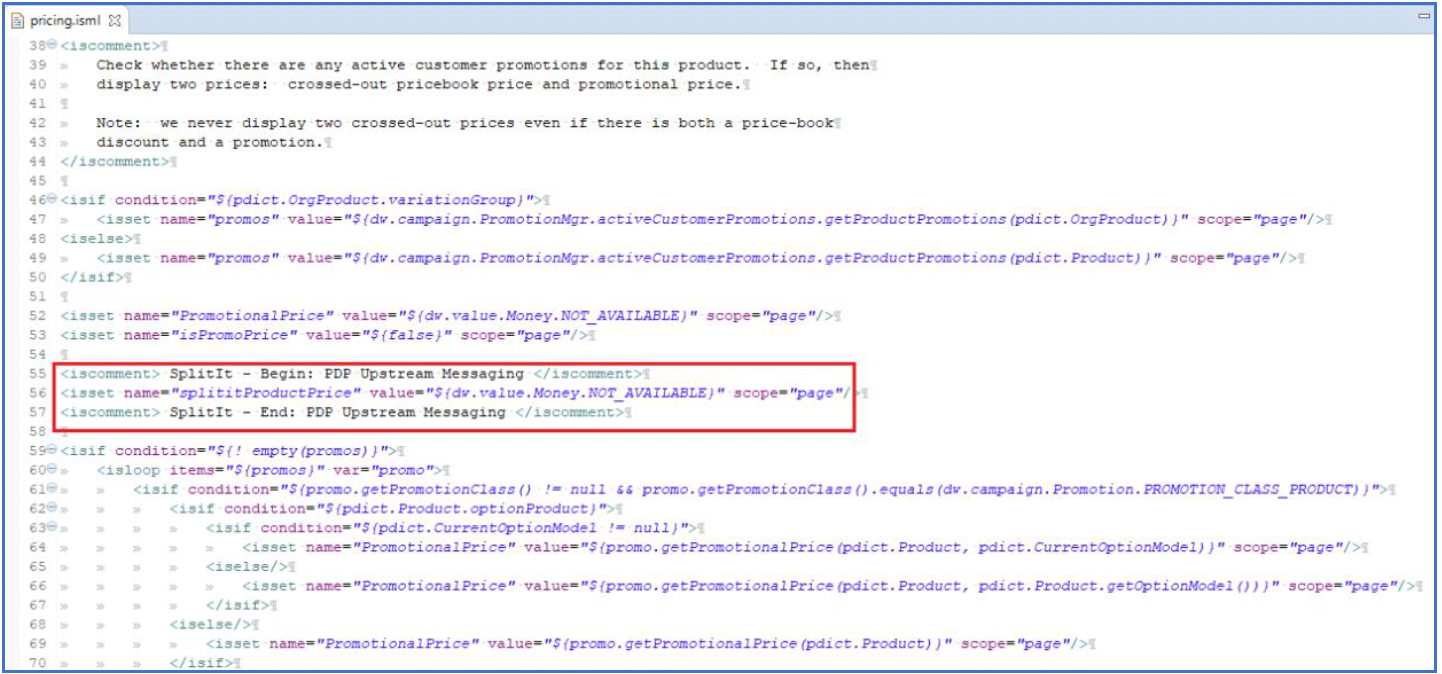
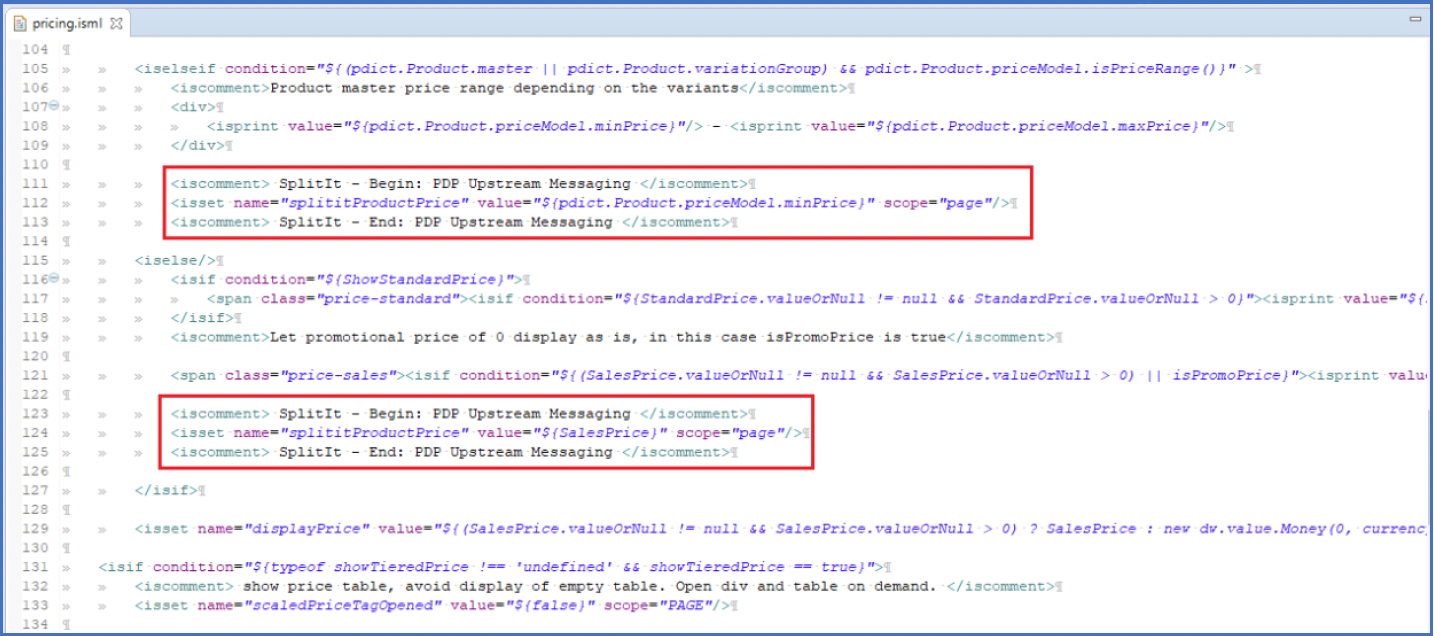
Pricing.isml
File location: sitegenesis-storefront-core-cartridge>>cartridge\templates\default\product\components\pricing.isml
Code changes #1
Add the following lines of code in orange as shown below:

The changes should reflect as shown below:
Code changes #2
Add the following lines of code in orange as shown below:
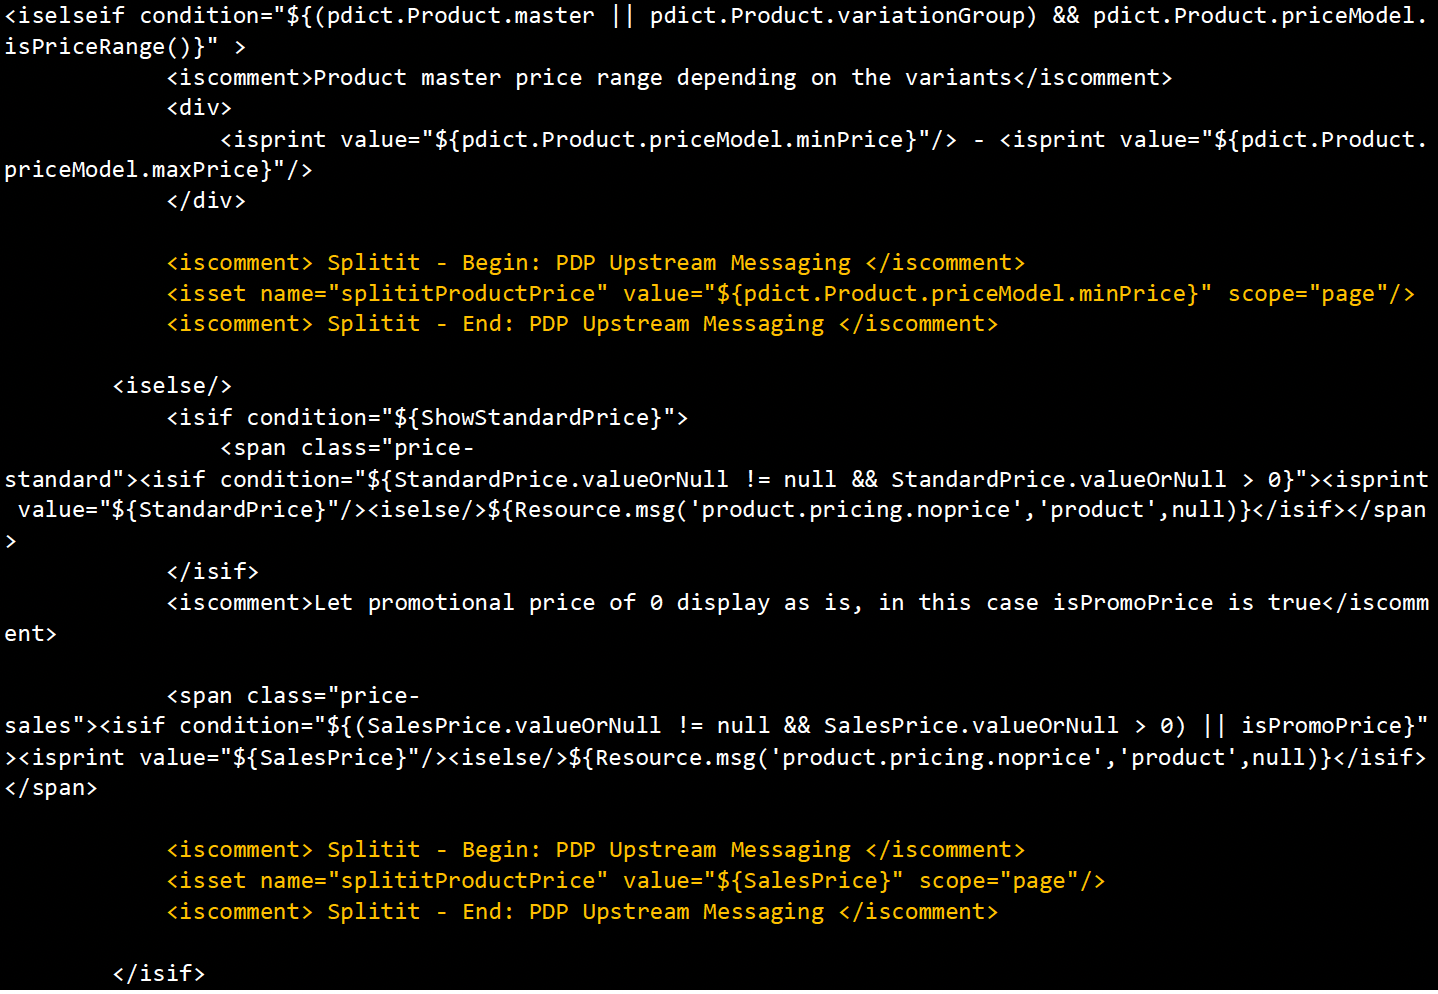
The changes should reflect as shown below:
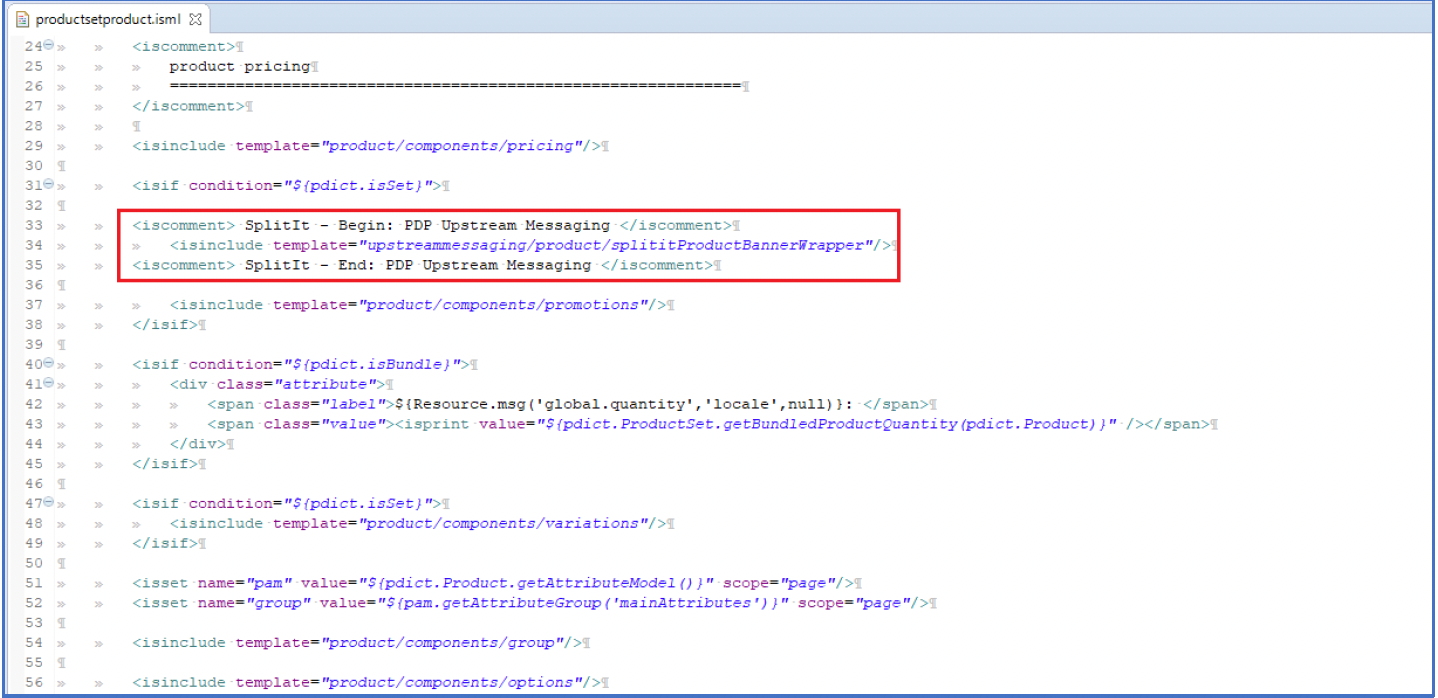
Productsetproduct.isml
File location: sitegenesis-storefront-core-cartridge>>cartridge\templates\default\product\components\productsetproduct.isml
Code changes #1
Add the following lines of code in orange as shown below:

The changes should reflect as shown below:
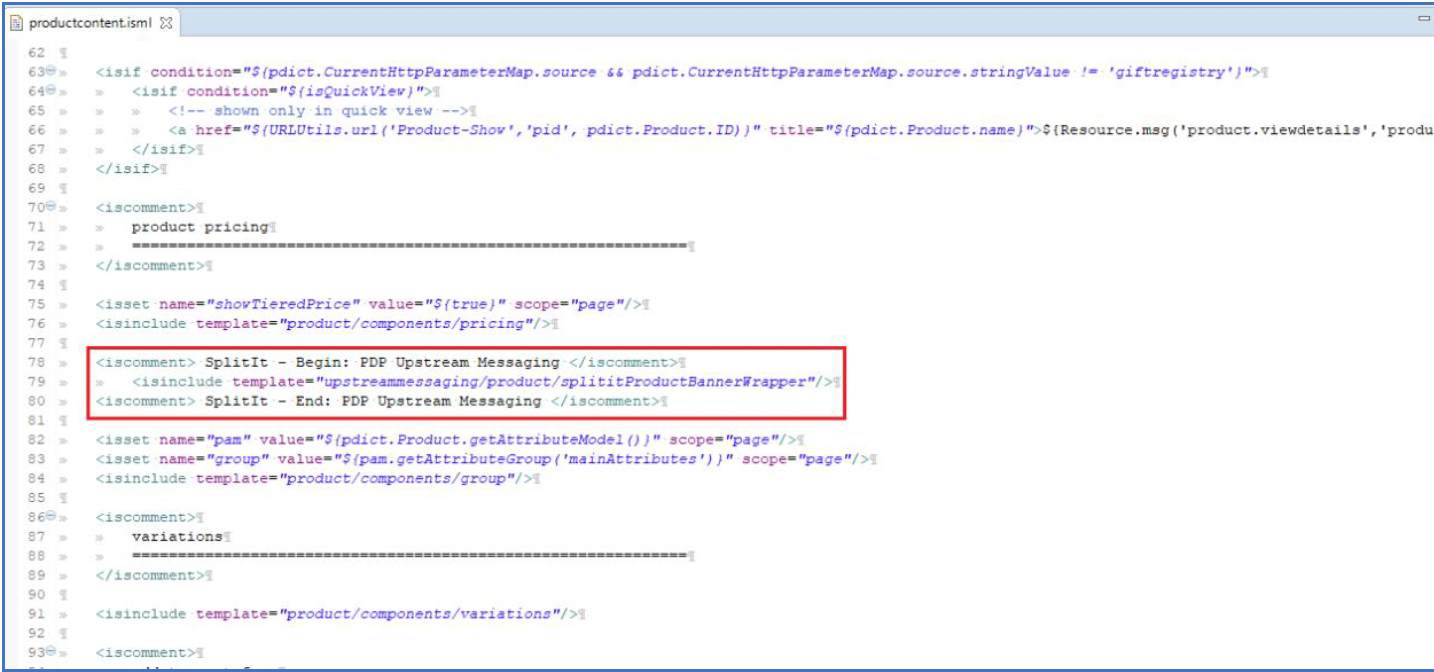
Productcontent.isml
File location: sitegenesis-storefront-core cartridge>>cartridge\templates\default\product\productcontent.isml
Code changes #1:
Add the following lines of code in orange as shown below:

The changes should reflect as shown below:
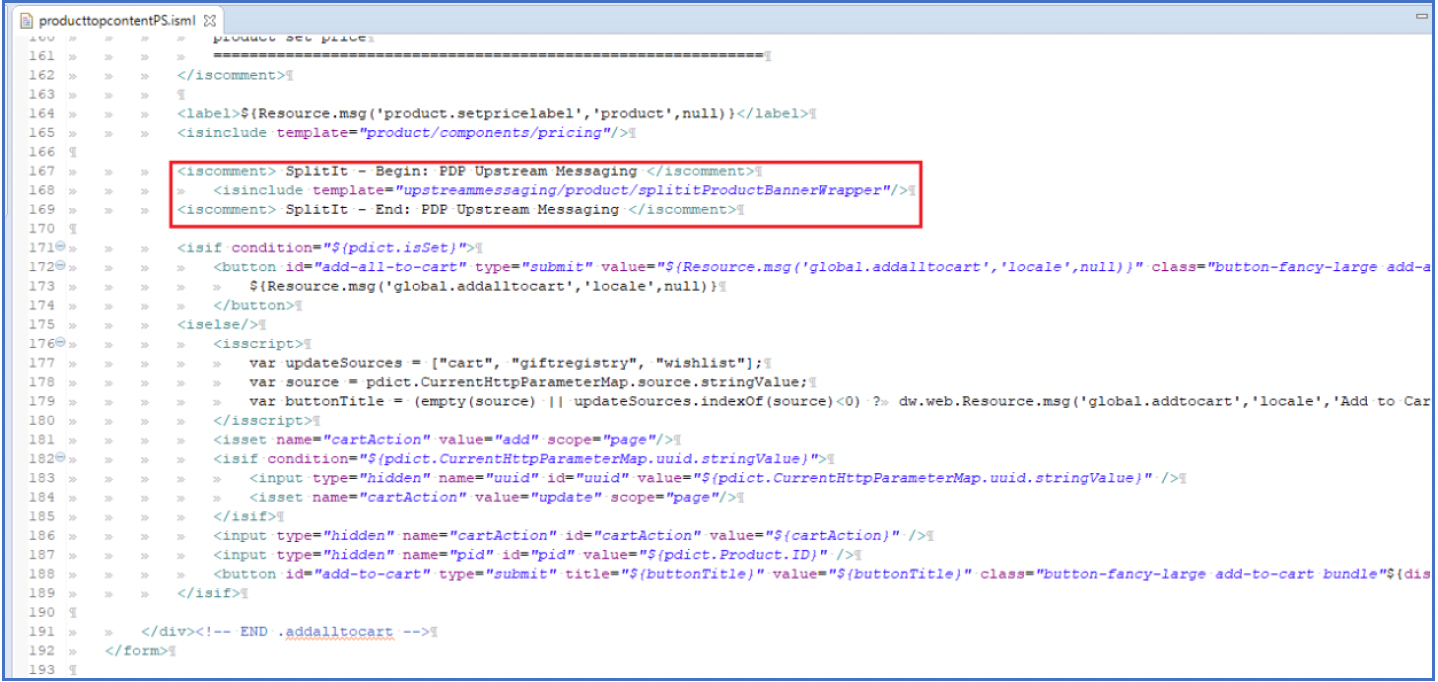
ProducttopcontentPS.isml
File location: sitegenesis-storefront-core-cartridge>>cartridge\templates\default\product\producttopcontentPS.isml
Code changes #1
Add the following lines of code in orange as shown below:

The changes should reflect as shown below:
User Guide
Content Related
This section describes the various features offered by the cartridge that the merchant can leverage to promote Splitit on their website.
Custom CSS
A custom CSS file has been created within the cartridge which can be used by merchants to add CSS specific to Splitit banners or Flex Field widgets.
File Details: in int_splitit_sfra\cartridge\client\default\scss\custom_splitit.scss.
CSS added to the custom CSS file by the merchant will override the Splitit default CSS.
Upstream Messaging Banner
As part of the cartridge, the Upstream messaging banners have been implemented on the following pages
Homepage

Footer

PDP, Cart, Checkout

Splitit Homepage Banner Slot
As part of the Splitit cartridge, a slot splitit-home-page-banner has been created which will render the following Upstream messaging banner. The slot uses the content asset splitit_homepage_banner to render the HTML.

The following code within int_splitit_sfra\cartridge\templates\default\home\homePage.isml renders the slot. Please adjust the placement of the slot as per business requirements.

Splitit Footer Banner
As part of the Splitit cartridge, a content asset splitit_footer_banner has been created which will render the following Upstream messaging banner in the footer:

Messaging
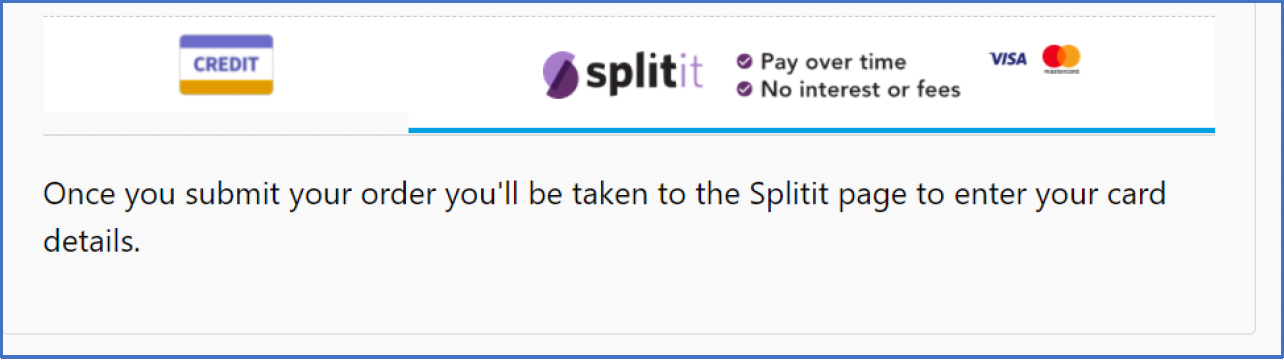
Splitit Hosted Payment Method Tab Content
As part of the Splitit cartridge, a content asset splitit_hostedpayment_paymenttab_message has been created which holds the message to be displayed to the customer on the checkout page when they select the Splitit Hosted Payment option.
If required, please update the messaging as per business requirements.
Splitit Payment Error Message
In the event of a failure during payment processing, the error message displayed to the customer is retrieved from:
int_splitit\cartridge\templates\resources\splitit.properties - payment.error.message
This message can be updated as per business requirements. Please note that the 0 within the existing message is a placeholder for supplementing the error message with the details returned from the API response.
Backend Operations
This section explains the various backend operations that merchants can leverage.
Refund Installments
The cartridge provides the ability for merchants to trigger refunds via code. As SFCC does not offer refund functionality as part of the OOB SFRA code, this code would need to be implemented wherever merchants need to trigger refunds.
Please use the following code to trigger a refund:

| Function Argument | Data Type | Value |
|---|---|---|
| order | dw.order.Order | SFCC Order object |
| refundInstallmentStrategy | String | Splitit refund installment strategy. Please refer here for refund strategies available |
| refundAmount | String | Amount to be refunded |
Start Installments/Capture
For merchants who prefer to start the first installment on order shipment, the cartridge provides the ability for merchants to trigger the same.
Please use the following code to trigger capture the first installment:

| Function Argument | Data Type | Value |
|---|---|---|
| order | dw.order.Order | SFCC Order object |
Cancel Installment Plan
The cartridge provides the ability for merchants to trigger the cancellation of the installment plan via code.
Please use the following code to trigger the cancellation of the installment plan:

| Function Argument | Data Type | Value |
|---|---|---|
| order | dw.order.Order | SFCC Order object |
| refundUnderCancellationStrategy | String | Splitit refund installment strategy. Please refer here for refund strategies available |
Update Installment Plan
When the basket total is updated after an installment plan is initiated, the Splitit installment plan needs to be updated with the new amount to ensure that the installments would be processed correctly.
The cartridge handles a view scenarios based on the OOB SFRA site however if the merchant website has other scenarios that could result in a change in basket total on the checkout, the following code could be utilized to trigger an update on the installment amount:

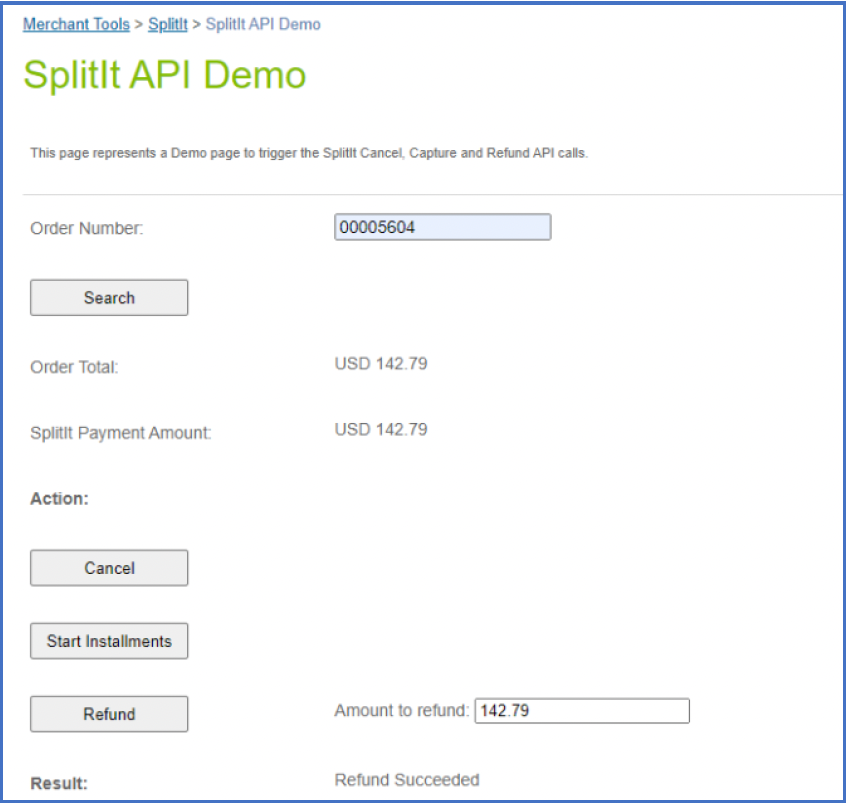
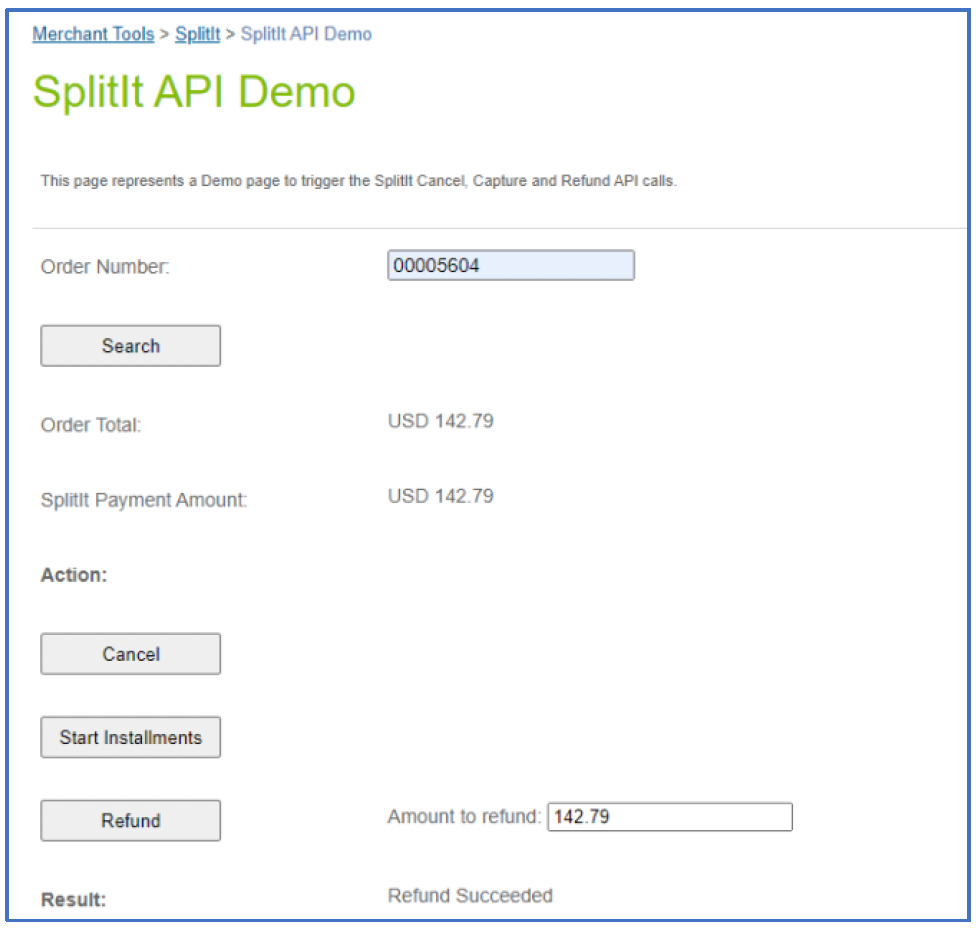
Demo page
The cartridge provides a customer BM module where developers/merchants can test the following actions:
- Cancel Installment Plan
- Refund Installments
- Start Installments
Note: This module will only work on SIG instances and the primary purpose for this is for unit testing.
This section Splitit API Demo can be located within Merchant Tools > Splitit
Testing
Checkout with Splitit Hosted Payment
This section outlines the Splitit Hosted Payment flow on the SiteGenesis storefront.
Prerequisites
- Payment processor Splitit payment method must be configured as SPLITIT_HOSTED
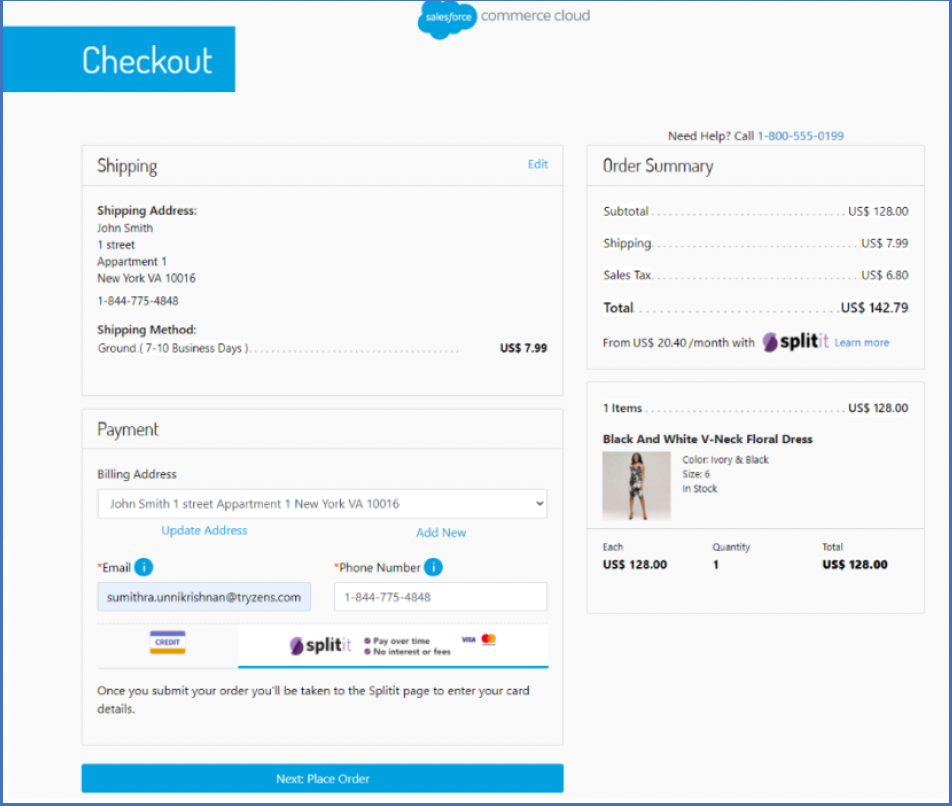
Checkout Page – Billing section
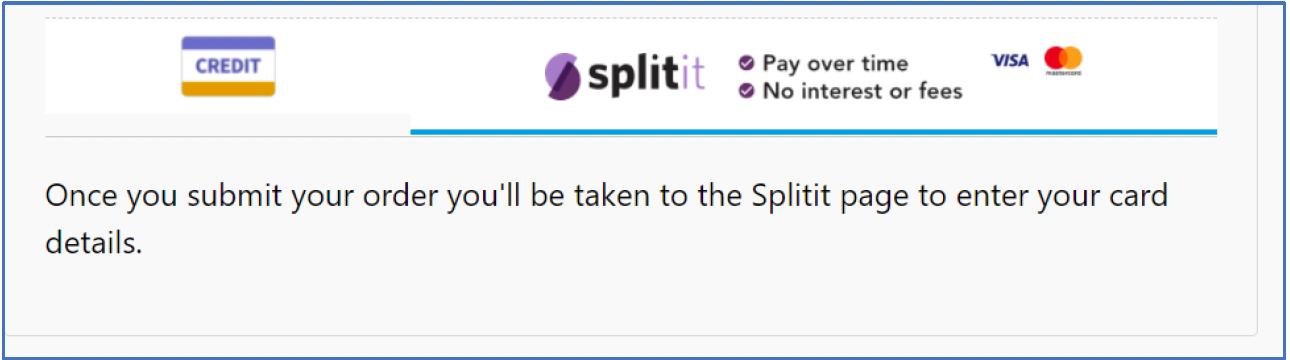
On the billing step, if everything has been configured correctly, Splitit should appear as a payment method.
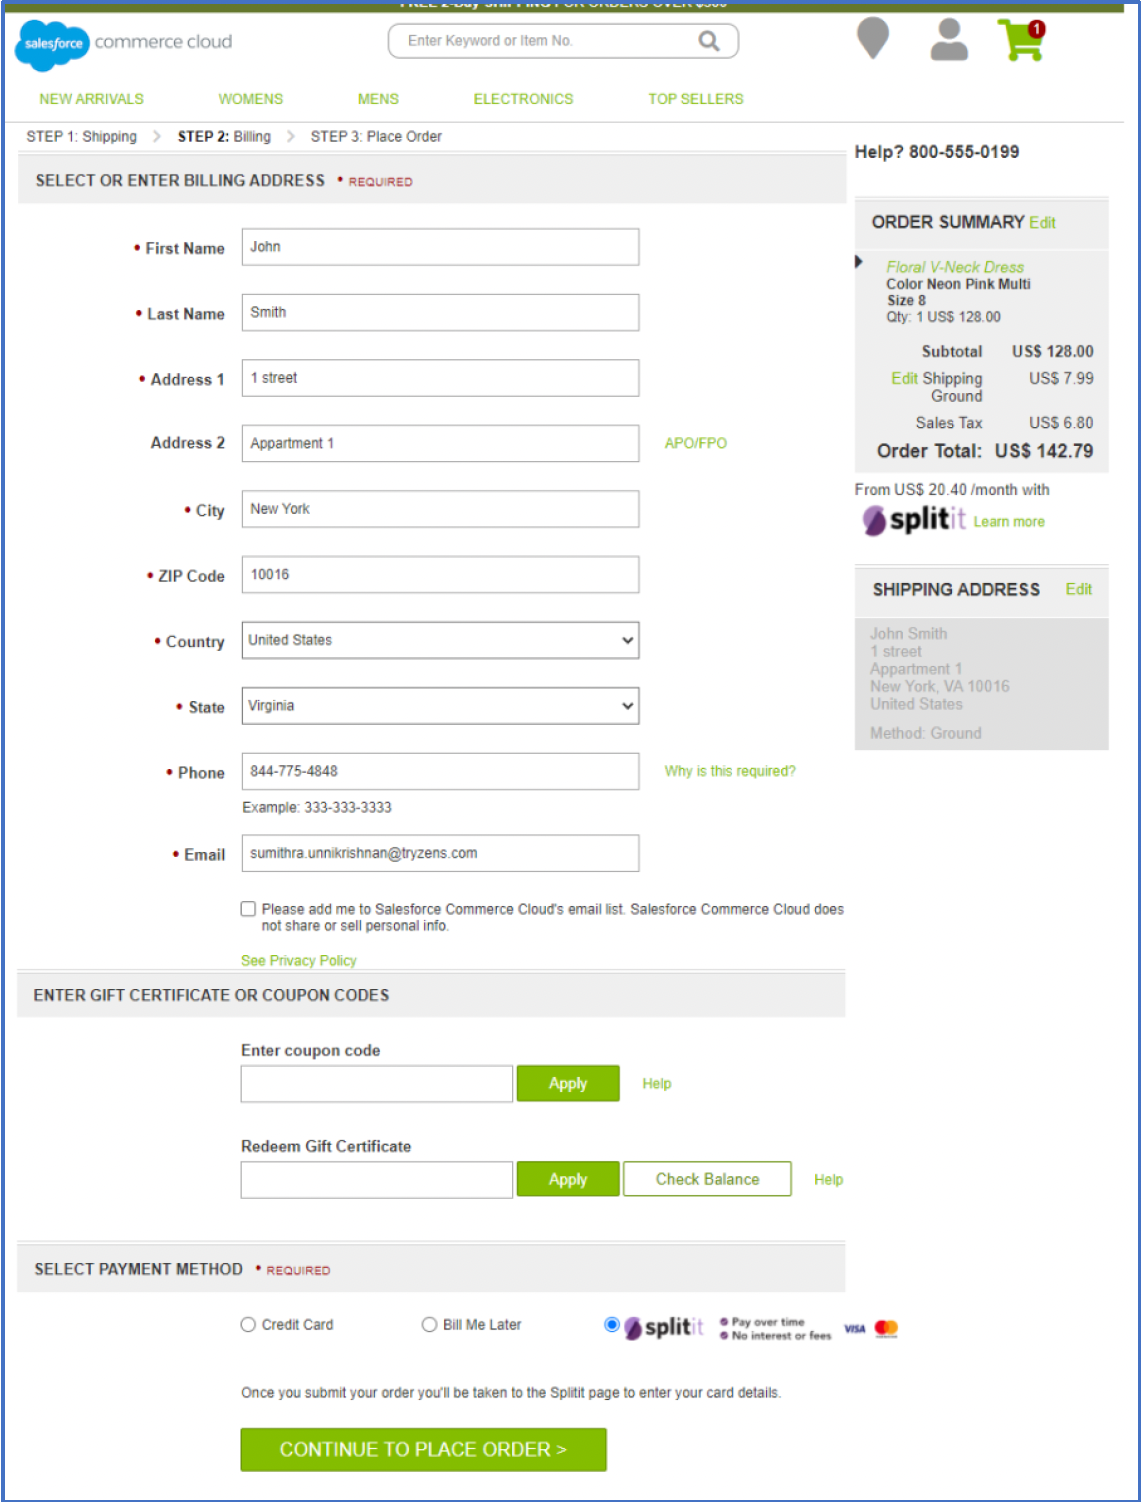
Proceed to place the order once all the necessary details have been filled in.
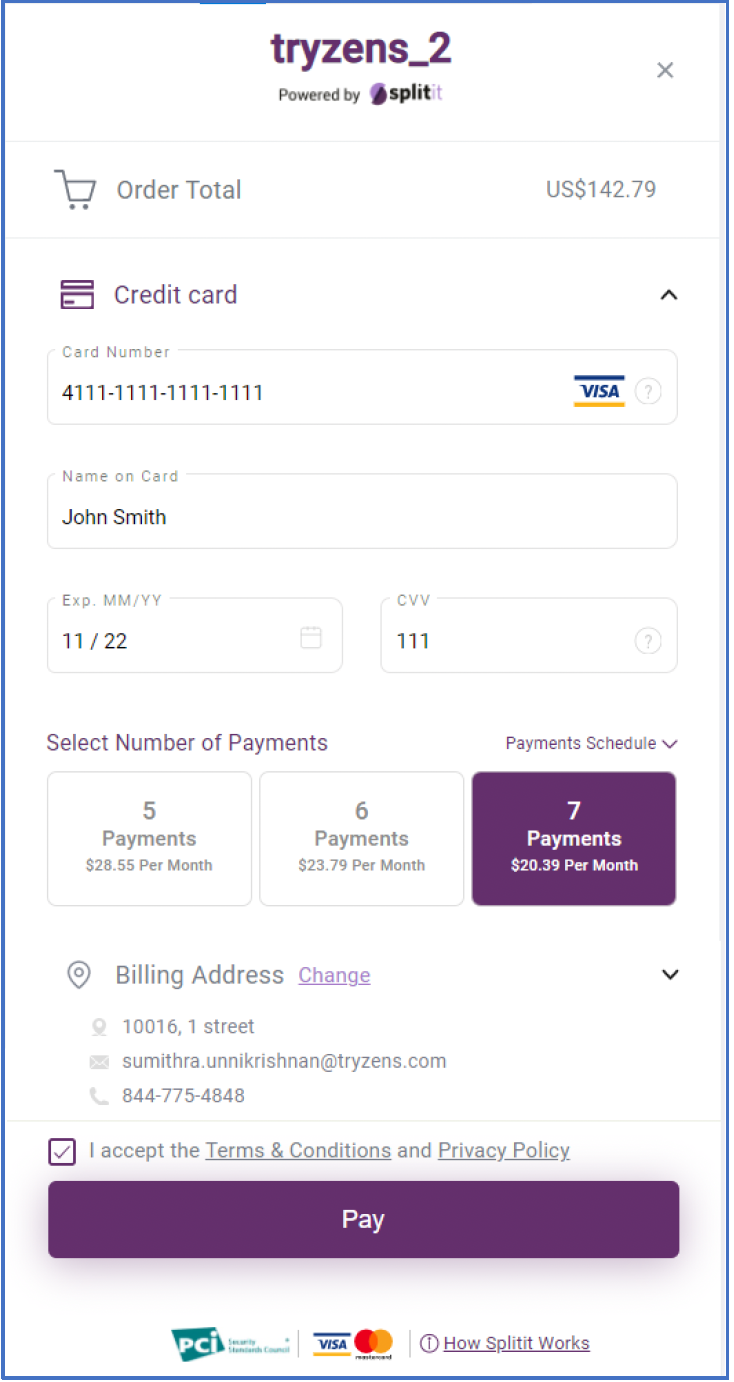
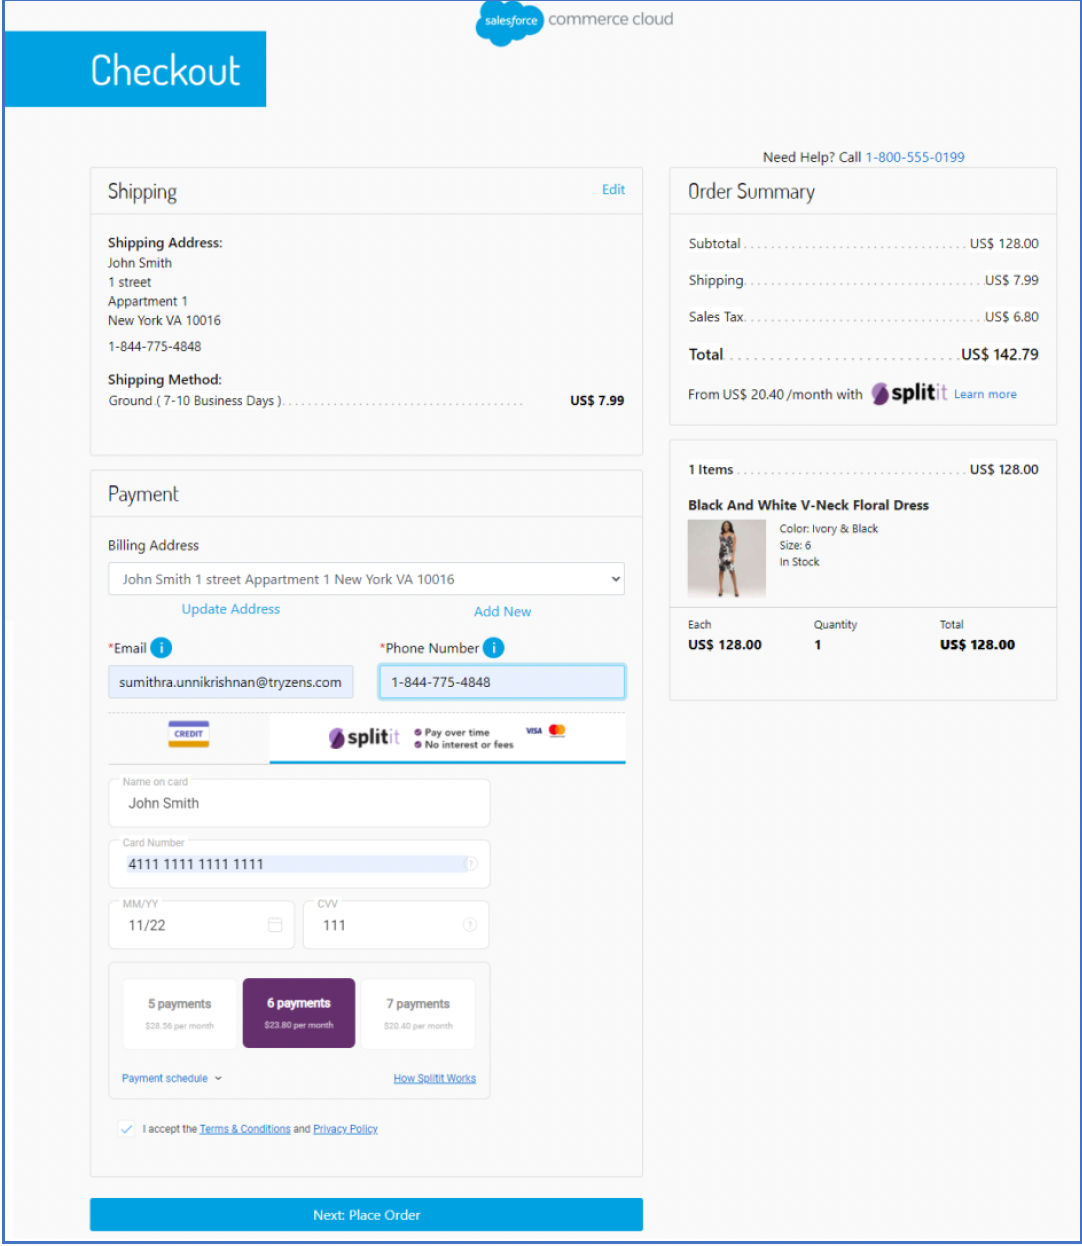
Hosted page
Customers will be redirected to the Splitit Hosted payment page where they can provide their card details and select their preferred number of installments.
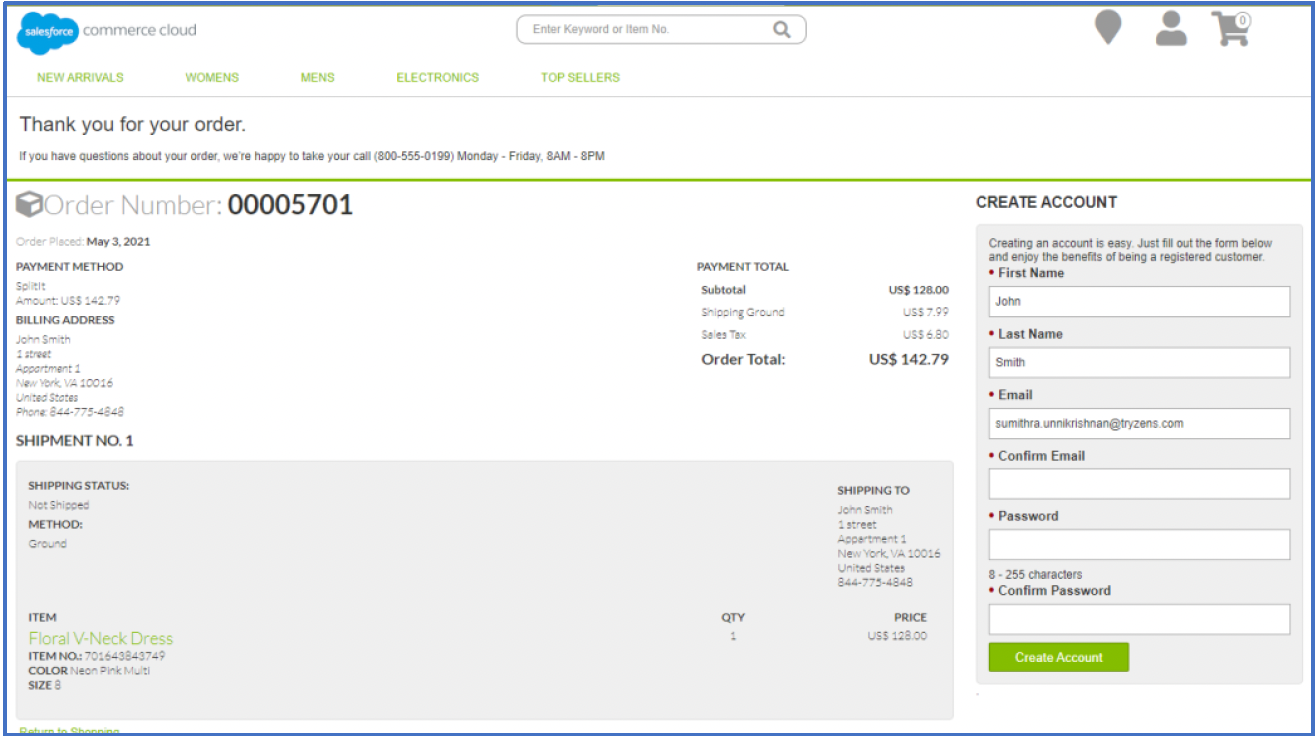
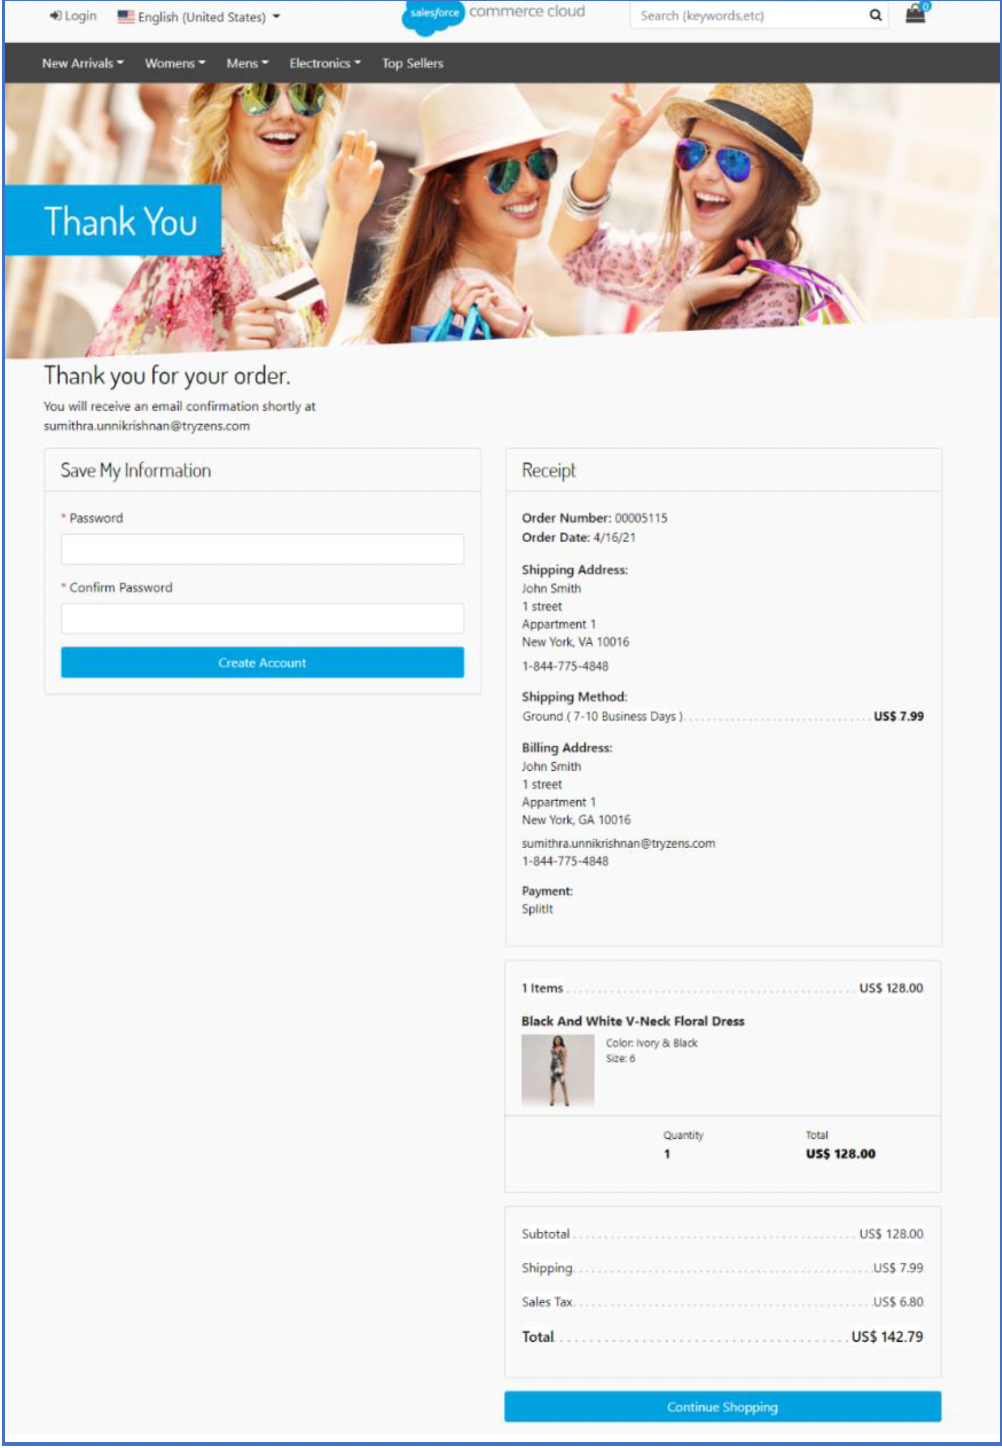
Order confirmation page
Once the payment has been processed successfully, customers will be redirected to the Order confirmation page.
Checkout with Splitit Flex Fields payment
This section outlines the Splitit Hosted Payment flow on the SiteGenesis storefront.
Prerequisites
- Payment processor Splitit payment method must be configured as SPLITIT_FLEXFIELDS
Checkout Page – Billing section
On the billing step, if everything has been configured correctly, Splitit should appear as a payment method.
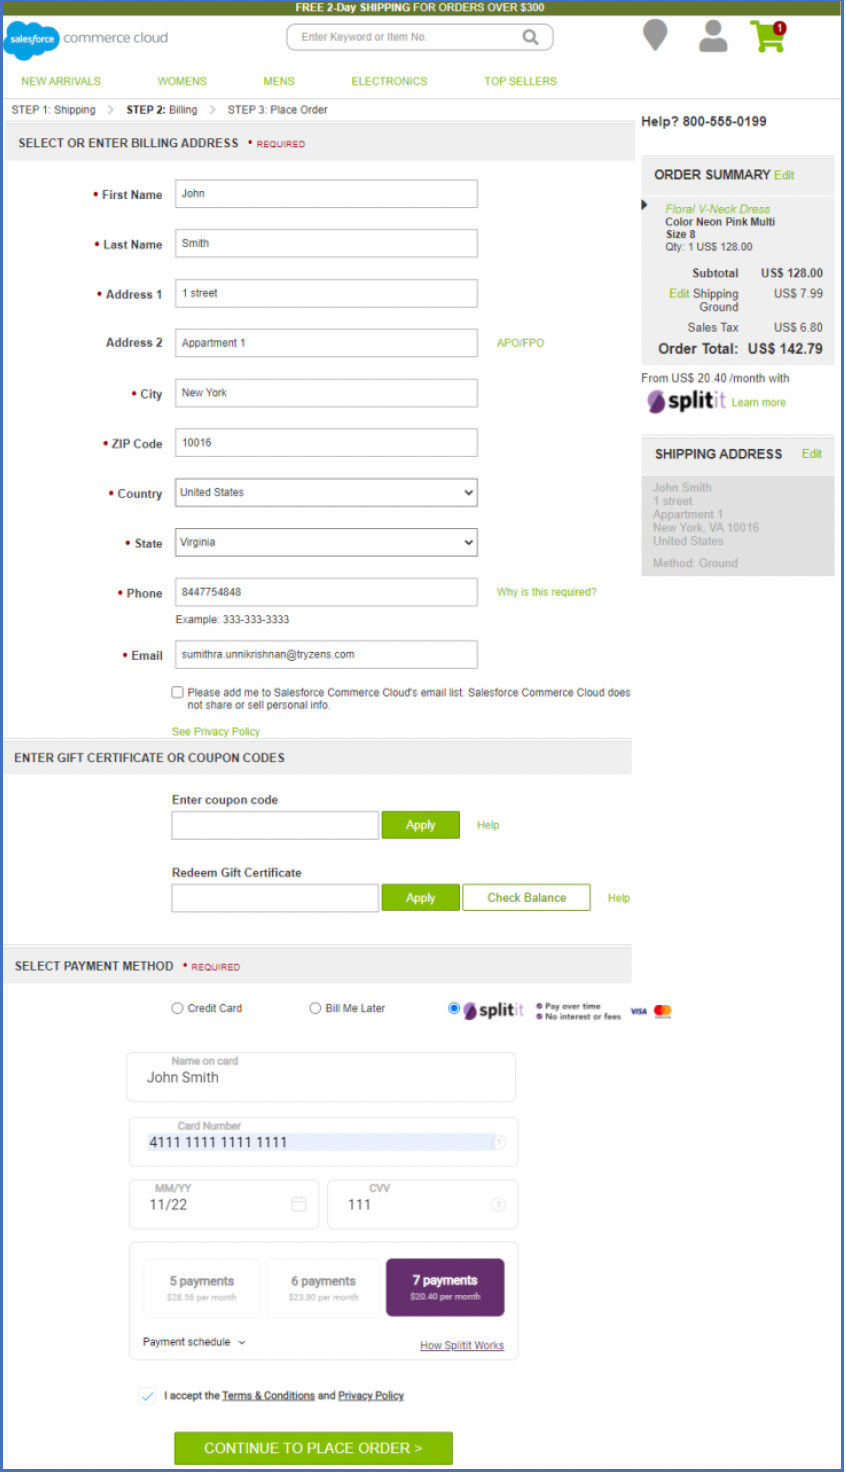
Proceed to place the order once all the necessary details have been filled in.
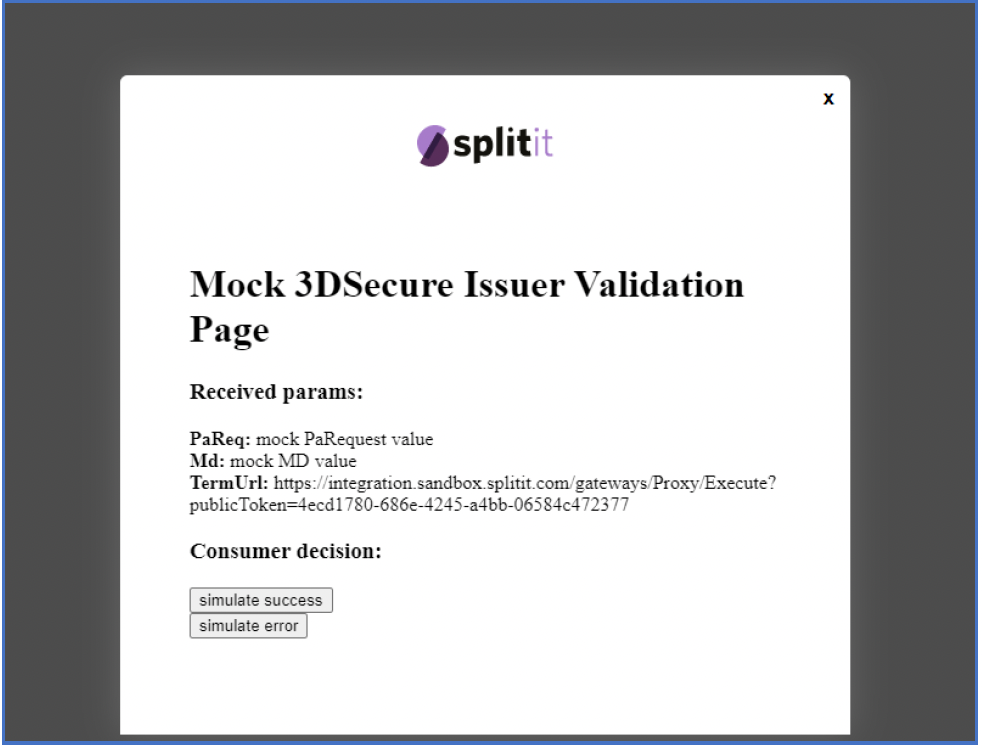
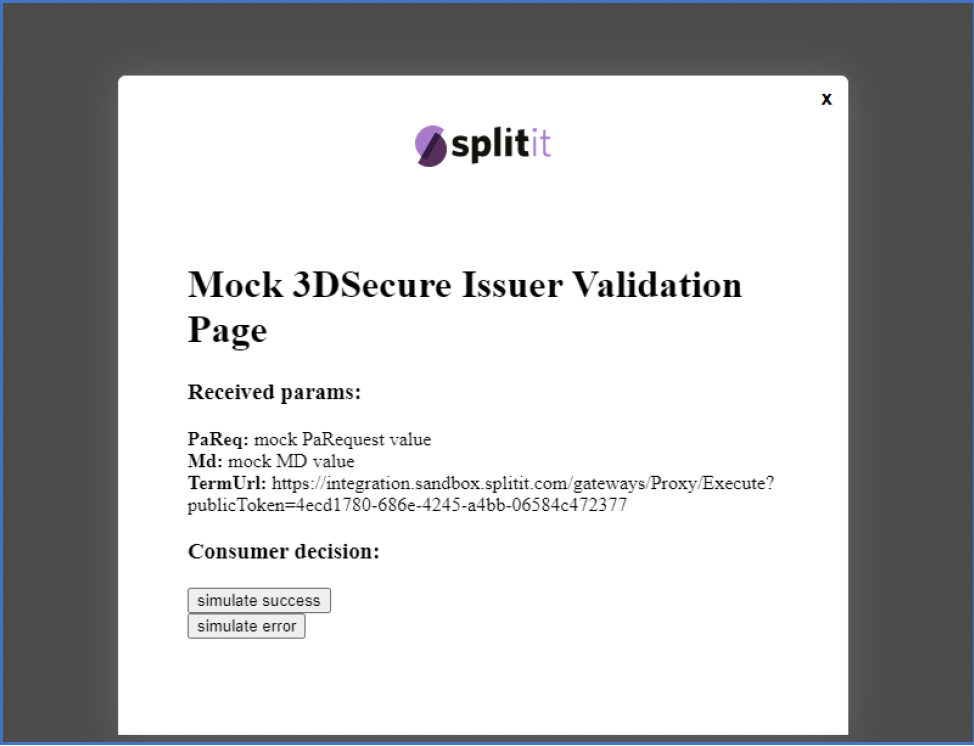
3DS page
If the merchant has enabled 3DS within the Splitit configurations and the customer’s credit card has been enrolled for 3DS, then an intermediate page would be shown to the customers where they need to provide the necessary details.
Customers will be redirected to the Splitit Hosted payment page where they can provide their card details and select their preferred number of installments.
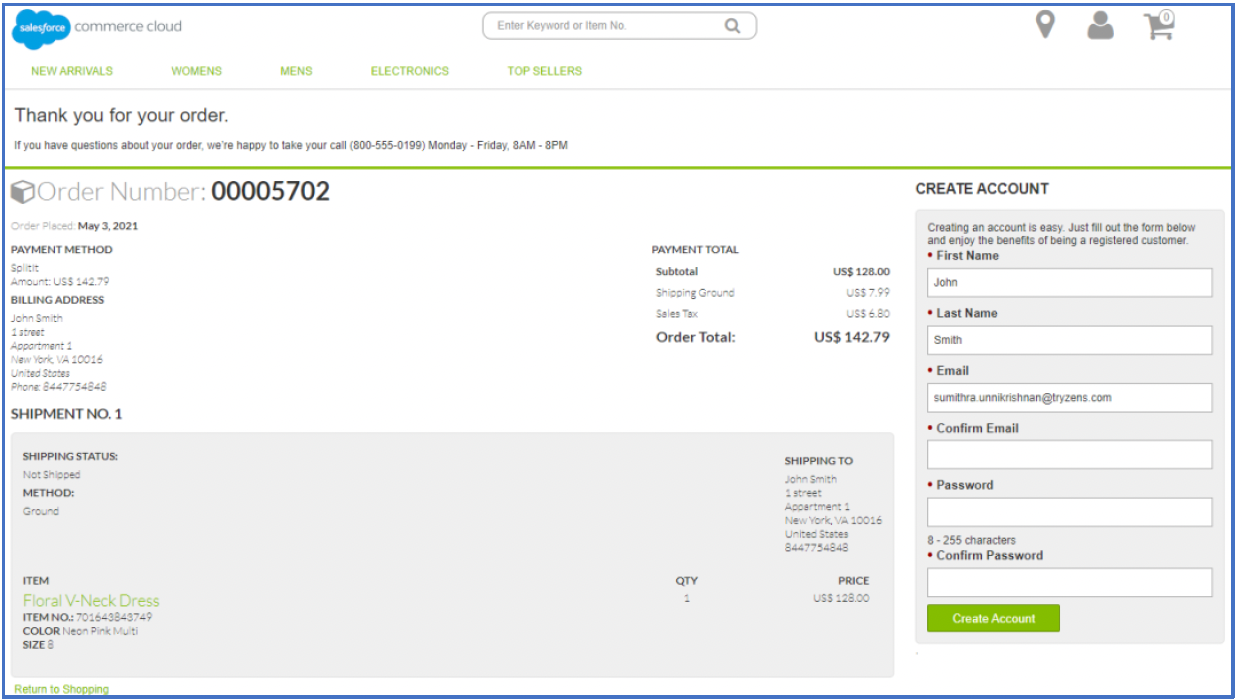
Order confirmation page
Once the payment has been processed successfully, customers will be redirected to the Order confirmation page.
Operations, Maintenance
Data Storage
Custom Objects
The following custom objects have been created as part of the integration.
- SplititGeneralConfigurations
- SplititInstallmentConfigurations
SplititGeneralConfigurations
This custom object holds all the Splitit related configuration details like
- General details
- Installments configuration
- API related
- Upstream messaging
| Scope | site |
| Replicable? | No |
| Retention Period | 0 |
At any given point in time, this will only always contain one record for each Site.
The records within this custom object are maintained by the custom BM module.
IMPORTANT: Records must not be manually created/updated within this custom object as this could result in unexpected results. Always use the custom BM module to configure the Splitit configurations which will internally update the custom objects.
| Attribute ID | Data Type | Description |
|---|---|---|
| isEnabled | Boolean | Enable/Disable Splitit |
| mailRecipients | Set of string | Email address of the recipients in the event of API failure |
| apiKey | String | Splitit API key |
| apiUserName | String | Splitit API username |
| apiPassword | Password | Splitit API password |
| splititEnvironment | Enum of string | Mode of environment. Sandbox/Production |
| productBannerMinThreshold | Set of string | Minimum threshold price required to display the Splitit banner on PDP |
| allowedPagesWithBanner | Enum of string | Configure the pages where Splitit upstream messaging banner displayed the |
| captureStrategy | Enum of string | Configure the auto-capture value |
| allowedPaymentCardTypes | Enum of string | Configure the Splitit allowed payment cards |
| is3DSEnabled | Boolean | Enable/Disable 3DS |
SplititInstallmentConfigurations
This custom object holds details about the various installment options available for the customer based on their order total.
| Scope | site |
| Replicable? | No |
| Retention Period | 0 |
Each record within this custom object is a combination of
- Installment range (lower limit)
- Installment range (upper limit)
- Currency
The records within this custom object are maintained by the custom BM module.
IMPORTANT: Records must not be manually created/updated within this custom object as this could result in unexpected results. Always use the custom BM module to configure the Splitit installment configurations which will internally update the custom objects.
| Attribute ID | Data Type | Description |
|---|---|---|
| currency | String | Configure the currency code. E.g.: USD |
| amountFrom | Integer | Configure the starting amount |
| amountTo | Integer | Configure the maximum amount |
| numberOfInstallments | Set of integers | Configure the number of installments |
SplititWebhookNotifications
This custom object creates a record entry for every CreateSucceeded Webhook notification received from Splitit. The job SplititWebhookNotifications picks the custom object records and processes the notifications. Once the record is processed, the job deletes the record.
| Scope | site |
| Replicable? | No |
| Retention Period | 0 |
| Attribute ID | Values | Description |
|---|---|---|
| type | String | Type of the notification |
| notificationReceivedAt | Datetime | Notification received time |
| encodedOrderNo | String | Encoded order number |
| data | Text | Whole response data |
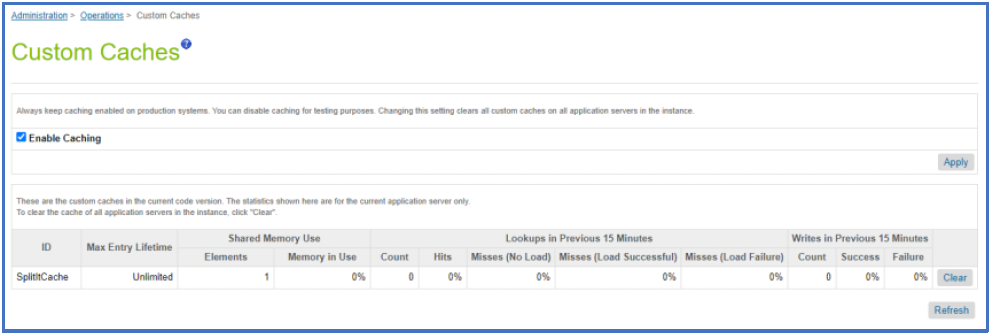
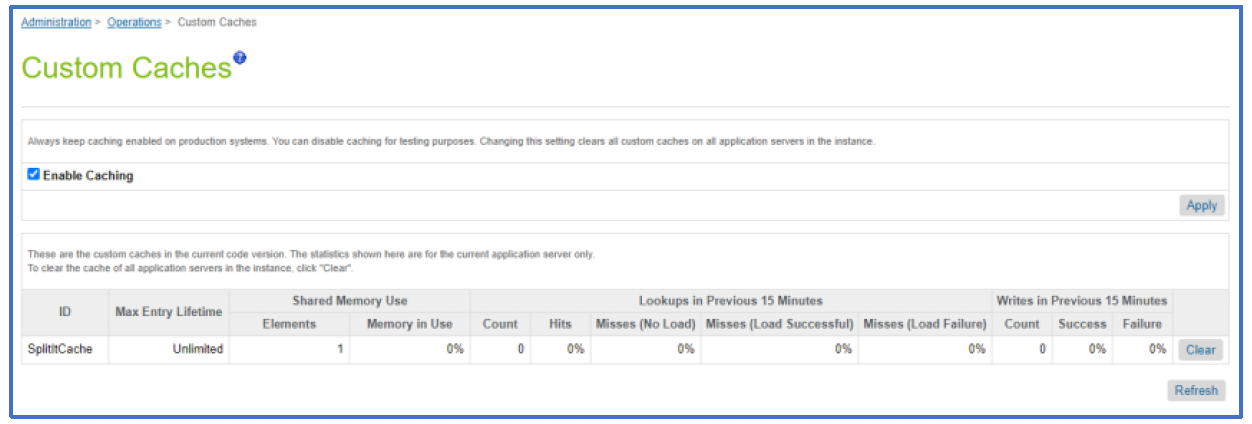
Custom Cache
The Splitit integration leverages the Custom Cache concept within Salesforce Commerce Cloud to retrieve the configuration data efficiently. The cache id for the custom cache created by the cartridge is called SplititCache.
For merchants who have disabled custom cache within Business Manager, the configuration data would be read directly from the custom object. This will not affect the functionality the performance will be slightly lower compared to using custom cache.
Note: When the customer changes the configuration against the payment methods in BM or updates the custom object directly then, the Splitit custom cache must be cleared. Splitit cache is automatically cleared when merchants use the custom BM module.
Availability
In case of problems with the connection to Splitit Payments, please contact the Splitit Payments support department.
Please supply as much information as possible (Merchant account, time, order number, Splitit installment plan number etc.). Also, please check the log files.
Failover / Recovery Process
In case the Splitit service is unavailable, the user will not be able to checkout using Splitit payment methods and an error message would be displayed on the checkout pages.
The service availability can be tracked in SFCC using the Service Status.
Support
In case of problems with the integration, missing features, etc. please contact the Splitit Payments support department or your Splitit account manager.
Appendix
System Extensions
Order
| ID | Purpose |
|---|---|
| splitit_cancelAPIResponse | Stores the response of cancel API |
| splitit_createAPIResponse | Stores the response of create API |
| splitit_initiateAPIResponse | Stores the response of initiate API |
| splitit_installmentPlanNumber | Stores the installment plan number |
| splitit_publicToken | Stores the public token generated by the Splitit |
| splitit_startInstallmentAPIResponse | Stores the response of start installment API |
| splitit_refundAPIResponse | Stores the response of refund API |
| splitit_verifyPaymentAPIResponse | Stores the response of verify payment API |
Basket
| ID | Purpose |
|---|---|
| splitit_initiateAPIResponse | Stores the response of initiate API |
| splitit_installmentPlanNumber | Stores the installment plan number |
| splitit_publicToken | Stores the public token generated by the Splitit |
Locating code changes
Developers can locate code changes done for the Splitit integration by searching for the following comments pattern.
JS
// Splitit - Begin: {Text summarising the changes}
Splitit code changes
// Splitit - End: {Text summarising the changes}
E.g.:

ISML
<iscomment> Splitit - Begin: Cart Upstream Messaging </iscomment>
<isinclude template="upstreammessaging/cart/splititCartBannerWrapper" />
<iscomment> Splitit - End: Cart Upstream Messaging </iscomment>
E.g.:

Known Issues
None.
SFRA
Overview
The Splitit payment cartridge enables a commerce cloud store to integrate with the Splitit payment service. This document provides detailed instructions for installing the Splitit payment cartridge onto a commerce cloud store. The integration is based on the SFRA demo store, on version 5.1.0, provided by SFCC. The integration consists of an archive with contents as described in the below table.
| Name | Purpose |
|---|---|
| cartridges | Contains Splitit integration cartridges |
| cartridges\int_splitit_sfra | This cartridge contains the SFRA specific changes required for Splitit integration |
| cartridges\int_splitit | This cartridge contains the API calls for Splitit integration and common code extensions |
| cartridges\bm_splitit | This cartridge contains Business Manager UI, BM-related system extensions to add/update general, API, payment, and upstream messaging configurations |
| cartridges\bm_splitit_demo | This cartridge contains BM-related system extensions for testing and validating payment flows (cancel, refund, and capture of charges). This cartridge will only work in Developer sandboxes. |
| metadata | Contains custom objects and settings required for the integration |
| documentation | Contains this document “Splitit SFRA Integration Document” |
Features
The integration described in this document supports the following features:
- Embedded card form checkout using Splitit Flex Fields payment
- Hosted page checkout using Splitit Hosted payment.
- Installment banners that have been implemented using Splitit Upstream Messaging
- Ability to enable/disable the payment methods based on currency and country.
- Ability to configure Splitit settings via a customer-friendly UI interface.
Splitit Flex Fields Payment
Splitit's Flex Fields is a unique product that allows you to fully integrate Splitit into the checkout process on your website, both stylistically and functionally. Flex Fields are individual iFrames plugged directly into the Splitit servers, however you can extensively customize them. For this customization, we have implemented an intermediate page for the checkout process.
Splitit Hosted Payment
Splitit's Hosted Payment Solution features a full redirect from the merchant site to Splitit's. To use it, fetch a URL from the Splitit API then send your customer there to enter credit card data. After the customer is done checking out, based on the outcome of the transaction, the customer is redirected to the appropriate endpoint within SFCC (success, cancel, or failure).
Splitit Upstream Messaging
Splitit's Upstream Messaging informs the customer early on in their journey on your website that Splitit will be available at checkout. It uses banners, price breakdowns, and Splitit messages that can be added to your home page, footer, product page, cart page, and checkout pages.
Payment Types Supported
Credit cards supported currently
- Visa
- Mastercard
Limitations, Constraints
Please check with Splitit to find out which languages are currently supported.
Compatibility
Compatible with Commerce Cloud Platform Release 21.2, SFRA 6.0.0.
Installation
Cartridges
Upload the following cartridge to the BM code version
- int_splitit_sfra
- int_splitit
- bm_splitit
- bm_splitit_demo (only on developer sandboxes)
Configure the cartridge path as shown in the below tables. Cartridges should be added to the beginning of the cartridge path.
| Site Cartridge Path | int_splitit_sfra:int_splitit |
| BM Cartridge Path | int_splitit:bm_splitit:bm_splitit_demo |
Metadata
All BM configurations related to the below components have been configured within metadata/site-template folder
- System/Custom object definitions
- Payment Methods
- Payment Processors
- Services
- Jobs
- Content
Please follow the below steps to import the BM configurations for the above-mentioned components
- Locate the folder metadata in the installation package.
- Review the contents within site-template folder.
- Change the site ID under path site-template\sites to your site ID.
- Change the library ID under path site-template\libraries to your library ID
- Archive the folder to ‘site-template.zip’ and the Import the file via Site Import & Export
Services
Two new services, “splitit.http.sandbox” and “splitit.http.production”, has been created as part of the integration.
| Service ID | Service Profile | Service Credential |
|---|---|---|
| splitit.http.sandbox | splitit.http.sandbox.profile | splitit.http.sandbox.credentials |
| splitit.http.production | splitit.http.production.profile | splitit.http.production.credentials |
The URLs for the sandbox and production endpoints have been configured within the cartridge.
| Environment | URL |
|---|---|
| Non-production instances | https://webapi.sandbox.splitit.com/api |
| Production instances | https://webapi.splitit.com/api |
Payment Processor
Two new payment processors have been created as part of the cartridge.
- SPLITIT_FLEXFIELDS
- SPLITIT_HOSTED
| Payment Processor ID | Purpose |
|---|---|
| SPLITIT_FLEXFIELDS | Payment processor for processing transactions using the FlexFields (embedded card form) integration |
| SPLITIT_ HOSTED | Payment processor for processing transactions using the Hosted page (external redirection) integration |
Payment Methods
A new payment method, Splitit has been created as part of the cartridge.
Jobs
A new job SplititWebhookNotifications has been created as part of the cartridge and is available under Administration > Operations > Jobs. This job processes the CreateSucceeded webhook notifications received from Splitit and processes them in recurring intervals.
Please follow the below steps to configure the job:
- Navigate to Administration > Operations > Jobs > SplititWebhookNotifications
- Select the Schedule and History tab.
- Check the Enabled checkbox.
- Set the Trigger as Recurring Interval
- Configure the start date and recurring interval duration. It is recommended that the recurring interval is >= 5 minutes.
The below image is for reference purpose only.
- Click on the Job Steps tab.
- Click on Scope and select the relevant sites
Content
The following content assets have been created as part of the cartridge
- splitit_homepage_banner
- splitit_footer_banner
- splitit_hostedpayment_paymenttab_message
The following content slots have been created as part of the cartridge
- splitit-home-page-banner
Custom BM Module
A custom BM module has been developed to allow merchants to be able to configure all the Splitit related configurations in one place. This module has been developed using custom objects and not site preferences due to limitations around data replication and API availability for updating site preferences.
IMPORTANT: The custom objects are non-replicable. Hence please complete Splitit production configurations directly on the SFCC Production Instance itself. Configurations through this module cannot be replicated via data replication.
Please follow the below steps to provide permissions to view this BM module.
- Navigate to Administration > Organization > Roles & Permissions.
- Select the role that you would want to give access to the BM module.
- Select the Business Manager Modules tab.
- Select all the relevant sites where Splitit would be configured.
- Select the following modules from the popup and apply the changes

- Confirm that the following section is visible in the Merchant Tools overlay
Configurations
The below sections explain how to set up the Splitit integration-related configurations within Business Manager.
Payment Methods
Please refer to the below table while configuring the Splitit payment method.
| Payment Method Setting | Value | Description |
|---|---|---|
| Payment Processor | SPLITIT_FLEXFIELDS OR SPLITIT_HOSTED | Please select the relevant Payment Processor based on your mode of integration – FlexFields or Hosted |
| Min/Max Payment Ranges | Do not configure | Do not configure the min/max payment ranges for currencies. This will be handled via a separate set of configurations. |
| Currencies | Based on requirements | Please configure the applicable currencies based on your requirements. |
| Countries | Based on requirements | Please configure the applicable countries based on your requirements. |
IMPORTANT: When any of the Payment Method settings have been modified, ensure that the Splitit custom cache is always cleared. Please refer to this link for more details regarding custom cache.
General Configurations
The General Configurations section within Merchant Tools > Splitit allows merchants to configure the following:
| Configuration | Purpose |
|---|---|
| Enable Splitit On/Off | Controls whether the Splitit integration is enabled for the site |
| API failure email recipients | Configure email addresses where notifications regarding email failure should be sent to. |
Splitit API Configurations
The API Configurations section within Merchant Tools > Splitit allows merchants to configure the following:
| Configuration | Purpose |
|---|---|
| API Username | This configuration is used within the Login API call which generates the Splitit session id. The value for this configuration can be retrieved from Splitit Dashboard > Credentials > Splitit Integration Credentials > API User Name |
| API Password | This configuration is used within the Login API call which generates the Splitit session id. The value for this configuration can be retrieved from Splitit Dashboard > Credentials > Splitit Integration Credentials > API User Password |
| API Key | This configuration is set within the header of all the Splitit API calls (except Login). The value for this configuration can be retrieved from Splitit Dashboard > Credentials > Gateway Provider Credentials > Payment Terminal API Key |
| Splitit Environment | Configure the Splitit environment this integration would use. On Production SFCC instances, this must be set to Production. On non-production SFCC instances, this must be set to Sandbox |
The Check Credentials button when clicked validates the following
- Format of API Key (does not check if the API key value is valid)
- API User Name and API Password against the Splitit Environment selected
Splitit Payment Configurations
The Payment Configurations section within Merchant Tools > Splitit allows merchants to configure the following:
| Configuration | Purpose |
|---|---|
| Enable 3DS | This configuration is used to enable/disable 3DS validation while processing payments. |
| Payment Action | This configuration indicates whether the first installment must be captured on order placement or once the order is dispatched. |
Splitit Upstream Messaging Configurations
The Upstream Messaging Configurations section within Merchant Tools > Splitit allows merchants to configure the following
| Configuration | Purpose |
|---|---|
| Minimum amount to display the Splitit installment price on PDP | This configuration determines what is the minimum product price required to display the Upstream messaging banners on PDP. Currency-specific amounts can be set. All currencies enabled for the site will be listed here. |
| Upstream messaging selection | This is a multi-select configuration with which merchants can decide which pages should display the Upstream Messaging Banner. |
| Footer allowed card brands | This is a multi-select configuration that indicates which of the card brand logos must be displayed within the Footer upstream messaging banner. The values selected here would also be used to render the card logos shown against the Splitit payment method tab on the checkout page. |
Splitit Installment Configurations
The Installment Configurations section within Merchant Tools > Splitit allows merchants to configure the following:
| Configuration | Purpose |
|---|---|
| Installment Configurations Min/Max currency | This is a currency dropdown that lists all the currencies enabled on the site. Merchants can configure currency-specific installment ranges and the applicable number of installments by selecting the currency from this dropdown. |
| Amount From | Indicates the lower limit of the order total range. |
| Amount To | Indicates the upper limit of the order total range. |
| No. of Installments | Comma-separated list of installment options to be presented to the customer on the checkout page for the particular range |
Steps to be followed while configuring installment range and options:
- Pre-determine the different order total ranges and the number of installments to be presented to the customers on the checkout page.
- Select the currency from the currency dropdown.
- Using the Add button creates an entry for the range.
- Enter the lower amount of the order total range within the Amount From column
- Enter the upper amount of the order total range within the Amount To column
- Enter the number of installments to be presented to the customers for this particular order total range.
- Repeat steps 4 – 6 if more than one range is applicable as per business requirements.
- Click on Save
- Repeat steps 1 – 8 for other currencies (if applicable)
User Guide
Content related
This section describes the various features offered by the cartridge that the merchant can leverage to promote Splitit on their website.
Custom CSS
A custom CSS file has been created within the cartridge which can be used by merchants to add CSS specific to Splitit banners or flex field widgets.
File Details: in int_splitit_sfra\cartridge\client\default\scss\custom_splitit.scss.
CSS added to the custom CSS file by the merchant will override the Splitit default CSS.
Upstream Messaging Banner
As part of the cartridge, the Upstream messaging banners have been implemented on the following pages:
Homepage

Footer
PDP, Cart, Checkout

Splitit Homepage Banner Slot
As part of the Splitit cartridge, a slot splitit-home-page-banner has been created which will render the following Upstream messaging banner. The slot uses the content asset splitit_homepage_banner to render the HTML.

The following code within int_splitit_sfra\cartridge\templates\default\home\homePage.isml renders the slot. Please adjust the placement of the slot as per business requirements.
<iscomment> Splitit - Begin: Homepage Upstream Messaging </iscomment>
<isinclude template="upstreammessaging/homepage/splititHomePageBanner" />
<iscomment> Splitit - End: Homepage Upstream Messaging </iscomment>
Splitit Footer Banner
As part of the Splitit cartridge, a content asset splitit_footer_banner has been created which will render the following Upstream messaging banner in the footer.
Messaging
Splitit Hosted Payment Method Tab Content
As part of the Splitit cartridge, a content asset splitit_hostedpayment_paymenttab_message has been created which holds the message to be displayed to the customer on the checkout page when they select the Splitit Hosted Payment option.
If required, please update the messaging as per business requirements.
Splitit Payment Error Message
In the event of a failure during payment processing, the error message displayed to the customer is retrieved from:
int_splitit\cartridge\templates\resources\splitit.properties - payment.error.message
This message can be updated as per business requirements. Please note that the 0 within the existing message is a placeholder for supplementing the error message with the details returned from the API response.
Backend Operations
This section explains the various backend operations that merchants can leverage.
Refund Installments
The cartridge provides the ability for merchants to trigger refunds via code. As SFCC does not offer refund functionality as part of the OOB SFRA code, this code would need to be implemented wherever merchants need to trigger refunds.
Please use the following code to trigger a refund:
// Splitit-Begin: Trigger refund
var splititServices = require('int_splitit/cartridge/scripts/services/splititServices');
var apiResponse = splititServices.refund(order, refundInstallmentStrategy, refundAmount);
// Splitit-End: Trigger refund
| Function Argument | Data Type | Value |
|---|---|---|
| order | dw.order.Order | SFCC Order object |
| refundInstallmentStrategy | String | Splitit refund installment strategy. Please refer to https://developers.splitit.com/api/v3/refund-a-plan for refund strategies available |
| refundAmount | String | Amount to be refunded |
Start Installments / Capture
For merchants who prefer to start the first installment on order shipment, the cartridge provides the ability for merchants to trigger the same. s Please use the following code to trigger capture the first installment:
// Splitit-Begin: Trigger capture / start installment
var splititServices = require('int_splitit/cartridge/scripts/services/splititServices');
var apiResponse = splititServices.startInstallment(order);
// Splitit-End: Trigger capture / start installment
| Function Argument | Data Type | Value |
|---|---|---|
| order | dw.order.Order | SFCC Order object |
Cancel Installment Plan
The cartridge provides the ability for merchants to trigger the cancellation of the installment plan via code.
Please use the following code to trigger the cancellation of the installment plan:
// Splitit-Begin: Trigger Cancel Installment Plan
var splititServices = require('int_splitit/cartridge/scripts/services/splititServices');
var apiResponse = splititServices.cancel(order, refundUnderCancellationStrategy);
// Splitit-End: Trigger Cancel Installment Plan
| Function Argument | Data Type | Value |
|---|---|---|
| order | dw.order.Order | SFCC Order object |
| refundUnderCancellationStrategy | String | Refund strategy to be used when canceling the installment plan. Please refer to https://developers.splitit.com/api/v3/refund-a-plan for possible values. |
Update Installment Plan
When the basket total is updated after an installment plan is initiated, the Splitit installment plan needs to be updated with the new amount to ensure that the installments would be processed correctly.
The cartridge handles a view scenarios based on the OOB SFRA site however if the merchant website has other scenarios that could result in a change in basket total on the checkout, the following code could be utilised to trigger an update on the installment amount.
//Splitit-Begin: Update installment amount on plan
$('body').trigger('splitit:updateInstallmentAmount');
//Splitit-End: Update installment amount on plan
Demo page
The cartridge provides a customer BM module where developers/merchants can test the following actions
- Cancel Installment Plan
- Refund Installments
- Start Installments
Note: This module will only work on SIG instances and the primary purpose for this is for unit testing. This section Splitit API Demo can be located within Merchant Tools > Splitit
Testing
Checkout with Splitit Hosted payment
This section outlines the Splitit Hosted Payment flow on the RefArch storefront.
Prerequisites
- Payment processor Splitit payment method must be configured as SPLITIT_HOSTED.
Checkout Page – Billing section
On the billing step, if everything has been configured correctly, Splitit should appear as a payment method.
Proceed to place the order once all the necessary details have been filled in.
Hosted Page
Customers will be redirected to the Splitit Hosted payment page where they can provide their card details and select their preferred number of installments.

Order Confirmation Page
Once the payment has been processed successfully, customers will be redirected to the Order confirmation page.

Checkout with Splitit Flex Fields payment
This section outlines the Splitit Flex Fields Payment flow on the RefArch storefront.
Prerequisites
- Payment processor Splitit payment method must be configured as SPLITIT_FLEXFIELDS.
Checkout Page – Billing section
On the billing step, if everything has been configured correctly, Splitit should appear as a payment method.
Proceed to place the order once all the necessary details have been filled in.
3DS Page
If the merchant has enabled 3DS within the Splitit configurations and the customer’s credit card has been enrolled for 3DS, then an intermediate page would be shown to the customers where they need to provide the necessary details.
Customers will be redirected to the Splitit Hosted payment page where they can provide their card details and select their preferred number of installments.
Order confirmation page
Once the payment has been processed successfully, customers will be redirected to the Order confirmation page.
Operations, Maintenance
Data Storage
Custom Objects
The following custom objects have been created as part of the integration.
- SplititGeneralConfigurations
- SplititInstallmentConfigurations
SplititGeneralConfigurations
This custom object holds all the Splitit related configuration details like
- General details
- Installments configuration
- API related
- Upstream messaging
| Scope | Site |
| Replicable? | No |
| Retention Period | 0 |
At any given point in time, this will only always contain one record for each Site.
The records within this custom object are maintained by the custom BM module.
IMPORTANT: Records must not be manually created/updated within this custom object as this could result in unexpected results. Always use the custom BM module to configure the Splitit configurations which will internally update the custom objects.
| Attribute ID | Data Type | Description |
|---|---|---|
| isEnabled | Boolean | Enable/Disable Splitit |
| mailRecipients | Set of string | Email address of the recipients in the event of API failure |
| apiKey | String | Splitit API key |
| apiUserName | String | Splitit API username |
| apiPassword | Password | Splitit API password |
| splititEnvironment | Enum of string | Mode of environment. Sandbox/Production |
| productBannerMinThreshold | Set of string | Minimum threshold price required to display the Splitit banner on PDP |
| allowedPagesWithBanner | Enum of string | Configure the pages where Splitit upstream messaging banner displayed the |
| captureStrategy | Enum of string | Configure the auto-capture value |
| allowedPaymentCardTypes | Enum of string | Configure the Splitit allowed payment cards |
| is3DSEnabled | Boolean | Enable/Disable 3DS |
SplititInstallmentConfigurations
This custom object holds details about the various installment options available for the customer based on their order total.
| Scope | Site |
| Replicable? | No |
| Retention Period | 0 |
Each record within this custom object is a combination of
- Installment range (lower limit)
- Installment range (upper limit)
- Currency
The records within this custom object are maintained by the custom BM module.
IMPORTANT: Records must not be manually created/updated within this custom object as this could result in unexpected results. Always use the custom BM module to configure the Splitit installment configurations which will internally update the custom objects.
| Attribute ID | Data Type | Description |
|---|---|---|
| currency | String | Configure the currency code. E.g.: USD |
| amountFrom | Integer | Configure the starting amount |
| amountTo | Integer | Configure the maximum amount |
| numberOfInstallments | Set of integers | Configure the number of installments |
SplititWebhookNotifications
This custom object creates a record entry for every CreateSucceeded Webhook notification received from Splitit. The job SplititWebhookNotifications picks the custom object records and processes the notifications. Once the record is processed, the job deletes the record.
| Scope | Site |
| Replicable? | No |
| Retention Period | 0 |
| Attribute ID | Values | Description |
|---|---|---|
| type | String | Type of the notification |
| notificationReceivedAt | Datetime | Notification received time |
| encodedOrderNo | String | Encoded order number |
| data | Text | Whole response data |
Custom Cache
The Splitit integration leverages the Custom Cache concept within Salesforce Commerce Cloud to retrieve the configuration data efficiently. The cache id for the custom cache created by the cartridge is called SplititCache.
For merchants who have disabled custom cache within Business Manager, the configuration data would be read directly from the custom object. This will not affect the functionality the performance will be slightly lower compared to using custom cache.
Note: When the customer changes the configuration against the payment methods in BM or updates the custom object directly then, the Splitit custom cache must be cleared. Splitit cache is automatically cleared when merchants use the custom BM module.
Availability
In case of problems with the connection to Splitit Payments, please contact the Splitit Payments support department.
Please supply as much information as possible (Merchant account, time, order number, Splitit installment plan number etc.). Also, please check the log files.
Failover / Recovery Process
In case the Splitit service is unavailable, the user will not be able to checkout using Splitit payment methods and an error message would be displayed on the checkout pages.
The service availability can be tracked in SFCC using the Service Status.
Support
In case of problems with the integration, missing features, etc. please contact the Splitit Payments support department or your Splitit account manager.
Appendix
System extensions
In addition to the changes mentioned above, the below system extensions were done as part of the cartridge.
Order
| ID | Purpose |
|---|---|
| splitit_cancelAPIResponse | Stores the response of cancel API |
| splitit_createAPIResponse | Stores the response of create API |
| splitit_initiateAPIResponse | Stores the response of initiate API |
| splitit_installmentPlanNumber | Stores the installment plan number |
| splitit_publicToken | Stores the public token generated by the Splitit |
| splitit_startInstallmentAPIResponse | Stores the response of start installment API |
| splitit_refundAPIResponse | Stores the response of refund API |
| splitit_verifyPaymentAPIResponse | Stores the response of verify payment API |
Basket
| ID | Purpose |
|---|---|
| splitit_initiateAPIResponse | Stores the response of initiate API |
| splitit_installmentPlanNumber | Stores the installment plan number |
| splitit_publicToken | Stores the public token generated by the Splitit |
Locating code changes
Developers can locate code changes done for the Splitit integration by searching for the following comments pattern.
JS
// Splitit - Begin: <<Text summarizing the changes>>
Splitit code changes
// Splitit - End: <<Text summarizing the changes>>
E.g.:
// Splitit - Begin: if payment method is splitit class added to input fields
if (paymentMethodID === 'Splitit') {
    $('#splititFlexFieldsFormHiddenCheckbox').removeClass('splitit-form-checkbox-display');
    $('.payment-method-expanded').filter('[data-method="Splitit"').removeClass('splitit-d-none');
} else {
    $('#splititFlexFieldsFormHiddenCheckbox').addClass('splitit-form-checkbox-display');
}
// Splitit - End: if payment method is splitit class added to input fields
ISML
E.g.:
<iscomment> Splitit - Begin: Cart Upstream Messaging </iscomment>
<isinclude template="upstreammessaging/cart/splititCartBannerWrapper" />
<iscomment> Splitit - End: Cart Upstream Messaging </iscomment>
Known Issues
None.
Videos
Splitit Metadata
Configuring Business Manager
Configuring Splitit Business Manager Module
Enable Flex Fields Integration Mode
Enable Hosted Integration Mode
Clearing Splitit Custom Cache
Splitit Integration Document
SiteGenesis Integration Guide